In this Raspberry Pi Snowboy project, we will be showing you how you can set up and use Snowboy on your Pi to train and detect custom hotwords.

Please note that as of January 1st, 2021, the Snowboy online service is now unavailable and has been taken offline. While you can still use pre-existing voice models, you are now unable to train your own.
This tutorial will remain as an archive in case this functionality is ever restored. An alternative is Porcupine. However, this service only allows you to train models if you are a paying customer.
Additionally, we will also show you how you can utilize the Snowboy library within your Python scripts to do specific actions.
To set up the Snowboy Hotword detection library, we will be walking you through the process of registering for their API. We will also be showing you how you can record and train your very own hotword detection models utilizing Snowboys training service.
In this tutorial, we will also be exploring how we can use Python to utilize the Snowboy’s detector to use your hotword model and do certain things based on hearing that word.
Best of all you can setup Snowboy as a completely headless solution as it does not require any graphical interface to operate.
If this project takes your fancy then you might also want to take a look at our Raspberry Pi Alexa tutorial and the Google Assistant on the Raspberry Pi tutorial.
You can find the full tutorial on how to set up Snowboy on your Raspberry Pi below.
Equipment List
Below is the full list of equipment that you will need to complete this Raspberry Pi Snowboy tutorial.
Recommended
- Raspberry Pi Amazon
- Micro SD Card Amazon
- Ethernet Cable Amazon or Wi-Fi Amazon
- Power Supply Amazon
- USB Microphone Amazon
- Speakers Amazon
Optional
Preparing your Raspberry Pi’s Audio Config for Snowboy
1. Snowboy is no longer available, so this tutorial is purely available for archive purposes.
Before we get started with setting up the Snowboy Hotword detection on our Raspberry Pi, we must first ensure that we have our audio configured correctly.
We will be achieving this by creating a configuration for the audio driver.
Before we do this, we must retrieve the card and device numbers for both our audio output and our microphone input.
To retrieve the information that we require, follow the following two steps.
1a. Locate your USB microphone by utilizing the following command. Write down both the card number and the device number for it.
arecord -l1b. Firstly, let’s locate the speaker. To do this we will be utilizing the following command. Write down the card number and device number.
Note that the Raspberry Pi’s 3.5mm-jack is typically labeled as Analog or bcm2835 ALSA. The HDMI output is identified as bcm2835 IEC958/HDMI.
aplay -l2. Now all the values that we need to configure our audio driver we can go ahead and create the .asoundrc file.
To begin creating the new .asoundrc file run the following command on your Raspberry Pi.
nano /home/pi/.asoundrc3. In this file, we need to enter the following configuration lines. These will set up our audio driver by telling it the specific devices that it should be utilizing.
Make sure that you replace <card number> and <device number> with their respective values that you retrieved during Step 1.
pcm.!default {
  type asym
  capture.pcm "mic"
  playback.pcm "speaker"
}
pcm.mic {
  type plug
  slave {
    pcm "hw:<card number>,<device number>"
  }
}
pcm.speaker {
  type plug
  slave {
    pcm "hw:<card number>,<device number>"
  }
}
4. With the lines in, and the changes made. Save by pressing CTRL + X then Y and finally ENTER.
Installing Snowboy to the Raspberry Pi
1. Before we begin installing the Snowboy Hotword detection software to our Raspberry Pi let’s first make sure that it is entirely up to date.
To do this, you need to enter the following two commands on the Raspberry Pi.
sudo apt update
sudo apt upgrade
2. Now that our Raspberry Pi is entirely up to date let’s now install all the dependencies that we will be relying on by running that command below.
The bulk of these dependencies are adding the pyaudio package that allows us to interact with the audio from Python.
Please note that while we are downloading these packages for Python 3, you can download them for Python as well by removing the 3 after “python” in the package name.
sudo apt install python3 python3-pyaudio python3-pip libatlas-base-dev portaudio19-dev3. With all our dependencies grabbed from the package manager we now need to install the python bindings for the PortAudio software.
Install the python bindings for PortAudio by running the following command on your Raspberry Pi.
sudo pip3 install pyaudio4. For our final dependency, we will need to install a Python package called requests, run the following command on the Raspberry Pi to install it using pip.
This Python package will allow us to interact with Snowboy’s Restful API from our Raspberry Pi. This Python package will be helpful for sending our hotword samples to their service.
sudo pip3 install requests5. Finally, we can download Snowboy itself to our Raspberry Pi. To do this use the following command on your Raspberry Pi to grab the latest compiled version for the Raspberry Pi.
This version of Snowboy should work on all current versions of the Raspberry Pi.
wget -O snowboy.tar.bz2 [NOLONGERAVAILABLE]6. Now that we have grabbed the latest version of the Snowboy software to our Raspberry Pi we need to extract it by running the following command.
Make sure when you issue the following command that you are located in the Pi users home directory. ( /home/pi or ~)
tar xvjf snowboy.tar.bz27. With the Snowboy software now downloaded to our Raspberry Pi, we need to rename the directory so that it will be easier to deal with later.
Run the following command to rename the folder to snowboy.
mv rpi-arm-raspbian-8.0-1.3.0/ snowboy/Getting your Snowboy API Key
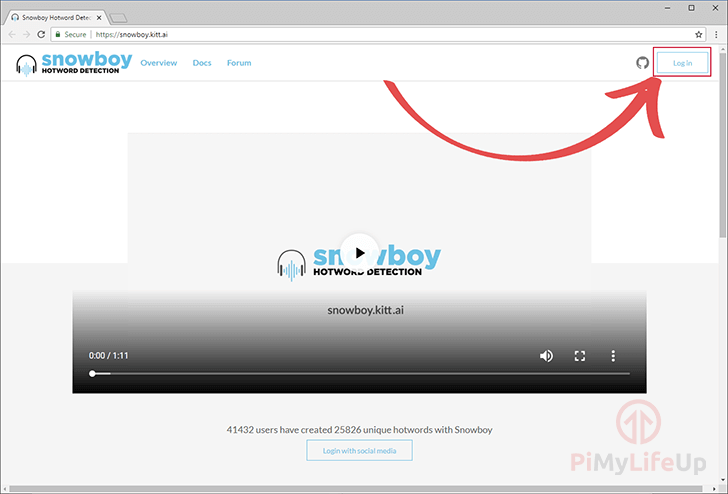
1. For the next section of our tutorial, we will require an API key for Snowboy. Over the following few steps, we will be walking you through the straightforward process of getting one.
Please note that the Snowboy site only supports OAuth for login so you must have either a Github, Facebook or Google account.
Begin by going to the Snowboy website and clicking the “Log in” button that is located in the top right-hand corner of the page as shown below.
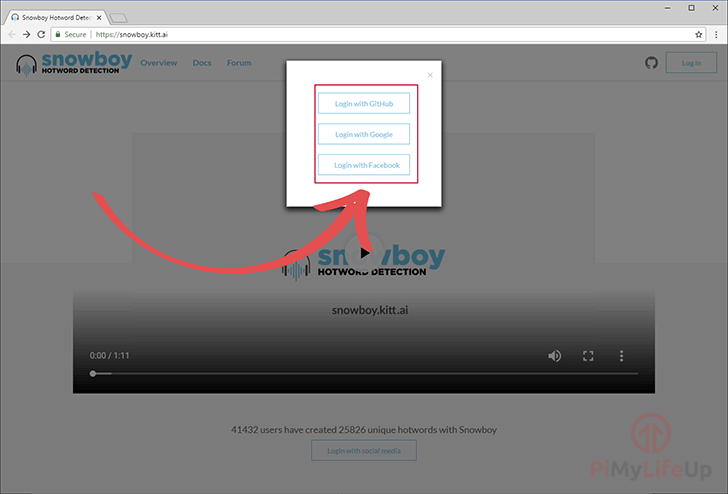
2. You will now be asked to choose from three different options to log in to the Snowboy service, for our run through of the tutorial we just utilized our Github account.
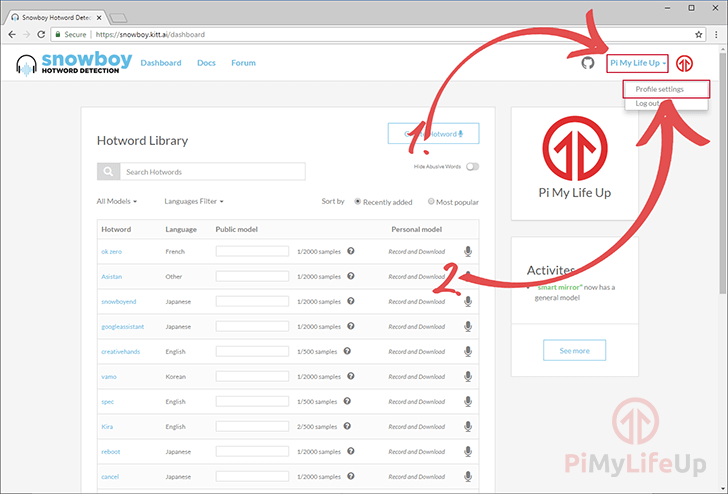
3. Once logged in you will be shown the screen below, this will list all the currently calculating hotwords. However, what we are after is located in the top right-hand corner.
Click your displayed name (1.) then click “Profile Settings” (2.), this will take us to a page where the API key will be displayed.
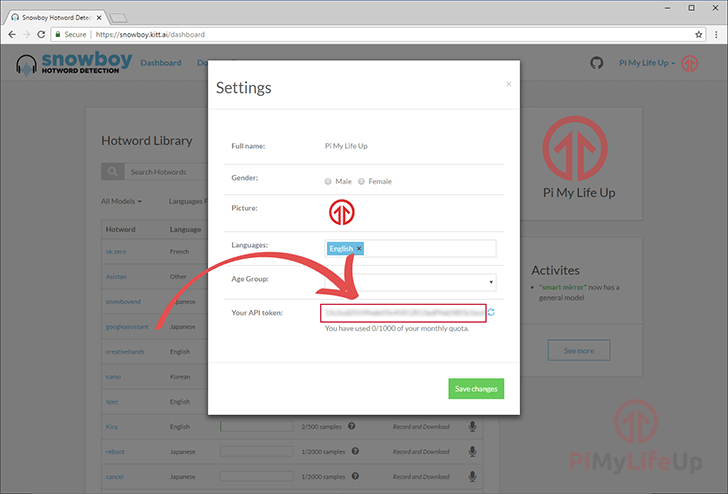
4. Finally, on this screen, you need to copy down the API token as you require this to talk with the Snowboy server later on in this guide.
We have highlighted the area where the token will be displayed in our screenshot below.
Recording your Custom Hotword for Snowboy
1. For this part of the Raspberry Pi Snowboy tutorial, we will need to write a Python script that will send our hotword recordings to the Snowboy service from our Raspberry Pi.
We won’t be delving too much into this script as it is relatively simple and is just a small stepping stone in this tutorial.
Create this script by running the following command on the Raspberry Pi.
nano /home/pi/training_service.py2. Within this file enter the following lines of python code.
Remember to replace ENTER_TOKEN with the API token you retrieved in the previous segment and ENTER_HOTWORD with the hotword that you want to record such as “Pi My Life Up“.
import sys
import base64
import requests

def get_wave(fname):
    with open(fname,'rb') as infile:
        return base64.b64encode(infile.read())

endpoint = "https://snowboy.kitt.ai/api/v1/train/"

token = "ENTER_TOKEN"
hotword_name = "ENTER_HOTWORD"
language = "en"
age_group = "20_29"
gender = "M"
microphone = "usb microphone"

if __name__ == "__main__":
    try:
        [_, wav1, wav2, wav3, out] = sys.argv
    except ValueError:
        print ("Usage: %s wave_file1 wave_file2 wave_file3 out_model_name" % sys.argv[0])
        sys.exit()

    data = {
        "name": hotword_name,
        "language": language,
        "age_group": age_group,
        "gender": gender,
        "microphone": microphone,
        "token": token,
        "voice_samples": [
            {"wave": get_wave(wav1)},
            {"wave": get_wave(wav2)},
            {"wave": get_wave(wav3)}
        ]
    }

    response = requests.post(endpoint, json=data)
    if response.ok:
        with open(out, "wb") as outfile:
            outfile.write(response.content)
        print ("Saved model to '%s'." % out)
    else:
        print ("Request failed.")
        print (response.text)
3. Once you have entered all the lines, save the file by pressing CTRL + X then Y and then ENTER.
4. Now that we have written out the training service Python script we can move onto actually recording our hotword to send with it.
To do this, we will be utilizing the arecord tool as this allows us to specify particular options such as the sample rate, the format and the duration of the recording.
For our recording we will be making a simple 5-second recording. This five seconds should be more than long enough to record our hotword.
Run each of these commands to generate our 3 hotword recordings, making sure that you say your hotword once during the recording.
The Snowboy software will use these three recordings to create a reference file so that it can easily listen for it.
arecord --format=S16_LE --duration=5 --rate=16000 --file-type=wav 1.wav

arecord --format=S16_LE --duration=5 --rate=16000 --file-type=wav 2.wav

arecord --format=S16_LE --duration=5 --rate=16000 --file-type=wav 3.wav
5. With the three samples of our hotword now recorded we can proceed to send these to the Snowboy service.
Here is where the Python script we wrote earlier in the tutorial will come in handy. We need to call the Python file, referencing our three recordings and our desired output name for the processed sample.
Our python script will process the files generating a base64 encoded version of the file, bundle this along with some other information and send it off to Snowboy and await their response.
Run the following command to send off your three samples to the training service.
python3 training_service.py 1.wav 2.wav 3.wav saved_model.pmdl6. Before we utilize our new model we should copy it into our Snowboy folder, this will make it easier to use in our Python scripts later on in this guide.
To copy the file, we can run the following two commands.
The first command will copy the model file the second one will move us into the snowboy directory.
cp saved_model.pmdl ./snowboy/saved_model.pmdl
cd snowboy
7. To test out our new model, we will utilize the demo.py script that came with snowboy. This script allows us to specify the model that we want to use.
Just run the following command from your current directory to start up the script.
Make sure you do not run this script as sudo as it will cause issues with reading from the microphone since we set up our .asoundrc configuration file for the pi user.
python demo.py saved_model.pmdl8. When loading up the demo Python script you may run into various error messages. Most of these are safe to ignore, and you can proceed with utilizing the demo without any issues.
If you see the error message “IOError: [Errno -9997] Invalid sample rate” appear in the command line make sure that you have correctly setup your .asoundrc file as specified earlier in the tutorial and that you are using a microphone that can record at 16,000 HZ. Most USB microphones should be fine with this.
If everything is working as intended, you should see the following message appear in the command line, and you will be able to speak your hotword to it.
Listening... Press Ctrl+C to exit9. Upon hearing your hotword, you should see the following message appear in the command line and hear a beep through the audio.
This message indicates that snowboy successfully identified what you said and fired off to its callback function.
INFO:snowboy:Keyword 1 detected at time: 2018-09-26 04:38:4110. In the next section, we will explore how you can implement Snowboy in a simple Python script to give you an idea of how you could utilize this in your projects.
Using Snowboy in a Python Script
1. For this section of the Snowboy tutorial, we will be writing a straightforward Python script that uses the Snowboy decoder library to load in our model and then listen for it.
To begin writing our script just run the following command within the terminal on the Raspberry Pi. For our purposes, we will be calling this python script “snowboy_sample.py“.
We create this file within the snowboy folder otherwise we will not be able to access the snowboydecoder class. The reason for this is that Pythons import functionality only searches the python path and the local directory.
nano /home/pi/snowboy/snowboy_sample.py 2. Within this file enter the following lines of code.
We will explain what each line of code does as we go along. If you would prefer to skip the explanation, you can move onto the next step to copy the code as one block.
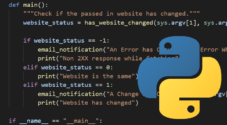
import snowboydecoderThis first line of code imports the snowboydecoder so we can access its functionality. This class will handle processing our voice model and listening for it.
def detected_callback():
    print ("Hotword Detected")
These two lines define our callback function. This function is simple in that it that will just print the text “Hotword Detected” to the command line whenever it is called.
detector = snowboydecoder.HotwordDetector("saved_model.pmdl", sensitivity=0.5, audio_gain=1)This line is one our most important as it instantiates our hotword detector. To this function, we need to pass in a few things.
The first is the location of our voice model. In our case, this is in the same directory so we can pass in the filename.
The next argument is the sensitivity. This argument defines how easy it is for your hotword to be triggered.
The closer this value is to 1 the less accurate the keyword needs to be.
The closer to 0 the value is, the more precise you have to be to your original recording.
Increase or decrease the sensitivity value if you have too many false positives or that you it is difficult to trigger your hotword.
The final argument that we define is audio_gain. This argument determines how much gain should be applied to the input volume, values greater than 1 increase the gain, values lower than 1 decreases the gain.
Fiddle with this value if you are struggling to be heard by your microphone.
detector.start(detected_callback)Our final line utilizes the detector that we instantiated on the previous line and tells it to start listening.
We pass in the name of the function we wrote as the detector will automatically call this every time it hears your hotword. This function will continually run until terminated.
3. With all those lines entered into the Python script you can compare it to what we have below to ensure you have entered everything correctly.
import snowboydecoder

def detected_callback():
    print ("Hotword Detected")

detector = snowboydecoder.HotwordDetector("saved_model.pmdl", sensitivity=0.5, audio_gain=1)

detector.start(detected_callback)
4. Once done, save the file by pressing the following keys, CTRL + X, then Y and finally ENTER.
5. With our script now written we can test to see if it is working correctly.
To run the script, all you need to do is enter the following line into the command line.
python snowboy_sample.py6. Now everytime you say your hotword the text “Hotword Detected” should appear in the command line as it will automatically call the “detected_callback():” function that we wrote.
You can quit out of this script by pressing CTRL + C.
As you can imagine this can be a powerful tool in any future projects that you might do. You can have Python trigger a task whenever a certain keyword is heard.
I hope by the end of this tutorial you will have been able to record your own custom hotword using the Snowboy service. I also hope that you have learned how you can implement Snowboy into your own Pi projects to use your own custom hotword.
If you have any feedback on this Raspberry Pi Snowboy hotword detection tutorial, then please feel free to leave us a comment below.


I could not download the Snowboy on my Pi. When trying
wget -O snowboy.tar.bz2 SNIPPED, this it came up:IT looks that the link is not working. Can you please me?
Hi George,
It looks like the Snowboy team have taken their CDN offline as part of their shutdown of the project.
I’ll try and see if I can source the builds elsewhere but may not have a huge amount of luck with that.
Cheers,
Emmet
Getting this stream of errors. The pi isn’t picking up my hotword 🙁
[[ ALSA ERROR LOG SNIPPED ]]
any help would be massively appreciated
Hi Sam,
The most common issue with your Raspberry Pi failing to pick up the hotwowrd is due to misconfiguration of the
.asoundrcfile.Please try following the
Preparing your Raspberry Pi’s Audio Config for Snowboysection again and seeing if that solves your issues.Cheers,
Emmet
Hi Emmet,
I’ve gone through the steps again and still no luck.
I’m using the 4mic array from Seeed, so this isn’t a USB mic, could that be a factor?
I also had some issues creating the .wav files, when I used the snippet you provided, nothing was being recorded, but if I used audacity, then it worked a dream.
Cheers,
Sam
Hi Sam,
I’ve only ever tried this with a USB mic so I won’t be able to help much with getting the 4 mic array working.
There is a chance that some modifications need to be made to Snowboy’s scripts to make it work properly the device but in theory it should just work.
I will see if I can find any mention of any workarounds needed, in the mean time hopefully another user might have a solution..
I should note that Snowboy is being archived / shut down by the dev team at the end of this year, so at the very least make sure you have any models you want trained before the 31st.
The voice engine should still work, you just wont be able to train any new voice activation models.
Cheers,
Emmet
(On a Pi4, 5.4.51 w/ Python 3.7)
The training_service.py program kept giving me
“UnicodeDecodeError: ‘utf-8′ codec can’t decode byte 0x80 in position 24: invalid start byte”
I looked around on the internet and found that replacing
open(fname) with open(fname,’rb’)
and
open(out,”w”) with open(out,”wb”)
solved my problem.
Hi Sixun8,
Thank you for posting your fix, I have updated our code to make use of this as well.
Cheers,
Emmet
I have an error.
File "snowboy_sample.py", line 7print "Hotword Detected"
^
IndentationError: expected an indented block
how to fix that?
Your code isn’t indented correctly. Double check the indentation on line 7. Python is white-space sensitive (4 spaces = one indentation level)
Does it require an Internet connection?
From the docs it doesn’t require a Internet connection. Now to investigate if it only does hot words or can do small phrases.
Looks like it can do very small phrases. 🙂
The command at 6, to extract snowboy, is the same as the one to get it downloaded. I think this is wrong.
Thank you for noticing this, we have updated the tutorial with the correct command.