In this tutorial, you will learn how to install the Proxmox Virtual Environment on the Raspberry Pi.
Proxmox Virtual Environment is an open-source virtualization platform that has an incredibly powerful and useful web interface.
You can easily manage virtual machines and containers on your Raspberry Pi using the built-in web interface.
This web interface even allows you to set up software-defined storage, network, and more. If you want to run VMs on your Raspberry Pi, Proxmox is one of the go-to solutions.
Thanks to recent advancements in Proxmox VE, it now supports ARM systems. The downside is that the team does not provide any builds for ARM64. Luckily, we can use a third-party fork of Proxmox that adds support for ARM systems like our Pi.
The fork that we are relying on is called Pxvirt. This fork maintains feature parity with Proxmox VE but features many additional optimizations that help Proxmox run even better on ARM.
The version of the Promox Virtual Environment that you will be installing in this guide depends on the version of Raspberry Pi OS you are running. If you are running Bookworm, then you will get Proxmox 8. If you are running Raspberry Pi OS Trixie, you will be running Proxmox 9.
Remember that while running virtual machines on your Raspberry Pi, avoid using anything too heavy. The Raspberry Pis aren’t the strongest machines, but they should be able to handle a few little VMs. You will have a better experience using the newer Pis with Proxmox, such as the Raspberry Pi 5.
Please note that for this tutorial to work, you must be running the 64-bit version of Raspberry Pi OS Lite Bookworm or Trixie. Using other operating systems is not guaranteed to work and is likely to cause issues.


Equipment
Below is a list of the equipment we used when setting up the Proxmox Virtual Environment on our Raspberry Pi.
Recommended
Optional
This tutorial was last tested on a Raspberry Pi 5 running the latest version of Raspberry Pi OS Lite Trixie 64-bit.
Installing Proxmox on the Raspberry Pi
Over the following sections, we will walk you through installing the Promox virtual environment on your Raspberry Pi.
We highly recommend that you follow these steps using a clean installation of Raspberry Pi OS Lite. In particular, you should be using the 64-bit version.
A non-clean version of the operating system may cause the Proxmox installation process to break.
If you prefer video, you can follow our video guide embedded below. Otherwise, continue to see our full written guide on installing Proxmox to the Raspberry Pi.
Preparing your Raspberry Pi for Proxmox
1. Our first task before installing Proxmox onto the Raspberry Pi is to update the package list cache and upgrade any out-of-date packages.
You can perform both tasks by using the following two commands within the terminal.
sudo apt update
sudo apt upgradeCopy
2. Your next step is to ensure that curl is installed on your Pi. We will be using curl to grab the GPG key for the PXVirt repository that we will be relying on to install Proxmox.
You can install this package by using the following command within the terminal.
sudo apt install curlCopy3. Before proceeding with this tutorial, you must set up your Raspberry Pi to use a static IP address.
The best way to do this is using DHCP reservation in your router. However, we have a guide that shows you how to do this through your Raspberry Pi if you don’t have access to your router.
Modifying your Hosts File for Proxmox
4. After setting up a static IP address, we must now edit the hosts file. Proxmox expects your hostname to point to the IP address of your Raspberry Pi.
You can begin editing the hosts file on the Raspberry Pi using the nano text editor by running the following command.
sudo nano /etc/hostsCopy5. With the hosts file open, you should see a line similar to the one below. Our hostname is set to the default “raspberrypi“, but yours might differ.
127.0.0.1 raspberrypiAfter finding this line, you will want to replace “127.0.0.1” with the local IP address of your Raspberry Pi.
In our case, our Pi’s IP is “192.168.0.32” so we changed the line to look like the following.
192.168.0.32 raspberrypi6. After making these changes, save and quit by pressing CTRL + X, Y, and then the ENTER key.
7. To verify that our changes are working, we can use the hostname command to output the IP address of our Raspberry Pi.
hostname --ip-addressCopyIf you have configured everything properly, the static IP of your Pi should be returned.
192.168.0.32Stopping Cloud Init From Managing the Hosts File
8. Recent versions of Raspberry Pi OS now have Cloud-init set up. As part of that setup, it will now automatically update the hosts file and remove our changes.
Luckily, we can switch off this functionality by modifying the “cloud.cfg” file and disabling a particular option.
sudo nano /etc/cloud/cloud.cfgCopy9. Within this file, you will want to find the following line. This will be under the “cloud_init_modules” header.
- update_etc_hostsOnce you have found this line, all you need to do is add a hashtag (#) to the front of it. This comments out that line and will mean Cloud-Init will not override our changes when you restart.
# - update_etc_hosts10. After making this change, you will want to save and quit by pressing CTRL + X, Y, and then ENTER.
Set a Password for the root User
11. The next thing we must do to use Proxmox on our Raspberry Pi is set a password for the “root” user. If we don’t set a password for this user we will be unable to login through the Proxmox web interface.
You can set a password for the root user using the command below within the terminal.
sudo passwd rootCopy12. To set a password, you must enter it twice, as shown below. We recommend that you set a strong password for this.
A password manager such as NordPass (Affiliate Link) makes generating and storing strong passwords significantly easier.
New password:
Retype new password:
Adding the Proxmox Port Repository to your Raspberry Pi
13. We are finally at the stage where we can begin adding the PXVirt repository to our Raspberry Pi. This repository is managed by a third party but allows us to install versions of Proxmox that can run on the Raspberry Pi’s hardware.
Our first step in this process is to add the GPG key for the repository. This key helps verify that the packages legitimately come from the PXVirt repository.
curl -L https://mirrors.lierfang.com/pxcloud/lierfang.gpg | sudo tee /usr/share/keyrings/lierfang.gpg >/dev/nullCopy14. Before we add the repository itself that enables us to install and run Proxmox, we should use the “source” command to read in the “/etc/os-release” file. This will enable us to easily get and print the current OS codename.
You can read in this file by running the command below.
source /etc/os-releaseCopy15. With the GPG key added, we can now add the repository itself to our sources list.
Use the command below to save the repository link into a file called “pveport.list“.
echo "deb [arch=arm64 signed-by=/usr/share/keyrings/lierfang.gpg] https://mirrors.lierfang.com/pxcloud/pxvirt $VERSION_CODENAME main" | sudo tee /etc/apt/sources.list.d/pveport.listCopy16. Since we made changes to the sources list, we must update the package list cache again by running the following command.
If we don’t do this, the package manager will be unaware of the repository we just added.
sudo apt updateCopyPreparing your Pi’s Network for Proxmox
The next couple of sections will ensure that your network will continue to function once Proxmox has been installed. Without these steps, you will lose network connection later.
Preventing Network Manager from Managing your Network
17. By default, Raspberry Pi OS comes with Network Manager installed and set up to start at boot. We must disable this service to prevent it from automatically managing and breaking Proxmox’s own networking.
The first step in this process is to disable the “networkmanager” service so it will not automatically start when your Raspberry Pi boots.
sudo systemctl disable NetworkManagerCopy18. Next, we can stop NetworkManager from running by using the command below in the terminal.
This will stop the service immediately, saving you from having to restart your Raspberry Pi.
sudo systemctl stop NetworkManagerCopy19. Finally, for good measure, we will also apply a mask to the NetworkManager service. Applying a mask prevents this service from being re-enabled without the mask first being removed.
sudo systemctl mask NetworkManagerCopyInstalling ifupdown2 and Resolvconf
20. With everything in place, we can finally begin installing Proxmox on the Raspberry Pi.
The first two packages that must be installed on our system is “ifupdown2“. Proxmox uses the “ifupdown2” package to handle the network.
sudo apt install ifupdown2CopyPlease note, if you run into an error that says the following, there are a couple of extra
If you see the following error message when installing “ifupdown2” then you will need to follow steps “a” and “b” below. Otherwise, skip straight to step 21.
error: Another instance of this program is already running.a. To work around the “already running” error, we will need to do some workaround steps to get ifupdown2 running.
This step involves deleting a temporary file that the ifupdown2 package is searching for during installation
sudo rm /tmp/.ifupdown2-first-installCopyb. With the temporary file removed, we need to re-run the install process for ifupdown2 again by using the following command.
This will ensure that the final setup steps are properly executed.
sudo apt install ifupdown2CopyModifying Your Network Interfaces
21. Our next step is to make some adjustments to the interfaces file. If we don’t make these changes, Proxmox will break when your Raspberry Pi restarts.
With these changes we will be setting our “eth0” interface to manual and create a new network interface that will bridge your connections and be used by your virtual machines.
You can begin to write this file by using the following command.
sudo nano /etc/network/interfacesCopy22. Within this file, you will want to add the following lines to the bottom of the file. There is a chance some of these interfaces are automatically specified, delete them and replace them with the values we have specified here
While filling out this file you must replace two values.
<IPADDRESS>: Change this placeholder with the IP address of your Raspberry Pi. This must be the local IP that it is accessible on.<GATEWAY>: Replace this placeholder with the IP address of your gateway. Typically this will be the IP of your router.
In a lot of cases this will actually be “192.168.0.1“.<DNSSERVER>: Swap this placeholder with the IP address of a DNS resolver of your choice. For example, if you wanted to use Cloudflare’s DNS service, you would replace this placeholder with “1.1.1.1 1.0.0.1“.
Another popular choice is Google’s, which in that case you would use “8.8.8.8 8.8.4.4“.
auto lo
  iface lo inet loopback

auto eth0
  iface eth0 inet manual

auto vmbr0
iface vmbr0 inet manual
        address <IPADDRESS>
        gateway <GATEWAY>
        dns-nameservers <DNS>
        netmask 255.255.255.0
        bridge-ports eth0
        bridge-stp off
        bridge-fd 0
Below is an example of what this file might look like after you have finished filling it out
auto lo
  iface lo inet loopback

auto eth0
  iface eth0 inet manual

auto vmbr0
iface vmbr0 inet manual
        address 192.168.0.200
        gateway 192.168.0.1
        dns-nameservers 1.1.1.1 1.0.0.1
        netmask 255.255.255.0
        bridge-ports eth0
        bridge-stp off
        bridge-fd 0
23. Once you have filled out this file, save and quit by pressing CTRL + X, Y, and then ENTER.
24. To ensure these network changes are working, restart your Raspberry Pi by running the following command in the terminal.
sudo rebootCopyInstalling Proxmox on the Raspberry Pi from the Repository
25. Finally, you can install Proxmox VE and a few required packages by typing the following command in the terminal.
This installation process can take a few minutes, so be prepared to wait a few minutes. Additionally, there are a few prompts you will have to go through during installation.
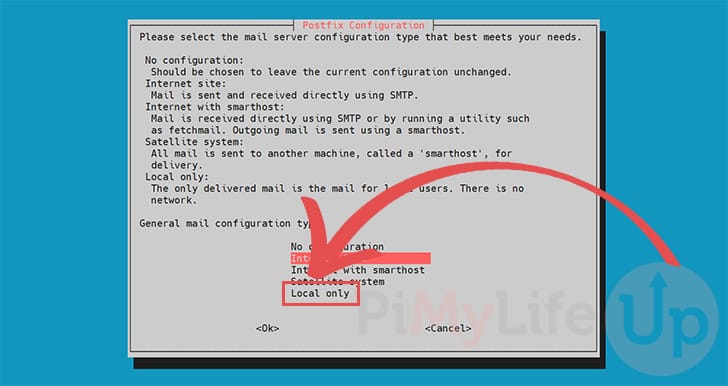
sudo apt install proxmox-ve postfix open-iscsi pve-edk2-firmware-aarch64Copy26. During installation, you will be asked to configure Postfix. You can navigate this menu using the ARROW keys to move and ENTER to select.
If you are unsure what you are doing here, select the “Local only” option.
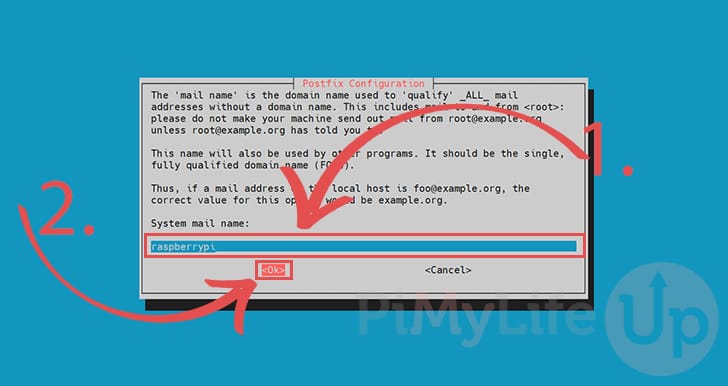
27. Next, you will be asked to set the mail name for Postfix to utilize (1.).
Again, if you don’t know what you are doing here, leave the default name and press ENTER to continue (2.).
28. Please note that if you run into an error message after installing with a message like the following, just try re-running the install command again.
Errors were encountered while processing:
 pxvirt-spdk
Accessing the Proxmox Web Interface
29. Once Proxmox finishes installing on your Raspberry Pi, it should be safe to access its web interface.
All you need to access the web interface is the IP address of your Raspberry Pi.
hostname -ICopy30. With your IP address in hand, you will want to go to the following address in your favorite web browser. Please note if you can’t connect, try restarting your Raspberry Pi and waiting a few minutes.
Ensure that you replace “<IPADDRESS>” with the IP of your Raspberry Pi.
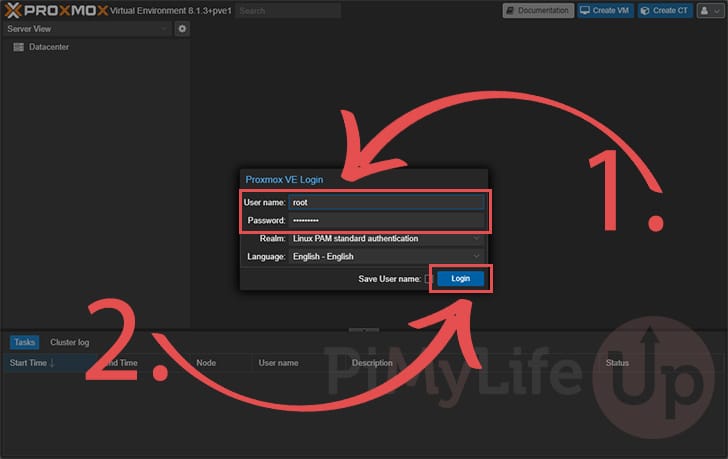
https://<IPADDRESS>:800631. With the Proxmox web interface now open in your web browser, you must log in to your account.
Start by typing in the username as “root” and then use the password you set earlier for this user (1.).
Once you have filled in your information, click the “Login” button (2.).
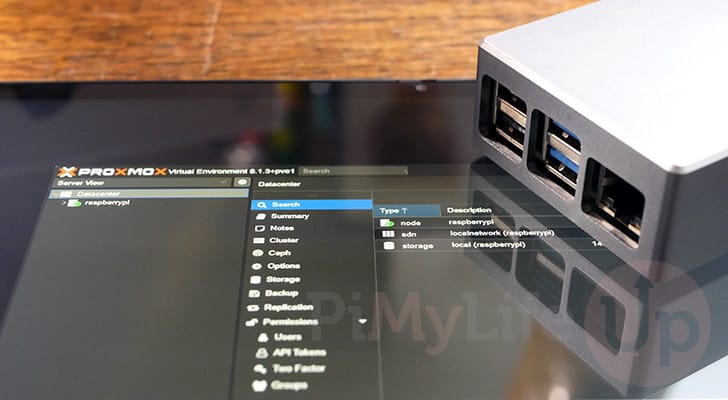
32. You should now have access to the Proxmox web interface.
You can begin to set up new VMs through this interface as well as configure Proxmox VE itself.

Conclusion
Hopefully, at this stage in the tutorial, you will now have Proxmox VE installed on your Raspberry Pi.
You can utilize this tool to set up and manage virtual machines on your Pi. It is a powerful hypervisor, especially for those dealing with multiple virtual machines.
Please feel free to leave a comment below if you have run into any issues with getting this software to work on your device.
If you found this tutorial to be helpful, we highly recommend checking out our many other Raspberry Pi projects.


Huge thanks for this tutorial!
To anyone else having this issue, noticed the very last prompt is no longer present during setup causing the host IP to revert back after boot.
You must edit: /etc/cloud/cloud.cfg
Comment out the following line:- update_etc_hosts
Save, exit, update host IP again if not already and all is well.
Thanks again!
Hi Vik,
Thank you for letting us know about this issue. I have updated our steps to now ensure that change is made.
Kind regards,
Emmet
The installation went great without any issues reported.
However, when I go to the login page
http://IP:8006it never finishes loading. Any ideas what to look for?Hi Brian,
The typical cause for this is a misconfiguration within the “/etc/network/interfaces” file. Can you ensure that your Raspberry Pi is actually being handed an IP address using the “hostname -I” command.
Kind regards,
Emmet
Hej Emmet
Thanks. I found the reason for the issue. It was my hosts file that got reverted back after at reboot.
I seams to be some new (at least for me) thing, that it is handled by some Cloud init process: https://cloudinit.readthedocs.io/en/latest/
After completing the steps, I get LIERFANG pxvirt instead of proxmox. Any suggestions to fix this?
Hi Barb,
As mentioned at the start of this tutorial, we rely on Pxvirt by Leirfang to run Proxmox on the Raspberry Pi.
Pxvirt is still essentially Proxmox, just a different name slapped on it and modifications made to make it run on ARM devices like the Pi. If you want normal Proxmox we are currently out of luck.
Kind regards,
Emmet
Hi Emmet,
thanks for the tutorial. Everything worked so far.
But how do i install Home Assistant?
Do you have any other guides for this?
Hey Kaylong,
Glad that everything is working well for you so far. I have a guide that actually covers installing Home Assistant using its virtual image. Hopefully that helps you out.
Kind regards,
Emmet
Great guide. My only issue is that zfs absoultely refuses to work. I reformatted the sd card and started with a fresh install of Pi OS and the issue persisted before following this guide, so I’m 99% sure that’s just a problem with Pi OS.
Excepting that, everything works flawlessly as written on a Pi 4b rev 2 4gb. I was able to join it to my existing proxmox cluster to act as a quorum node. Working on getting it to actually run services shortly
After point 13 i get this warnings and notices. shoes I be aware of?
Hi Chico,
Having a quick look, it shouldn’t be something you need to worry about at all.
Kind regards,
Emmet
Thank you for ypour quick answer. But just out of interest. Why does the error occur?
Hi Chico,
It is basically a warning that it can’t find packages for a certain architecture. In the example of Raspberry Pi OS, it will search for both arm64 (64-bit) and armhf (32-bit) packages. Since PXVirt (Proxmox) is 64-bit only, you will always see a warning that it can’t find armhf packages.
We do specify that it should only read ARM64 packages from the Pxvirt repository but that seems to be getting overwritten. It’s not a big deal just means you will see those warnings everytime.
Kind regards,
Emmet
Works wonderfully with Rpi5 and Trixie. Many thanks for the instructions!
Hi!
Would love to try this, but I’m getting this error:
Any idea what could be the solution?
Hi Andrew,
What version of Raspberry Pi OS Lite were you attempting to use?
If it was Trixie then you will need to re-run the tutorial (Specifically the part that adds the Proxmox repositories). We have had to make some adjustments to support that new version.
Kind regards,
Emmet
Fantastic tutorial. I’ve been slowly building up a RP5 cluster as money permits. I’ve got three nodes now. Each with an 8GB RP5, PoE hat, and 520Gb SSD via USB. Following this was so incredibly easy. Proxmox is a great homebrew hypervisor, and I’m running about 10 linux VMs across it now with Docker, Kubernetes, and load balancers, MySQL servers, and a shared NFS server. All in little box a little bit bigger than the palm of my hand.
The only thing I found missing is somewhere around step 20 it also asks if you want to use a different boot loader. I’ve always chosen NO, and everything appears to be working just fine.
I don’t know if downloading proxmox like this is still possible because when i get to step 12 and update the pi it says that there is no public key available and i get an error.
Could someone please help me solve this issue, if it is even possible!
Thank you before hand 😊
Hi Edwin,
That error would indicate that you haven’t downloaded the key from step 10. Please try re-running that step and look for any errors that might have occurred.
Kind regards,
Emmet
Hm, my comment seems not to be stored, so again:
Thank you very much for that guide. Worked fine, installed Proxmox on my Pi 5 & can access it via web.
Problem is: no SCSI is working, not for configured hard disk whether for the selected image. After boot I got an bdsdxe error for both devices.
I also deactivated secure booting in the bios of the VM but didn’t help.
Any hints or tips?
An EFI image is configured (if not I cannot use the console, not display set).
Thank you on advance!
Hi Patrik,
I didn’t run into any issues like that last time I was trying out Proxmox on my Raspberry Pi. I see you have posted an issue on the ports GitHub already.
Have you tried following through our Home Assistant Proxmox steps?
Kind regards,
Emmet
Is there any way to install proxmox 9 on the pi yet?
Hi Johnathon,
Considering Proxmox 9 is somewhat recent it will probably be a little bit before we see a port that will function on the Pi.
Kind regards,
Emmet
Hi, is there any update on how to install proxmox 9 in trixie?
Hi Jose,
I have quickly ran through and updated the tutorial so that it will now install Proxmox on to Raspberry Pi OS Trixie, which means you will also get Proxmox 9 during this process.
The steps have had a slight re-adjustment so they should still also work fine for those who are choosing to run Bookworm still.
I haven’t had a chance to fully test Proxmox 9 on the Pi, but installation wise everything should work without issue on a clean copy of Raspberry Pi OS Trixie Lite (64-bit edition).
Kind regards,
Emmet
Hi Emmet,
Thank you for all the effort you put into the development and the tutorials — they’re perfect.
I successfully installed Proxmox 9 in a fresh trixie rpi5, but I’m getting a “Timeout error.”
Could you please help me with this?
Thank you so much!
Hi Emmet, I get the error when I try to create a VM.
Thanks.
SOLVED!
I’ve just changed the browser from Safari to Firefox 🙂
Thanks!
Perfect guide, I only have one question: Is it safe to install on SD card? I suppose proxmox has lot of read/writes, so I fear a dead of the SD card. Any experience?
Regards
Patrick
Hi Patrick,
While most of my testing is done on an SD Card since its just so easy to reformat and quickly test things, I would definitely recommend someone to use either a USB drive or NVME drive for actual everyday use. Losing everything because the SD card randomly died would be super frustrating.
Kind regards,
Emmet
Very well documenteVery well documented! Thank you all for the article!d! Thank you all for the article!
Sehr gute Dokumentation! Danke euch für den Artikel!
Also the br_netfilter module needs to be added for the firewall. Add it to the /etc/modules file or create a new file in the /etc/modules-load directory and reboot.
Needed to install resolvconf as well (apt install resolvconf) as DNS was not working so couldn’t install Proxmox after the editing the /etc/network/interfaces file. After that added an extra entry to the “iface vmbr0” section in the /etc/network/interfaces file:
dns-nameservers 1.1.1.1
This solved it and it’s now running correctly.
Thanks! this solved it for me too. It should be part of the tutorial steps
Hi Techro,
Thanks for the heads up that you also ran into the same issue, I have never ran into the same issues the numerous times I’ve re-ran through the guide but it’s obviously a problem that can occur.
I have added an additional step for setting the “dns-nameservers” within the network interfaces file. However, can you confirm whether you needed to install the resolvconf package or not? My understanding is that this shouldn’t be required.
Kind regards,
Emmet
Normally i don’t comment.
But this guide is excellent so i have to.
Your guide worked for me like a charm.
Not even one error or problem as far as i can see right now.
May i buy you a coffee?
Paypal?
Very thankful regards,
C.K.
Hi C.k,
Really glad to hear that the tutorial worked well for you!
If you ever feel like supporting us we do have our Premium offering that gives you ad free a bunch of other benefits. But we do also have a smaller donation button at the bottom of that page. You don’t get the adfree etc but enables people to give a little bit to support us if they would like to.
Kind regards,
Emmet
Excellent guide, thanks. I noticed there haven´t been updates lately. This made me think: how do we know the source is reliable and, more important, legit?
Hi Arnout,
I can’t really speak for the neceserally reliableness of the source, as with any projects there is a chance the repo just randomly stops being made available. However, it has, so far, seemed to be the most actively worked on and one of the only ways of getting Promox to run nicely on the Raspberry Pi.
The person behind it does however provide their build scripts and appears to be actively working on it. You can look at this on their GitHub at https://github.com/jiangcuo/Proxmox-Port.
Kind regards,
Emmet
Emmet, kindly note: “The original Proxmox-Port repository will be cancelled. If you want to get updates, please visit docs.pxvirt.lierfang.com to get the latest documentation information!” from https://github.com/jiangcuo/pxvirt
Maybe the reason for…
Hi Mike,
Thank you for the heads up about this issue. It looks like the team behind the ports had to rebrand their fork of Proxmox and at the same time dumped all their older repositories.
I have updated the tutorial to now use there newest repositories. Some of the screenshots are now a little out-of-date as it now uses the PXVirt branding from the fork rather than Proxmox. However, everything should continue to function properly.
Kind regards,
Emmet
His repo is currently down. Trying for the last week.
E: The repository ‘https://mirrors.apqa.cn/proxmox/debian/pve bookworm Release’ does not have a Release file. Looking at his github it’s not the first time so I don’t know how much he keeps up with it. 🙁
Hi Tis,
I have updated the tutorial to now use the repository that the team are offering their fork of Proxmox through. This also means that it will now install as “PXVirt” on your Raspberry Pi rather than Proxmox as that is what their fork is called.
Functionality wise everything should continue to work fine.
Please let me know if there are any major issues that come from this change. I’ve only really had the time to quickly verify that it installs properly and works.
Kind regards,
Emmet
Thank you, this is the best and easiest way that I have found to install this. The only thing different I did was change the Https to Http when importing Proxmox Ports Respository’s, every time I do it and its Https, it neve goes as planned. Thanks again.
Figured it out.
Had to delete the interfaces directory and then the install went fine.