If you have ever tried to utilize a PlayStation controller with the Raspberry Pi, you may have found it’s not very simple to do. Hopefully, this tutorial will help simplify the process.
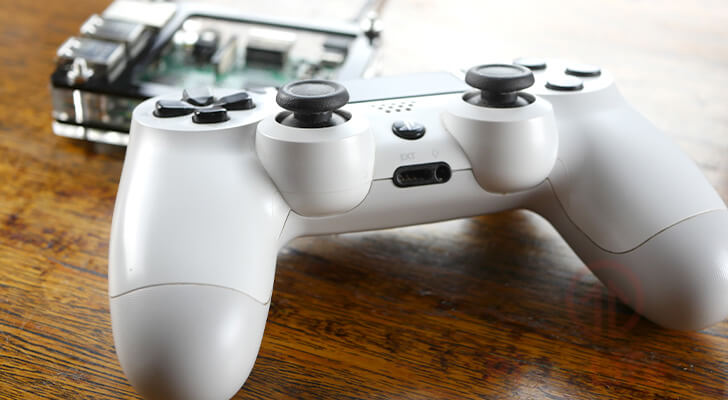
Our Raspberry Pi PlayStation controller guide will walk you through the process of setting up and connecting both PlayStation 3 controllers and PlayStation 4 controllers.
For PS3 controllers, we show you how to install the six-pair software and utilize it to set up your PS3 controller so it can connect to whatever Bluetooth device you are using on your Raspberry Pi.
In this PS4 controller tutorial, we walk you through the process of pairing it with the Raspberry Pi’s Bluetooth and also offer alternative solutions if your controller doesn’t work with the standard Bluetooth stack.
You can also set up Xbox controllers on the Raspberry Pi, as well as several other types of game controllers.
Setting up controllers is the perfect way to have your Pi ready to play some games. You might also be interested in using the controllers in other Raspberry Pi projects that make use of a gamepad.
Equipment List
Below are all the pieces of equipment that I made use of for this setting up PlayStation controllers on the Pi tutorial.
Recommended
- Raspberry Pi Amazon 2 or newer
- Micro SD Card Amazon
- Power Supply Amazon
- PlayStation Controller Amazon (PS3 Controller or PS4 Controller)
- Bluetooth Adapter Amazon (Only if not using a Pi 3 or Zero W)
Optional
- Raspberry Pi Case Amazon
Setting up a PS3 Controller on the Raspberry Pi
Setting up a PlayStation 3 controller on the Raspberry Pi isn’t an entirely straightforward process. Especially if you intend on using it wirelessly, we will walk you through all the steps to get it up and running in no time.
If you want to use your PS3 Controller wired, you should be able to use it just as a plug and play device.
However, we recommend you go to our section on compiling and installing sixad. Sixad is a piece of software that ensures that all of the PS3 Controllers features are supported.
Before you begin this section of the Raspberry Pi PlayStation tutorial make sure that you have a USB mini cable handy as you will require this to pair the controller with the Raspberry Pi. The reason for this is due to the way the PS3 Controller is set up to talk with Bluetooth controllers.
Preparing your PS3 Controller to Connect to the Raspberry Pi
1. Before we get started with installing anything on our Raspberry Pi, we must first run the following two commands.
These commands will ensure that your Raspberry Pi is up to date.
sudo apt update
sudo apt upgradeCopy
2. To begin we first need to install a package, this is so we can compile the sixpair software. This package being the libusb-dev, this is for programs to interact with USB devices.
sudo apt install libusb-devCopy3. With our required package now installed we can go ahead and download the sixpair code and make a folder for it.
mkdir ~/sixpair
cd ~/sixpair
wget http://www.pabr.org/sixlinux/sixpair.cCopy
4. Now with the sixpair code downloaded to our Raspberry Pi, we need to compile it, to do this we can just run the following command.
This command will tell the GCC compiler to compile the code.
gcc -o sixpair sixpair.c -lusbCopy5. With Sixpair now compiled on our Raspberry Pi, we need to plug our PS3 Controller into the Raspberry Pi using the USB mini cable.
6. Once the controller has been plugged in, we can run sixpair by running the command below.
Sixpair will re-configure the controller so that it will talk with our Bluetooth device.
sudo ~/sixpair/sixpairCopy7. If the sixpair software has successfully reconfigured the PS3 Controller to talk with your Raspberry Pi’s Bluetooth dongle, then you should see something like below appear on your command line.
Current Bluetooth master: b8:27:eb:a4:59:08
Setting master bd_addr to b8:27:eb:a4:59:08Copy
8. Now at this point, you are required to unplug the PS3 controller from the Raspberry Pi, now the changes have been made we should no longer need to plug your controller in by USB unless your Bluetooth adapter changes.
You now have two options, these being compiling and installing sixad to handle the connection between the PS3 controller or just using the bluetoothctl tool to make a connection to the PS3 Controller.
Personally, we recommend you try using Bluetooth as it is the most compatible with other Bluetooth devices.
Continue to the next section for how to pair your PS3 controller by using Bluetooth. Otherwise, skip to the section after for how to use SIXAD to pair the controller.
Using bluetoothctl to connect your PS3 Controller
1. With the PS3 Controller now ready to be connected with our Raspberry Pi we can move onto actually pairing it with the Raspberry Pi.
To do this, we need to first start up the Bluetooth configuration tool by running the following command on the Raspberry Pi.
sudo bluetoothctlCopy2. Now that we have launched up the Bluetooth configuration tool, we need to switch the agent on and set it to utilize the default-agent. Just type in the following two commands to do this.
agent on
default-agentCopy
3. Once we have enabled the agent we now want to actually scan for new Bluetooth devices, running the following command will tell the tool to start scanning.
scan onCopyYou will notice immediately that any Bluetooth device in the area will start showing up in your command line.
Ignore these for now as we only want to pay attention to the PS3 controller itself.
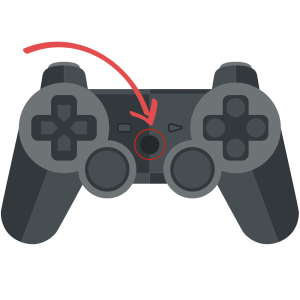
4. Now is the time to press down the PlayStation button on the controller, so it begins to talk to the Raspberry Pi. You should soon start to see entries appear in the command line.
5. Once you see something like the following appear, make sure you copy down the MAC address that is displayed. It is the sequence of text that is separated with ‘:’ symbols.
[NEW] Device B8:27:EB:A4:59:08 B8-27-EB-A4-59-08
[CHG] Device B8:27:EB:A4:59:08 Connected: no
[DEL] Device B8:27:EB:A4:59:08 B8-27-EB-A4-59-08Copy
6. Now that you have a MAC address available copy it down, in our example, this is “B8:27:EB:A4:59:08“.
With the MAC address handy you want to use that in the next command. With this following command, we are trying to get a successful connection and a UUID returned by the device.
Please note you may have to run this command a few times before it is successful.
Make sure that you replace “YOUR_MAC_ADDRESS” with the one you found in step 7.
connect YOUR_MAC_ADDRESSCopyPlease keep an eye on your PlayStation 3 controller, if it stops trying to connect then make sure you press the PS button again.
7. You will know a successful connection has been made when you see the text as we have shown below appears on the command line. With the UUIDs available we can proceed to the next step.
Attempting to connect to B8:27:EB:A4:59:08
[CHG] Device B8:27:EB:A4:59:08 Modalias: usb:v054Cp0268d0100
[CHG] Device B8:27:EB:A4:59:08 UUIDs:
        00001124-0000-1000-8000-00805f9b34fb
        00001200-0000-1000-8000-00805f9b34fbCopy
8. Now that you have the MAC address we need to add this to our Bluetooth trusted list. What this does is allow the controller to connect to the Raspberry Pi on its own.
To do this, we need to just type in the following command to our Raspberry Pi. Make sure that you replace “YOUR_MAC_ADDRESS” with the one you found in Step 7.
trust YOUR_MAC_ADDRESSCopy9. Once your PS3 controller has been successfully added to the trusted list, you should see something like below appear on the command line.
[CHG] Device B8:27:EB:A4:59:08 Trusted: yes
Changing B8:27:EB:A4:59:08 trust succeededCopy
10. With your PS3 controller now successfully connected to your Raspberry Pi, we can now quit out of the Bluetooth configuration tool.
To quit out of the tool you can either use the command below or just press CTRL + D.
quitCopy11. Now you can restart the Raspberry Pi. We do this so we can test to make sure everything is working as intended. Run the following command to reboot the Raspberry Pi.
sudo rebootCopy12. With the Raspberry Pi now restarted, press the PS button on your controller to test the connection between it and the Raspberry Pi.
The LED’s on the controller should briefly flash as it connects, afterward however if everything has worked correctly only one LED should remain lit on the controller.
Using SIXAD to Connect your PS3 Controller
1. Before we get started with compiling and setting up SIXAD on our Raspberry Pi, we must first install a few packages that we require.
The essential packages here are libusb-dev and libbluetooth-dev as they contain the code that we need to compile the sixad software.
Libusb-dev contains code that allows us to interact with USB devices that are plugged into the computer through code.
Libbluetooth-dev provides the code required to be able to interact with the operating systems Bluetooth stack. In sixad’s case this is used to detect when a PS3 device is connected to the Raspberry Pi.
sudo apt install git libbluetooth-dev checkinstall libusb-dev
sudo apt install joystick pkg-configCopy
2. Now that we have all the packages that we could need let’s go ahead and clone the SIXAD repository from Retropie, the reason we use Retropie’s fork is that it has a few improvements and is tested on the Raspberry Pi.
Run the following two lines on your Raspberry Pi to clone the GIT repository.
cd ~
git clone https://github.com/RetroPie/sixad.gitCopy
3. With the repository now cloned to our Raspberry Pi, we can now move onto actually compiling it. Compiling SIXAD is simple to do and just requires to run the following two commands.
The first command moves us into the folder, the second line runs the makefile and compiles the program.
cd ~/sixad
makeCopy
4. Now with the sixad software now compiled there are a couple more things to be done before we can use it.
The first of these is to make a folder where sixad keeps track of all its profiles.
Run the following command to create a folder for it.
sudo mkdir -p /var/lib/sixad/profilesCopy5. Finally lets run the checkinstall package that we installed in step 1 of this section.
Basically what this tool does is check the current install then proceeds to run the commands “make install” if they are required.
sudo checkinstallCopyAt specific points, you will be asked a few things, ignore these and just press ENTER to continue until the installation is complete.
Once the installation is complete, you should see the following appear in your command line.
**********************************************************************
 Done. The new package has been installed and saved to

 /home/pi/sixad/sixad_20171230-1_armhf.deb

 You can remove it from your system anytime using:

      dpkg -r sixad
**********************************************************************Copy
6. Now that we have finished installing sixad we can finally run it by typing the following command in on our Raspberry Pi.
sudo sixad --startCopyIf everything is working as intended, you will now be asked to press the PS button on your controller. Do this now to connect your controller to your Raspberry Pi.
7. Now that we know that sixad is up and running we want to make sure that it starts at boot so we can always connect our PS 3 controller.
To do this, we can run the following command to add sixad to the boot sequence of the Raspberry Pi.
sudo update-rc.d sixad defaultsCopySetting up a PlayStation 4 Controller On the Raspberry Pi
There are a few different ways you can utilize your PlayStation 4 controller with your Raspberry Pi. Some of these are simpler to deal with than others.
Sony USB Wireless Adapter
The Sony USB Wireless Adapter is probably the easiest solution to getting your PS4 controller paired with the Raspberry Pi. Especially since the dongle should be able to work out of the box and pair with any official PS4 Controllers.
Bluetooth
Bluetooth is a bit more complicated than just using the official Sony USB Wireless adapter and requires you to have a Raspberry Pi 3, Raspberry Pi Zero W, or a USB Bluetooth adapter.
However, this method does not work correctly for every PS4 controller, and you may have to end up utilizing a userspace controller driver called ds4drv to be able to interact with it.
Please note that if you previously set up the SIXAD tool, you will have to uninstall it to use your PS4 controller with the Raspberry Pi.
USB Cable
Using a USB Cable is the easiest way to utilize your PS4 Controller, just plug it in with a Micro USB cable like you would when first connecting your controller to the PS4 itself.
Using the USB connection, the PS4 controller should just work straight off the bat.
Pairing your PS4 Controller via BluetoothCTL
Please note that if you previously followed our guide on connecting a PS3 controller to your Raspberry Pi via Bluetooth, you will have to follow the next couple of steps. Otherwise, skip to step 2 of this section.
1. The reason for having to remove SIXAD is that it seems to conflict with the PlayStation 4 controllers and does not allow them to pair and function correctly.
To uninstall the sixad package that we compiled and installed in our PS3 section we need to just run the following command on the Raspberry Pi.
sudo dpkg -r sixadCopy2. Now before we get to set up everything lets make sure our Raspberry Pi is entirely up to date by running the following two commands on it.
sudo apt update
sudo apt upgradeCopy
3. Now let’s begin the process of pairing our PS4 controller with our Raspberry Pi. For this guide, we will be using the Bluetooth command line tool.
Run the following command on your Raspberry Pi to start it up.
sudo bluetoothctlCopy4. With the bluetoothctl tool now up we need to run the following two commands in it, this we enable the agent and set the agent to the default.
agent on
default-agentCopy
5. Now that we have enabled the agent we can finally start scanning for devices. Switching scan on is crucial as it will show up our controller when we tell it to start syncing.
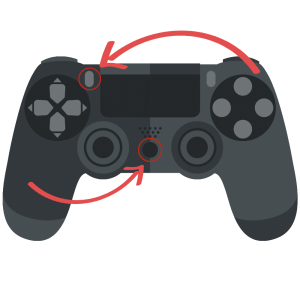
scan onCopy6. Now is the time to press both your “Share” button and PS button on your controller at the same time like shown in the diagram below. Hold these till the light on your controller starts flashing.
7. You should see something like below appear on your command line, once you see this, make a note of the MAC address.
The MAC address is the hexadecimal number separated by the ‘:‘ symbol.
[NEW] Device 00:01:6C:B4:06:7E Wireless ControllerCopyIn this case, the MAC Address is “00:01:6C:B4:06:7E“.
8. While your controller is still flashing, type in the following command. Make sure that you replace “YOUR_MAC_ADDRESS” with the MAC address that you got in Step 8. This command makes a connection with your PS4 controller.
If your controller stops flashing just press the “Share” and “PS” buttons again.
connect YOUR_MAC_ADDRESSCopy9. Upon a successful connection, you should see the following appear in your command line.
Attempting to connect to 00:01:6C:B4:06:7E
[CHG] Device 00:01:6C:B4:06:7E Connected: yes
[CHG] Device 00:01:6C:B4:06:7E UUIDs: 00001124-0000-1000-8000-00805f9b34fb
[CHG] Device 00:01:6C:B4:06:7E UUIDs: 00001200-0000-1000-8000-00805f9b34fb
[CHG] Device 00:01:6C:B4:06:7E ServicesResolved: yes
[CHG] Device 00:01:6C:B4:06:7E Paired: yes
Connection successfulCopy
10. Now we need to add our MAC address to the trusted list so the PS4 controller can automatically connect to the Raspberry Pi.
trust YOUR_MAC_ADDRESSCopy11. With the PS4 controller now trusted by the Raspberry Pi’s Bluetooth device, we can now quit out of the tool by pressing CTRL + D or typing in “quit“.
We can now proceed on to testing whether the controller is working.
12. Let’s now install the joystick package, while this comes with some installations of Raspbian we will run the install command just in case. This package includes the applications we need to be able to test whether our controller is working correctly.
Run the following Linux command on your Raspberry Pi to install the software.
sudo apt install joystickCopy13. With the joystick package now installed to your Raspberry Pi you can now run the following command, this will test js0 and receive the values back from it.
sudo jstest /dev/input/js0Copy14. Now if values change when you move and press buttons on your controller, then you are ready to go with your PS4 controller, and you can finish the tutorial here.
However, if your controller refuses to work, you may have to try the alternative way and utilize the userspace driver, follow our guide in the next section below.
Using ds4driv to connect the PS4 Controller to the Raspberry Pi
Only utilize this option if standard Bluetooth doesn’t work at all. This method makes use of a userspace driver that talks with the controller and allow it to be understood by the Raspberry Pi.
You will need to of already paired your PS4 controller with your Raspberry Pi before you can continue with the following steps.
1. To begin, we need to install the packages we require for ds4drv. To install the necessary python3 components run the following command on your Raspberry Pi.
sudo apt install python3-dev python3-pipCopy2. With the required python packages now installed to the Raspberry Pi, we can use pip to grab ds4drv and the python libraries necessary for it. Run the following command to use pip3 to install it.
sudo pip3 install ds4drvCopy3. Lets now setup the Raspberry Pi so non-root users can gain access to the joystick device that ds4drv creates, to do this run the following three commands on your Raspberry Pi. These commands download the ruleset then applies them.
sudo wget https://raw.githubusercontent.com/chrippa/ds4drv/master/udev/50-ds4drv.rules -O /etc/udev/rules.d/50-ds4drv.rules
sudo udevadm control --reload-rules
sudo udevadm triggerCopy
4. Now while your PlayStation 4 controller is still paired to the Raspberry Pi, we can run the following command to see if ds4drv can read and interact with your controller.
sudo ds4drv --hidraw --led 000008Copy5. Once you see text like below appear on your command line, that means that ds4drv can see and talk with your PS4 controller that is paired with the Raspberry Pi.
[info][controller 1] Connected to Bluetooth Controller (00:01:6C:B4:06:7E hidraw5)
[info][hidraw] Scanning for devices
[info][controller 1] Battery: Fully chargedCopy
Now quit out of ds4drv by pressing CTRL + C.
6. We need to modify the bootup script now, so it automatically launches ds4drv at startup. To begin doing this run the following command on the Raspberry Pi.
sudo nano /etc/rc.localCopy7. Now we need to add the following line to this file. This line will launch ds4drv when the Raspberry Pi boots up.
Find
exit 0CopyAdd Above
/usr/local/bin/ds4drv --hidraw --led 000008 &CopyOnce you have made the changes, you can save the file by pressing CTRL + X then Y then hitting ENTER.
8. You can now restart the Raspberry Pi to test whether it is starting up correctly. Do this by running the following command.
sudo rebootCopy9. Once your Raspberry Pi has rebooted, you can now use the following command to test whether everything is working. If the numbers change then everything is working as it should.
sudo jstest /dev/input/js0CopyConclusions
Hopefully, by the end of this guide, you have your Raspberry Pi up and running with your PlayStation controllers successfully connecting to it.
Be sure to also check out some of our other game tutorials for the Pi such as Parsec streaming. If you have any feedback or need assistance with this guide, then feel free to drop a comment below.


I “love” how you lay out everything super simple until you write “run the checkinstall package that we installed in step 1 of this section”. What does that mean?!?!?
Hi Aaron,
Thank you for pointing out that mistake.
We have now added the command for that step.
Cheers,
Emmet
Thank you! Sorry if my comment was a little harsh. I was in the middle of an adult temper tantrum
Also, is there a way to have the ps3 controller work as a mouse when exiting Steam? It’d be nice not to have to grab the mouse to turn the machine off.
1st PS3 controller succesfully connected using bluetooth method, 2nd controller keeps connecting and disconnecting. With the GUI and ‘add device’ I get ‘authentication error’ when trying to pair
Hi Steven,
That seems very weird that your 2nd controller wont work. There is a chance that it may be a model that isn’t to friendly with connecting? When i wrote this guide i do remember reading up on some weird issues with some controllers, however i never ran into that issue myself.
Does the 2nd controller work if the 1st controller is unpaired?
Cheers,
Emmet
Will the PlayStation 3 controller still work perfectly with PS3 without changes after performing these actions described in this tutorial?
Hi Steven,
I no longer have a PS3 or PS3 controller to verify that it will work with no issues.
But from memory everything will work as normal, of course you will have to re-pair your controller with your PS3 using a cable.
Cheers,
Emmet