In this tutorial, we will show you how to mount a network drive on a Raspberry Pi.
A network drive is a great way of sharing data between multiple devices that sit on the same network.
Not all data needs to exist on every device that you own, that includes your Raspberry Pi. Setting up and mounting a network share can be very useful. For example, you could set up a share on another device and use it to back up the contents of your Raspberry Pi over the network.
Another example is using it to store larger files on a drive array that don’t necessarily need instant access on your Pi. You could even use this as a simple way to easily copy files to your Raspberry Pi without setting up something like an FTP server or copying using a USB drive.
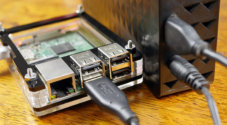
The device you are mounting the network drive from can be anything; it could even be another Raspberry Pi set up to act as a low-powered NAS.
There are no real limitations on the protocols that the Raspberry Pi supports for mounting networking drives. The most common one you will probably be familiar with is Samba, however, you can just as easily mount a drive that is shared over the NFS protocol.
The steps we will be covering in the next few sections will be run entirely within the terminal. If you aren’t too familiar with the terminal, don’t worry; the commands we rely on are fairly easy to understand.
If you are running a desktop variant of Raspberry Pi OS, you can bring up the terminal by pressing CTRL + ALT + T on your keyboard.
Equipment
Below is a list of equipment we used when mounting a network drive on our Raspberry Pi.
Recommended
- Raspberry Pi Amazon
- Monitor Amazon
- Micro SD Card Amazon
- Power Supply Amazon
- Ethernet Cable Amazon or Wi-Fi Amazon
Optional
We last tested these steps on a Raspberry Pi 5 using the latest version of Raspberry Pi OS Bookworm.
Using the Terminal to Mount a Network Drive on the Raspberry Pi
In the following sections, we will show you how to mount a network drive to your Raspberry Pi easily.
Mounting a network drive is one of those things that are incredibly simple, even when using the terminal. There is a single command that you can use to mount a drive. Even if you use a non-standard Linux format like an SMB network share, mounting only requires installing a single package.
We will be covering two different methods for mounting a network drive to your Raspberry Pi.
The first method is temporarily mounting the drive using the mount command. The second is to modify the fstab file so that your Raspberry Pi will mount the network share every time it turns on. Both have their pros and cons.
Setting up your Raspberry Pi to Mount a Network Drive
1. Before we begin to mount a network drive on your Raspberry Pi, there are a few things we need to do first.
With these two commands, we can update the existing packages on your system.
sudo apt update
sudo apt upgrade -yCopy
2. Once the update completes, your next step is to install the “cifs-utils” package by running the command below.
This package is used to support network drives that have been shared using the Samba protocol and a few others.
sudo apt install cifs-utilsCopy3. Now, your next step is to create a directory where you will mount the network share on your Pi.
For this example, we will be creating a directory using the mkdir command at “/media/pishare“.
sudo mkdir -p /media/pishareCopyTemporarily Mounting a Network Drive on your Pi
This section will cover how you can temporarily mount a network drive on your Raspberry Pi. The methods we are showing here will persist until you unmount the drive or your Raspberry Pi is rebooted.
Temporarily mounting a network share to your Pi is useful in cases where you only need temporary access to files.
Mounting an Unprotected Share
If you are mounting a public/unprotected network share, this process is super straightforward. All we need to do is use the mount command and point it at the local network share.
With this command, you only need to specify two things.
<NETWORKSHARE>: Here you will specify the network location of your shared drive. Typically, this will be an IP address or a hostname followed by the specific directory you want to mount.
For example, “//192.168.0.23/work” is a valid path to a network share.<MOUNTLOCATION>: Replace this with where you want this network drive to be mounted to on your Raspberry Pi.
sudo mount //<NETWORKSHARE> <MOUNTLOCATION>CopyTo give you an example of this, let us mount a network drive located at “//192.168.0.23/work” to the local directory “/rmedia/pishare” by running the command below.
sudo mount //192.168.0.23/work /media/pishareCopyMounting a Protected Network Drive
Of course, the chances are the network drive that you want to mount to your Raspberry Pi requires authentication using a username and password.
Luckily, by using the “-o” option with the mount command, we can tell the command to use a specific username and password when mounting the given network drive.
-o <OPTIONS>: This allows us to specify multiple options to control how a drive is mounted. You can specify multiple options here. Just separate each with a comma (,).user=<USERNAME>: Use this option to specify the user that you want to mount the network drive.password=<PASSWORD>: With this option, you can specify the password to use with the given user.
sudo mount -o user=<USERNAME>,password=<PASSWORD> //<NETWORKSHARE> <MOUNTLOCATION>For example, if we wanted to mount our Samba based network share to our Raspberry Pi with the user “pimyubu” and password “pimylifeup“, we would run the following command.
sudo mount -o user=pimyubu,password=pimylifeup //192.168.0.23/work /media/networkshareCopySetting User Owner of the Network Mounted Drive
One problem you may run into when you mount a network drive on to your Raspberry Pi is permissions. By default, when you mount a network drive it will be mounted under the root user. Now, this is fine if you only ever use the root user; this is different for most people.
Luckily, we can use the “-o" option again to set the user ID and the group ID for any drive we mount.
uid=<USERID>: Use this option to set the ID of the user that will own this mounted drive.
The default user on your Raspberry Pi will have an ID of1000.gid=<GROUPID>: This option will let you set the ID of the group that should own the drive you are mounting on your Raspberry Pi.
Typically, the default user on your Pi will have a group ID of1000.
sudo mount -o uid=<USERID>,gid=<GROUPID> //<NETWORKSHARE> <MOUNTLOCATION>CopyYou can combine this with other options, such as setting the user and password. Just ensure you separate each option with a comma (,).
sudo mount -o user=<USERNAME>,password=<PASSWORD>,uid=<USERID>,gid=<GROUPID> //<NETWORKSHARE> <MOUNTLOCATION>CopyAn example of how this command will look after mounting the network drive under our user ID 1000 and group ID 1000 is below.
sudo mount -o user=pimyubu,password=pimylifeup,uid=1000,gid=1000 //192.168.0.23/work /media/pishareCopyMount a Network Drive at Boot on your Raspberry Pi
If you want to permanently mount a network drive onto your Raspberry Pi, then the steps differ quite a bit, but the information you require is very similar.
Over the following steps, we will walk you through how to modify the “fstab” file to mount your chosen network drive when your Pi powers on.
The fstab is a crucial file used by your system to mount any drive, including network ones.
One important thing to note before continuing is that your Raspberry Pi will continue to boot in most cases even if a network drive becomes unavailable. However, the boot time will be extended as the Pi will wait 90 seconds before continuing.
Exploring the Options to Mount your Network Drive Permanently
Before we dive into how to modify the fstab file to mount a network drive to your Raspberry Pi permanently, let us explore all of the options you will need to modify.
<NETWORKSHARE>: This option is where you will specify the location of the network share you are trying to mount onto your Raspberry Pi.
For example, to mount a network drive sitting on “192.168.0.32” you would use a value like “//192.168.0.32“.<MOUNTLOCATION>: With this option you can specify the local directory where you want the network share to be mounted to. This should be a full path.
For example, the directory “/media/pishare” would be a valid path.<FILESYSTEM>: To mount a network drive using the fstab file, we must specify the filesystem that should be used. There are two specific options that you can use here.cifs: If you are trying to mount a network share that uses the SMB/Samba protocol, you will want to use this value
If the drive you are mounting is shared from a Windows device, this is the value you will want to use here. Most shared drives are likely using this protocol in a home environmentnfs: NFS is another protocol that your network share could be using. It is typically used when sharing a network drive from a Linux system. It tends to have performance benefits
<OPTIONS>: When mounting a network drive with the fstab file on your Raspberry Pi, you will likely need to specify a few options such as the user and group that should own the mounted drive.
Each option that you use here should be separated by a comma (,) and not a space.
Below are a few of the options that you might want to use when mounting a drive.nofail: By adding this option, we are telling the system that this network drive is not required for it to function. Without this, your Raspberry Pi will wait 90 seconds for the network drive to be attached before continuing with the boot process.user=<USERNAME>: With this option, you can specify the user to use when mounting the network drive.password=<PASSWORD>: Use this to set the password to use when mounting your drive.uid=<UID>: This option can be used to set the ID of the user that will own the mounted drive.gid=<GID>: The final option you will want to set allows you to set the ID of the group that should own this mounted network drive.
Using the fstab File to Mount a Network Drive to your Pi
1. Now that you understand how you will configure the “fstab” file to mount your network drive, we can move on.
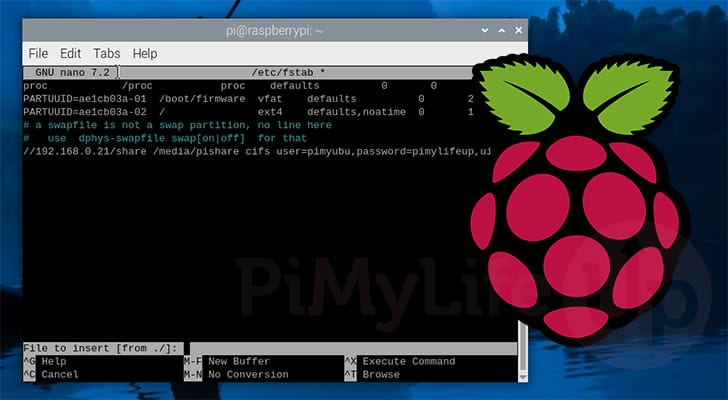
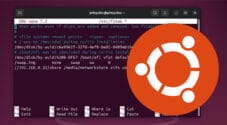
Your next step is to begin editing the “fstab” file on your Raspberry Pi. We will be using Nano for this tutorial, but you can use whichever text editor you feel most comfortable with.
sudo nano /etc/fstabCopy2. Within this file, you will want to use the following syntax to add an additional line to the bottom of the file. This line is what your Raspberry Pi will read when it boots to mount your network drive.
Fill out this line using the information we discussed earlier in this section.
<NETWORKSHARE> <MOUNTLOCATION> <FILESYSTEM> <OPTIONS> 0 0For example, if we wanted to mount a network share located at “//192.168.0.32/share” to the directory “/media/pishare” using CIFS we would use the following line.
With this line we use the options parameter to specify our user, password, UID, and GID.
//192.168.0.32/share /media/pishare cifs nofail,user=pimyubu,password=pimylifeup,uid=1000,gid=1000 0 03. After adding the line to your “fstab” file, check over it to ensure you haven’t made any mistakes.
Once you are happy everything is correct, save and quit out of Nano by pressing CTRL + X, Y, and then ENTER.
Mounting your Network Drive without Restarting
4. Changes to the “fstab” file will require you to restart the System daemon using the following command.
sudo systemctl daemon-reloadCopy5. With the daemon restarted, getting your Raspberry Pi to mount your network drive is as easy as using the following command in the terminal.
All you need to do is replace “<MOUNTPATH>” with the directory where you set your network drive to be mounted.
sudo mount <MOUNTPATH>For example, to mount the drive we set up as an example earlier, we would use the following command.
sudo mount /media/networkshareCopyChecking on your Mounted Network Drive on the Raspberry Pi
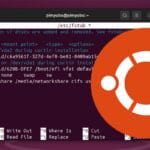
6. You can verify that your network drive has been successfully mounted to your Raspberry Pi drive by using the df command and the “-h” option.
This tool is used to reveal the disk usage status of your connected drives, this included mounted network shares.
df -hCopyThe result below shows we successfully mounted our Samba network share to our Raspberry Pi.
Filesystem      Size  Used Avail Use% Mounted on
//192.168.0.32/share    55T   22T   34T  40% /media/pishare
How to Unmount a Network Drive on the Raspberry Pi
Unmounting a network drive from your Raspberry Pi is a super simple process as long as you know the mount location of that drive. For example, our share is mounted at “/media/pishare“.
1. To unmount a network share from your Raspberry Pi, you will want to use the “umount” command followed by the path where your drive is mounted.
If this drive has only been temporarily mounted, then this is all you will need to do.
sudo umount <MOUNTLOCATION>Copy For example, to unmount our network share that was mounted to “/media/pishare” we would use the following command.
sudo umount /media/pishareCopy2. If you mounted your network drive using the “fstab” file, you will want to edit it to stop your drive from being mounted again the next time you boot your Raspberry Pi.
Open up the “fstab” file for editing by using the following command and remove the line that defines your network share.
sudo nano /etc/fstabCopy3. After removing the line, check over the file to ensure you didn’t remove anything you didn’t intend to. Once you are happy, save and quit by pressing CTRL + X, Y, and then ENTER.
Conclusion
After getting to this point in the guide, you should now have a good idea of how you can mount a network drive on your Raspberry Pi.
Mounting a network share is simple; even if you have used Samba or another protocol, such as NFS, to share the drive, mounting can be done with a single line.
Using network shares can be a great solution for sharing data between multiple devices. A common use case here is sharing large files such as media.
Please feel free to leave a comment below if you have had any issues mounting network shares on your Raspberry Pi.
If you liked this tutorial, we highly recommend taking some time to explore some of the Raspberry Pi projects we have on offer.


Your tutorials are fantastic, very clear, simple. Thanks to your tutorials i fave set up a ftp server with access to folders in various RaspberyPies. Now i can see under one ftp user all my folders on multiple disks on multiple raspbery pies. Thank you for doing this.
I’m not sure about all linux/unix distributions, but on debian at least, the verb to unmount a drive is “umount”, not “unmount”.
Hi Harvey,
You are 100% correct, I’ve mindlessly auto corrected it in my head while typing it out.
I’ve fixed it up and now reference the actual umount command rather than the non-existent “unmount”.
Kind regards,
Emmet
Thanks for this article – very helpful! One thing you forgot to mention: what happens if you modify your fstab file to mount a network drive that’s unavailable? Will the RPi lock up, waiting for a drive that isn’t online? Or will it time out after XX seconds and continue to boot/operate normally?
Hi Jeff,
Thank you for pointing that out, it is definitely something important that should be covered.
Your Raspberry Pi will continue to boot even if the network drive is unavailable, however, you will experience a longer start up time. I think by default the system will wait 90s for the connection to complete / fail.
You can speed up this process by marking the network drive as “nofail”. Basically this tells the system that this drive is not required for the system to function. I have updated the tutorial to utilize this option as well.
Hopefully that answers your question.
Kind regards,
Emmet