In this project, we will show you how you can convert your Raspberry Pi into a cost-effective AI proxy using LiteLLM.
LiteLLM is a software that is designed to act as a proxy for the huge number of available large language models. The key part of what makes this proxy useful is that it converts all the different LLM API’s into one singular API.
A consistent request format and response make it much easier to integrate different LLMs into your workflow. It also enables you to use software on your Raspberry Pi, like OpenWebUI, with more AI providers than just OpenAI.
The Raspberry Pi is a great device to operate as a LiteLLM Ai proxy as it is affordable to keep running 24/7, especially if you just intend on using this for your own home usage.
Please note that running this software requires a 64-bit operating system on your Raspberry Pi. This means you will also need to be using a Pi 3 or newer. The LiteLLM Docker container we are using offers no support for 32-bit systems.


Equipment
Below is a list of some equipment we used to get the LiteLLM Ai proxy running on our Raspberry Pi.
Recommended
Optional
We last tested this project on a Raspberry Pi 5 running the latest version of Raspberry Pi OS Bookworm.
Installing and Running LiteLLM on your Raspberry Pi
Over the following sections, we will walk you through installing and setting up the LiteLLM AI Proxy on your Raspberry Pi.
Preparing your Raspberry Pi
1. Before we can set up the LiteLLM AI proxy on our Raspberry Pi, we will want to ensure that our operating system is up to date.
You can use the following two commands to update your system’s existing packages. The first updates the package list cache, and the second upgrades any out-of-date packages.
sudo apt update
sudo apt upgrade -yCopy
2. Once updated, you must install the Docker runtime next. We will be using Docker to make installing LiteLLM a much simpler process on our Raspberry Pi. It saves us the hassle of having to manually clone and compile the code.
If you haven’t installed Docker previously, we highly recommend following our own guide on installing Docker to the Raspberry Pi. Our tutorial will assume that you followed this.
https://pimylifeup.com/raspberry-pi-docker/3. Once you have installed Docker, we can move on to getting the LiteLLM proxy running. The first part of this process is to make a directory where we will store both the Compose file and the proxies database.
You can use the mkdir command to create this directory by running the following.
sudo mkdir -p /opt/stacks/litellmCopy4. After creating the directory, you will then want to change in to it by utilizing the cd command.
We need to be in this folder for the next few steps.
cd /opt/stacks/litellmCopyWriting a Compose File to Run the LiteLLM Proxy on your Raspberry Pi
5. We are now in the position where we can write the Docker Compose file that will set up and run the LiteLLM AI Proxy on our Raspberry Pi.
You can write this file using the Nano text editor by running the command below.
sudo nano compose.yamlCopy6. Within this file, enter the following lines. These lines will set up two separate Docker containers. One is for LiteLLM, which will handle and proxy the Ai requests on your Raspberry Pi.
The second container is a Postgres database. LiteLLM will use this to store its data, and it is required for the software to enable its web interface.
We don’t need to configure anything in this file, as that will be all done within an environment file later.
services:
  litellm:
    image: ghcr.io/berriai/litellm:main-latest
    restart: unless-stopped
    depends_on:
      - litellm-db
    environment:
      DATABASE_URL: postgresql://litellm:litellm@litellm-db:5432/litellm
      LITELLM_MASTER_KEY: ${LITELLM_MASTER_KEY}
      UI_USERNAME: ${UI_USERNAME}
      UI_PASSWORD: ${UI_PASSWORD}
      STORE_MODEL_IN_DB: "True"
    ports:
      - 4000:4000
  litellm-db:
    image: postgres:16-alpine
    healthcheck:
      test:
        - CMD-SHELL
        - pg_isready -U litellm -d litellm
      interval: 5s
      timeout: 5s
      retries: 5
    volumes:
      - ./db:/var/lib/postgresql/data:rw
    environment:
      POSTGRES_DB: litellm
      POSTGRES_USER: litellm
      POSTGRES_PASSWORD: litellm
    restart: on-failure:5Copy
7. Once you have finished filling out this file, save and quit by pressing CTRL + X, Y, and then ENTER.
Configuring LiteLLM Through the .env File
8. With the Compose file now written, we can write the “.env” file that will be automatically read in by the LiteLLM container when it gets started.
Begin writing this file on your Raspberry Pi by using the command below.
sudo nano .envCopy9. Within this file, enter in the following lines. While filling this out, there are a few key placeholders that you must swap out.
<MASTERKEY>: You must replace this with a long key that will be used as the “master key” for your LiteLLM proxy. This is essentially an API key that will give anyone full access to all models you have set up in the proxy.
Ensure you make this a long, secure, and random string. You will be able to generate more fine-grained API keys through the LiteLLM proxy’s web interface.<USERNAME>: Replace this placeholder with the username you will use to login through the web interface.<PASSWORD>: You must also set a password that will be used to login to your account.
LITELLM_MASTER_KEY=<MASTERKEY>
UI_USERNAME=<USERNAME>
UI_PASSWORD=<PASSWORD>Copy
10. With the “.env” file now written, save and quit by pressing CTRL + X, Y, and then ENTER.
Starting up the LiteLLM Ai Proxy on the Raspberry Pi
11. We finally have everything in place and can start up our LiteLLM AI proxy on our Raspberry Pi.
When you run this command, Docker will download both the LiteLLM and PostgresDB containers and start them up. During start up, it will read in the “.env” file to fill in both the master key and UI username and password.
Additionally, we use the “-d” option to ensure that Docker will continue to run in the background once it has started up the containers.
docker compose up -dCopyConnecting to the LiteLLM Web UI
12. Now that we have LiteLLM up and running on our Raspberry Pi, you will want to access its web interface. This web interface is how you will add models to your Ai proxy, generate API keys, view usage, and more.
To access this interface, you will need to know your Pi’s IP address. One of the easiest ways to get your Raspberry Pi’s IP address is to use the hostname command.
hostname -ICopy13. Now, within your favorite web browser, you will want to go to the following address.
Ensure that you swap out “<IPADDRESS>” with the IP of your Pi.
http://<IPADDRESS>:4000/uiFor example, if your IP address was “192.168.0.22“, you would use the following address.
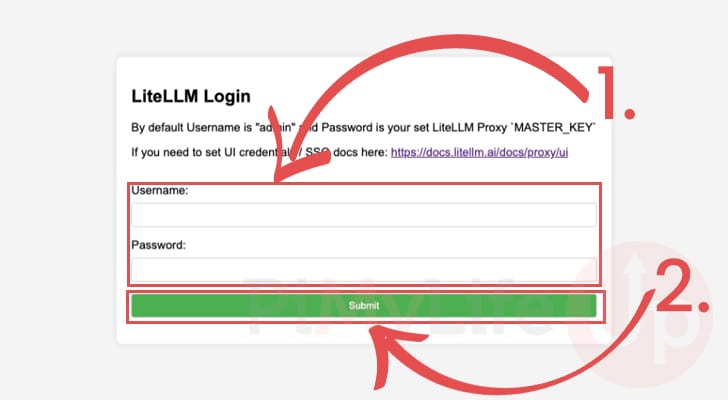
http://192.168.0.22:4000/ui14. You should now be greeted by the LiteLLM Web ui login screen. You will want to use the username and password (1.) that you set earlier.
After filling in your login details, click the “Submit” button (2.).
Adding a Model to the Ai Proxy
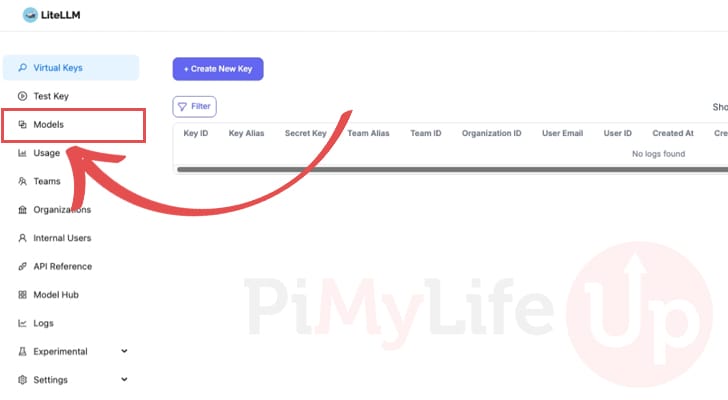
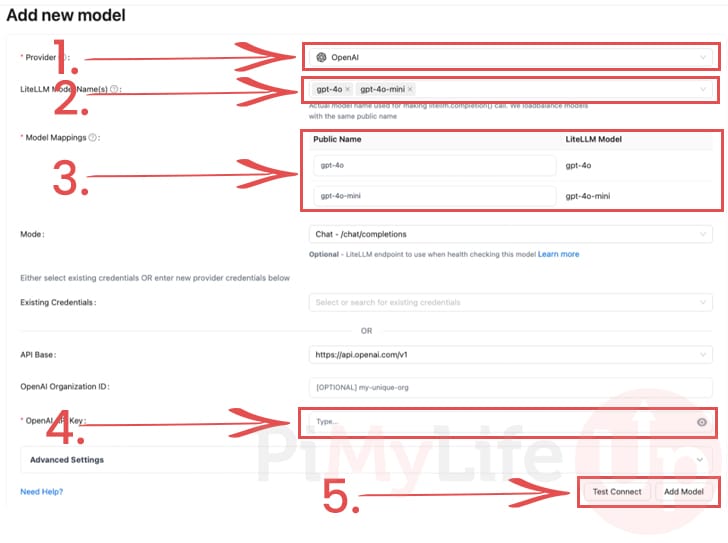
15. The first thing you will want to do when setting up the LiteLLM Ai proxy on your Raspberry Pi is to add a model.
To start this process, use the sidebar to change to the “Models” screen.
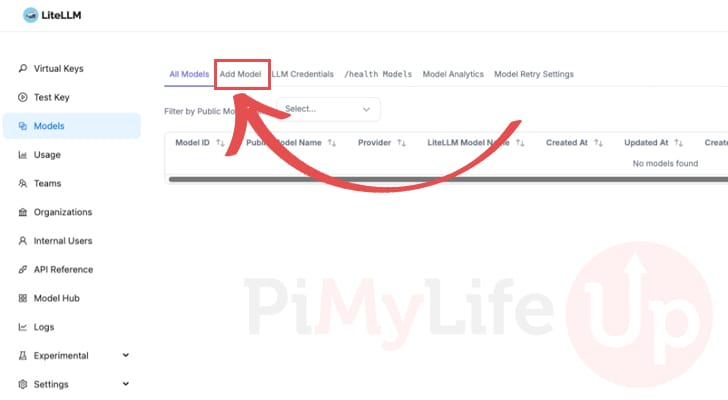
16. After swapping to the model’s screen, you want to click the “Add Model” tab.
17. This screen will allow you to add any available model to your Proxy. All you need is an API key for whatever provider you plan on adding.
Provider: You must first select the provider for whichever model you intend to use.
For our example, we will be using OpenAI.LiteLLM Model Name(s): The next option will allow you to select the models that you want made available through LiteLLM proxy.
To showcase this, we will be selecting two different models, “gpt-4o” and “gpt-4o-mini“.Model Mappings: With these options, it is possible to control the public name that is used for each of the models you are adding.
Changing the public name allows you to use that name through the LiteLLM proxy.API Key: Finally, you must specify the details that will be used for LiteLLM to talk with your provider. For the vast majority of providers, this will be an API key.
With OpenAI, this field will be labeled “OpenAI API Key“.
Once you are happy with everything that has been set, you can add this model to LiteLLM by clicking the “Add Model” button (5.).
Testing the Ai Proxy
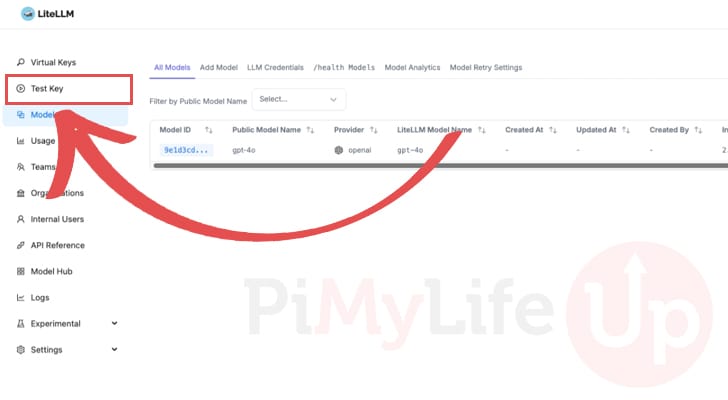
18. Now that we have given our Raspberry Pi LiteLLM Ai proxy access to a model, let us test that everything is working properly.
Luckily the web interface has built-in functionality that makes testing models and API keys easy. To test this, use the sidebar to change to the “Test Key” screen.
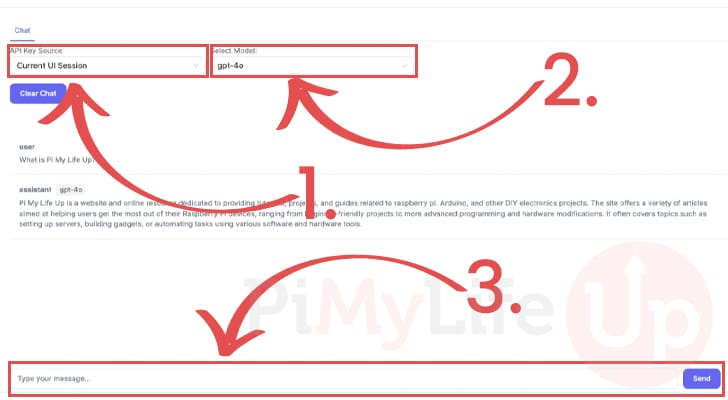
19. On this screen, change the “API Key Source” to “Current UI Session” (1.). We must do this as we haven’t yet created unique API keys on our Raspberry Pi.
Once you have the key source set, you can use the second select box to choose the model that you intend on testing (2.).
Finally, you can use the text box to talk with the Ai Model and verify that everything is working as intended (3.).
Creating an API Key for the LiteLLM Proxy on the Raspberry Pi
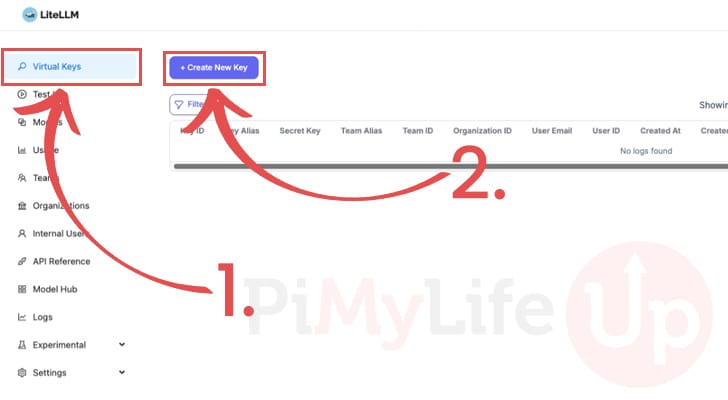
20. Now that you have added an Ai Model to the LiteLLM Proxy running on your Raspberry Pi, you will want to generate some API keys that can be used to talk with the proxy.
To create a new API key, first change to the “Virtual Keys” screen using the sidebar (1.). Once you have changed to this screen, click the “Create New Key” button at the top of the screen (2.).
21. The first thing you must do on this screen is give this API key a name (1.). This enables you to identify what this key will be used for.
Once you have set a key, click the “Create Key” button (2.).

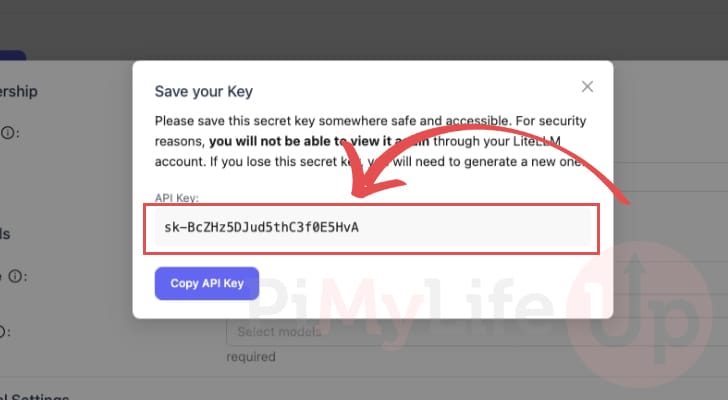
22. Upon generating a key, it will be displayed on your screen. You must copy this key down as it will not be shown to you again.
If you accidentally close this menu without copying the key down, simply delete it and repeat the steps to generate a new key.
Using Curl to Test LiteLLM on your Raspberry Pi
23. At this point, we have successfully installed and started up the LiteLLM Ai proxy on our Raspberry Pi. We can now test this out using the terminal by using curl to send a request to one of LiteLLM’s API endpoints.
As LiteLLM replicates the OpenAI API, you can read more about the completions endpoint that we are using by reading through the OpenAI documentation.
While typing out this command, there are a few placeholders that you must swap out.
<IPADDRESS>: Change this placeholder with the IP address of your Raspberry Pi where the LiteLLM proxy is running.<APIKEY>: Swap this out with the API key you generated from within the LiteLLM web UI.<MODEL>: Next, you must specify the name of the Ai model that you want to run. This must match the public name of the model as it is set within LiteLLM.<MESSAGE>: Finally, you can type in the message that you want to send to the endpoint.
curl -X POST http://<IPADDRESS>:4000/v1/chat/completions \
-H "Content-Type: application/json" \
-H "Authorization: Bearer <APIKEY>" \
-d '{
    "model": "<MODEL>",
    "messages": [
        {
            "role": "user",
            "content": "<MESSAGE>"
        }
    ]
}'
Copy
Below is an example of what a filled-out version of this command might look like.
curl -X POST http://192.168.0.22:4000/v1/chat/completions \
-H "Content-Type: application/json" \
-H "Authorization: Bearer sk-BcZHz5DJud5thC3f0E5HvA" \
-d '{
    "model": "gpt-4o",
    "messages": [
        {
            "role": "user",
            "content": "What is pimylifeup"
        }
    ]
}'
Copy
26. Below you can see an example of what the response looks like from the LiteLLM proxy API endpoint. You can then write a Python script or something similar to use your new proxy to interact with various AI models.
This software can even be used to integrate into the incredibly useful OpenWebUI interface.
{"id":"chatcmpl-pfBnfbt12lzL7h","created":1742788843,"model":"gpt-4o-2024-08-06","object":"chat.completion","system_fingerprint":"fp_90d33c15d4","choices":[{"finish_reason":"stop","index":0,"message":{"content":"PiMyLifeUp is a website dedicated to providing tutorials, projects, and guides related to the Raspberry Pi, a popular single-board computer. The site covers a wide range of topics, including electronics, programming, and Linux, with a focus on using the Raspberry Pi for various DIY projects. PiMyLifeUp is a valuable resource for beginners and experienced users alike, offering clear, step-by-step instructions and tips to make the most of the Raspberry Pi's capabilities. The site often includes detailed articles on setting up and configuring hardware and software for different projects, including home automation, media centers, and gaming consoles.","role":"assistant","tool_calls":null,"function_call":null}}],"usage":{"completion_tokens":123,"prompt_tokens":13,"total_tokens":136,"completion_tokens_details":{"accepted_prediction_tokens":0,"audio_tokens":0,"reasoning_tokens":0,"rejected_prediction_tokens":0},"prompt_tokens_details":{"audio_tokens":0,"cached_tokens":0}},"service_tier":"default"}%Updating the LiteLLM Ai Proxy on the Raspberry Pi
The LiteLLM Ai proxy receives updates fairly rapidly. These updates often provide critical new fixes and features. Luckily, the key advantage of using Docker to run this proxy on your Raspberry Pi is that it makes updating the new release a very simple process.
1. To update the LiteLLM on your Raspberry Pi, you must first change to the directory where we wrote the Docker Compose file.
Assuming you stuck with our folder structure, you can change to the correct place by using the following command in the terminal.
cd /opt/stacks/litellmCopy2. After swapping to the correct directory, we must use Docker to pull the latest version of LiteLLM to our Pi.
This will download the latest image but not update the already running container. This will require another command.
docker compose pullCopy3. To get Docker to update your already running LiteLLM proxy container, you only need to use the following command.
Docker will detect when a new image is available, safely shut the container, and then start it back up again on the new image.
docker compose up -dCopyConclusion
Hopefully at this point in the guide, you will have successfully managed to get LiteLLM up and running on your Raspberry Pi.
LiteLLM is a neat AI proxy that simplifies handling multiple AI models from multiple providers, making it a much simpler process. Instead of dealing with many different API endpoints, you only have to deal with the popular OpenAI API, even if you are dealing with a model from Anthroopic.
Please feel free to drop a comment below if you have any questions about setting up and using LiteLLM as an AI proxy.
If you liked this project, we highly recommend exploring some of the many other Raspberry Pi projects we have on offer.


I wasn’t able to access the web UI from my LAN until I added the ports to my compose.yml like so:
STORE_MODEL_IN_DB: “True”
ports:
– “4000:4000” # Expose LiteLLM on LAN
Hope this helps someone!
Hi Queso,
I really don’t know how I maanged to miss including that. I must of mindlessly corrected it on my local copy and forgot to make that change to the article.
Thank you very much for pointing that out and it has now been corrected.
Kind regards,
Emmet
To continue on this, it appears you are missing the “-” in step 6 where it should show “- 4000:4000″ where you have it just listed as ” 4000:4000″ under ports as of 04/07/2025. Everything else is flawless, thank you so much!
Hi Andrew,
Correct! I was rushing to much to fix it and forgot to type in the hyphen. I have now corrected it. Thank you for letting me know.
Kind regards,
Emmet