In this guide, we will be showing you how to install and run CentOS on the Raspberry Pi.

CentOS is a Linux distribution that provides a free, community-supported operating system.
It is the free and open-source version of its upstream source, Red Hat Enterprise Linux.
CentOS is one of the most used operating systems for web hosting. One of the reasons for this is that each release has a very long support schedule. For instance, CentOS 7 was released in 2014 but will have continued support until at least 2024.
The long term support means you can continually run the same operating system for an extended period without having to do a full upgrade.
This allows you to maintain longer uptimes without worrying about packages becoming no longer supported as security and bug fixes are commonly backported.
Equipment
Below is the equipment that we used to install CentOS on to the Raspberry Pi.
Recommended
Optional
We tested this tutorial on a Raspberry Pi 4 and a Raspberry Pi 3B+.
For the Raspberry Pi 4, we were running the minimal version of CentOS. For the Raspberry Pi 3B+, we were running CentOS with the GNOME desktop interface.
Downloading CentOS for the Raspberry Pi
In this section, we will show you where you can download the official releases for CentOS on the Raspberry Pi.
1. To download CentOS for our Raspberry Pi, we will need to go to the official CentoOS website.
On this page you will find a list of CentOS mirrors, you can use any of these. However, the one at the top is typically the best mirror for your region.
2. Once you are on a CentOS mirror website, you will have a couple of choices to make.
The first choice you need to make is depending on what Raspberry Pi you are using. The Pi 4 only has access to the minimal version of CentOS.
Raspberry Pi 4
Sadly for the Raspberry Pi 4, you will have a limited choice on what version of CentOS that you can use.
On the mirror page, you need to find the minimal version of CentOS that contains the number 4 in its filename.
For example, the filename CentOS-Userland-7-armv7hl-RaspberryPI-Minimal-4-2003-sda.raw.xz contains the phrase “Minimal-4” within it.
This text indicates that it has support for the Raspberry Pi 4’s hardware. Other builds will not function on the Pi 4.
Raspberry Pi 3
If you are running a Raspberry Pi 3, then you have a few more choices in what version of CentOS that you can download.
You can download Centos 7 for the Raspberry Pi that contains the GNOME desktop interface.
This iso file will be named something like “CentOS-Userland-7-armv7hl-RaspberryPI-GNOME-2003-sda.raw.xz“.
Alternatively, you can download the minimal version of Centos 7 for the Raspberry Pi.
The minimal version of the OS does not feature a desktop interface, so it is best for those familiar with navigating an OS using the terminal.
This file will be noted by the text minimal in it, for example, CentOS-Userland-7-armv7hl-RaspberryPI-Minimal-2003-sda.raw.xz.
3. Once you have a copy of CentOS 7 downloaded to your device, we can now write it to an SD Card.
Writing CentOS to an SD Card
In this section of the guide, we will show you how to write the CentOS image to your Raspberry Pi’s SD card.
To write the image to the SD card, we will be making use of the BalenaEtcher software.
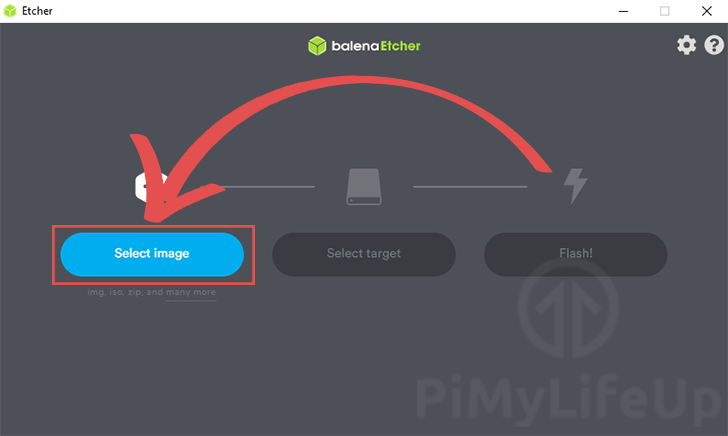
1. With Etcher opened on your device, click the “Select image” button.
Clicking this button will bring up a file dialog box that will allow you to select the CentOS image that you want to write.
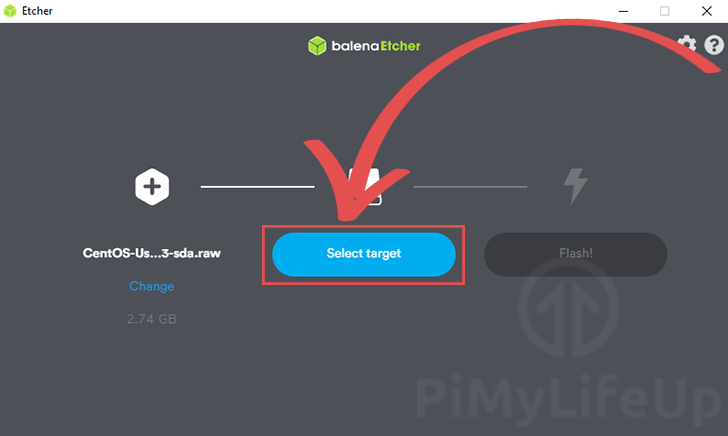
2. Next, we get to select the drive that we want to write the image to.
Click the “Select target” button to select the SD card to write the image to.
If you only have one compatible drive plugged in, the Etcher software will automatically select it.
3. To begin the process of flashing the image, click the “Flash!” button.
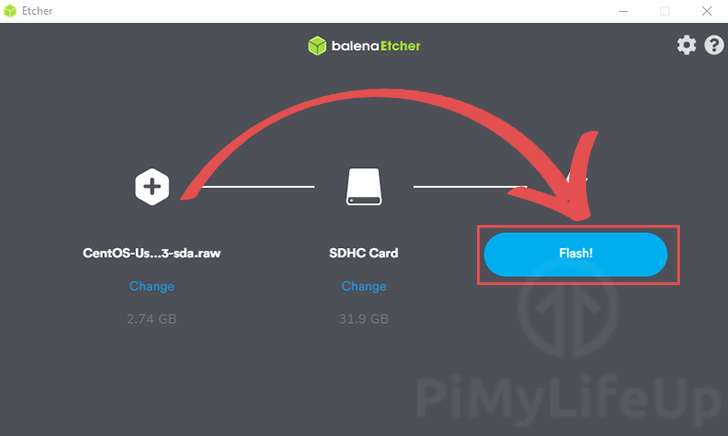
4. Once the image has been written to your SD card, you can plug it into your Raspberry Pi.
First boot of CentOS GNOME on the Raspberry Pi
In this section, we will walk you through your first boot of CentOS running the GNOME desktop interface.
If you are using CentOS minimal on your Raspberry Pi, be sure to skip to the next section.
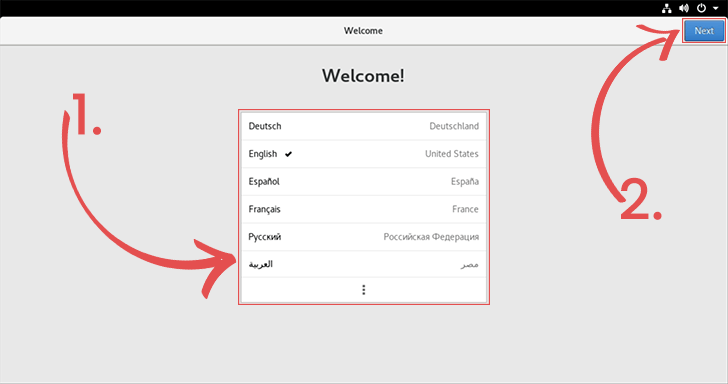
1. When you start up your Raspberry Pi, you will be greeted with the CentOS setup welcome screen.
You can select the language that you want to use for CentOS (1.).
Once you have a language selected, click the “Next” button in the top-right corner.
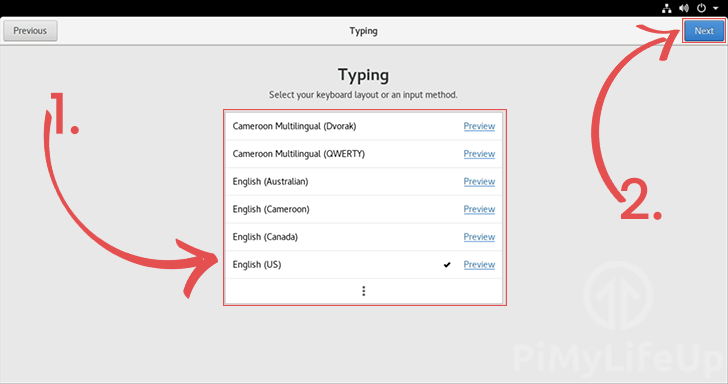
2. Next, you will be asked to select the keyboard layout (1.).
Make sure you select the correct layout; otherwise, you may run into issues with typing.
Once selected, click the “Next” button to proceed with the setup process.
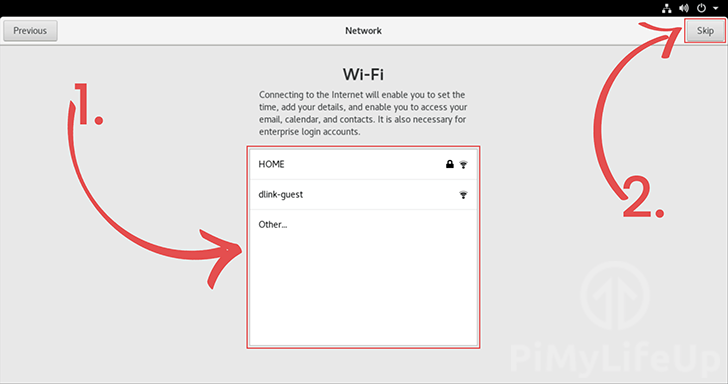
3. If you are not using an ethernet connection and need to connect to Wi-Fi, now is your chance.
Using the box here, you can select and connect to your Wi-Fi network (1.).
Alternatively, you can skip this step by clicking the “Skip” button.
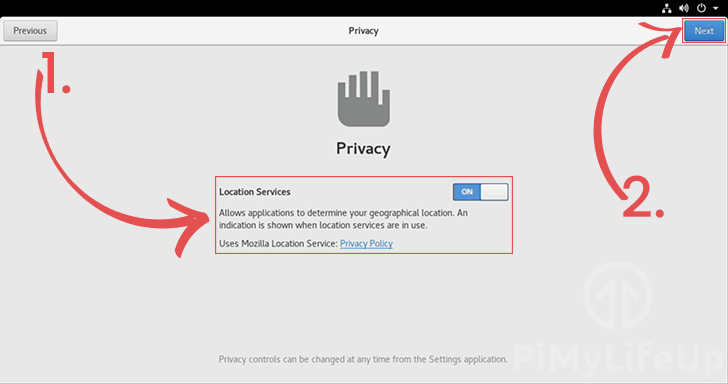
4. On this next screen, you can control some of the privacy settings of CentOS.
Currently, the only option you can switch on or off is the location services (1.). To disable the location services, you need to click the toggle.
Once you have made your selections, click the “Next” button to proceed (2.).
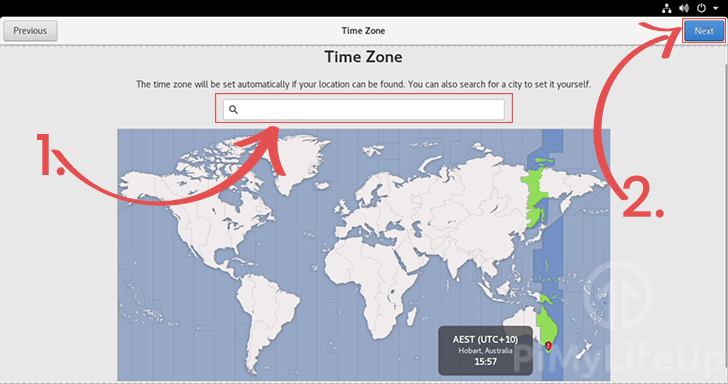
5. We can now select the timezone for your device.
CentOS will attempt to select this using your network connection automatically. However, if it has chosen the wrong timezone, you can use the textbox to search for your city (1.).
With the time zone selected correctly, click the “Next” button to continue(2.).
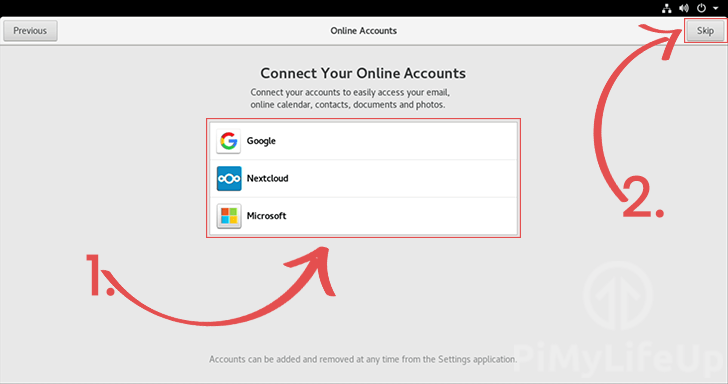
6. You can now connect any online accounts you might have to your CentOS installation (1.).
Connecting accounts allow CentOS to synchronize things like your email, calenders, or contacts to your device.
If you don’t want to connect any accounts, click the “Skip” button (2.).
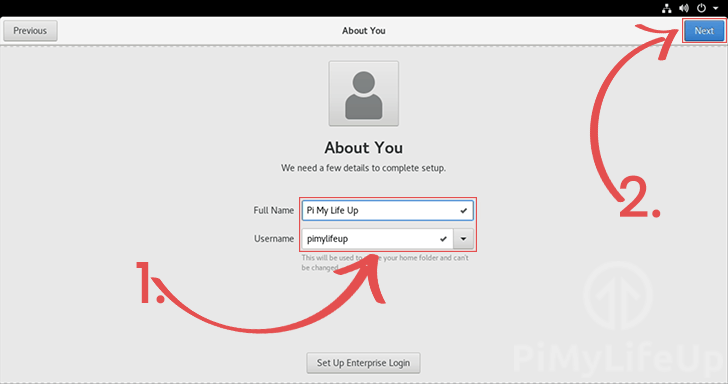
7. Finally, we can move on to setting up an account for CentOS on your Raspberry Pi.
Within this page, you can enter both a name and a username for your account (1.).
CentOS will automatically try to work out a username based on your full name. However, you can set your own.
Once you have a username and full name set, click the “Next” button (2.).
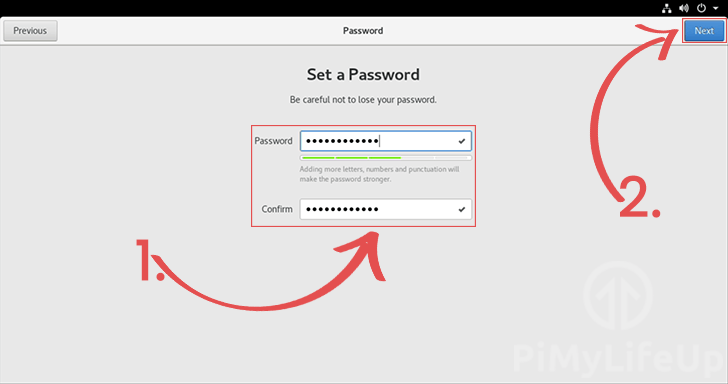
8. Our final task is to set a password for your new account.
Enter, then re-enter a strong password for this account (1.).
Once you have set a secure password, click the “Next” button (2.).
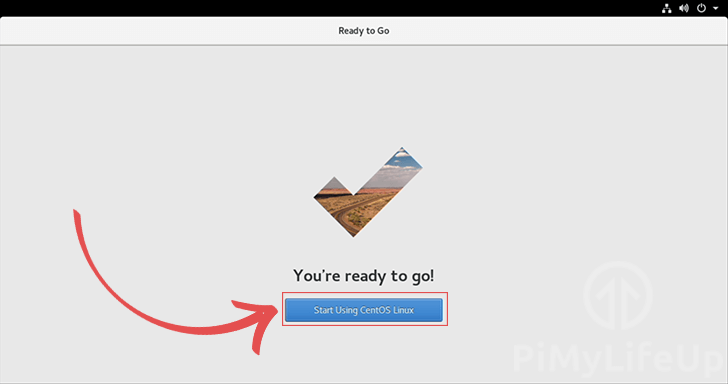
9. You have now finished setting up CentOS on your Raspberry Pi.
All you need to do to get to the desktop is click the “Start Using CentOS Linux” button.
10. You should now see the CentOS GNOME desktop interface.

First Boot of CentOS Minimal on the Raspberry Pi
This section will walk you through the short process of booting up CentOS minimal on a Raspberry Pi.
1. When you first boot up your Raspberry Pi running CentOS, you will be asked to log in.

The default user on your new CentOS installation is root.
The default password for the root user is centos. We highly recommend that you change this password once you have logged in.
2. To change the password for the root user, you can use the following command.
passwdMake sure you set the password to something secure as the root user has full access to all parts of the operating system.
3. You should now have the minimal version of CentOS up and running on your Raspberry Pi.
In our next section, we will quickly walk you through installing packages using CentOS’s package manager.
Using the Package Manager on CentOS
Unlike Raspberry Pi OS, which uses the apt package manager, CentOS makes use of yum.
yum is a package management tool that is very similar to apt.
Just like with apt, you can use this to install, update, and uninstall packages.
Installing Packages from the Repository with yum
Installing a package using yum is a very simple process.
All we need to do is reference yum followed by install, then the package name.
yum install PACKAGENAMEFor example, if we wanted to use yum to install git, you would run the following command.
yum install gitUsing yum to Uninstall Packages
Like installing a package, uninstalling one is also incredibly simple.
To uninstall a package, you need to reference yum, followed by remove than the package name.
yum remove PACKAGENAMEFor example, if we decided we wanted to remove the git package, we can use the command below.
yum remove gitUpdating Packages using yum
Updating all of the currently installed packages is a straightforward process.
All you need to do to update everything is run the following command with yum, followed by update.
yum updateIf you wanted to update a specific package instead of all of them, you could append the package name to the end.
For example, if we wanted to update git, we can type in the command below.
yum update gitHopefully, by this stage, you will now have a good understanding of how to install and use CentOS on the Raspberry Pi.
If you have run into any issues, feel free to leave a comment below.


I’ve found the GNOME install on my Pi 3B would keep rebooting after reporting it couldn’t find a network connection. The Minimal install worked well though, just don’t forget to run the “rootfs-expand” command to expand the default 1.9GB root partition to the size of the remainder of your sd card, otherwise you’ll have no room to do install anything, let alone updates. The GNOME environment can be installed on a minimal install using the command ‘yum group install “Server with GUI” ‘
Worked right the first time, using Raspberry PI 4 and the minimal install. Well done!
So why does the Raspberry Pi 4 have fewer options than the 3B+? I bought the 4 since it was supposed to have greater capabilities, but it doesn’t?
Hi Earl,
While the Raspberry Pi 4 is a more capable device it did also bring with it some architectural changes.
Support for the Pi 4 is still slowly increasing and will hopefully become more standardized in the short future.
Cheers,
Emmet