In this tutorial, we will show you how to run the image hosting service called PhotoPrism using Docker.
PhotoPrism is a self-hosted web application for hosting and organizing your photos.
It is similar to the popular Immich project in that it attempts to rebuild the same experience you would expect from a service like Google Photos, but you remain completely in control of your data.
Some of the core pieces of functionality that PhotoPrism includes is the ability to automatically classify your photos based on their content and location.
This self-hosted image service even supports almost any file format you throw at it, including RAW, JPEG, PNG, GIF, WebP, and more.
The one major caveat to self-hosting PhotoPrism is that not all its functions are available without paying. Some pieces such as improved gecoding, and vector graphics support are locked behind a paywall.
Despite this, PhotoPrism is still a great tool to self-host your images in a central location. It is also super easy to get up and running, as you will see over the following few sections.
Please note that when self-hosting this software, you should at least have 4GB of RAM as well as 4GB of swap space. The indexer can be super memory intensive and crash due to inefficient memory.
If you want to run this software on a Raspberry Pi, we have a dedicated guide for that hardware.


Setting up and Running PhotoPrism using Docker
Over the following few sections, we will show you how to set up and run PhotoPrism using Docker on your machine.
Preparing your System to Run PhotoPrism
1. Before setting up PhotoPrism, you must install Docker on your machine.
If you still need to install Docker, we highly recommend our guide on installing Docker on Linux.
https://pimylifeup.com/linux-docker-install/2. Once you have Docker installed, your next step is to create a directory to store the Compose file for PhotoPrism.
We will be creating this directory at “/opt/stacks/photoprism” using the mkdir command
sudo mkdir -p /opt/stacks/photoprismCopy3. After creating the directory, change into it by using the cd command.
We will need to be in this directory for the rest of this guide.
cd /opt/stacks/photoprismCopyDownloading the Docker Compose File for PhotoPrism
4. As the PhotoPrism team frequently changes their Compose file, we will download the current version to the directory using the wget tool.
This Compose file contains instructions for Docker on how to install and run the PhotoPrism container.
sudo wget https://dl.photoprism.app/docker/compose.yaml -O compose.yamlCopyConfiguring PhotoPrism
5. With the Docker Compose file for PhotoPrism saved to your system, you will want to open it up in your text editor to make some adjustments. You can configure numerous options within this file, but we will focus on two in particular.
To edit this file, we will use Nano as it is one of the easiest text editors to start with.
sudo nano compose.yamlCopy6. The first option we want to modify is the one that controls the default admin password for PhotoPrism’s admin panel.
Scroll through this file until you find the following line.
PHOTOPRISM_ADMIN_PASSWORD: "insecure"CopyAfter finding this line, you will want to swap out “insecure” with a password of your own. PhotoPrism requires you to set a password that is at least eight characters long when using Docker.
For example, if we were to set the password to “YOURPASSWORDGOESHERE“, the line would end up looking like the one we have shown below.
PHOTOPRISM_ADMIN_PASSWORD: "YOURPASSWORDGOESHERE"Copy7. The next vital option is the volumes you should mount to your PhotoPrism Docker container. This is important because it allows PhotoPrism to access any photos and videos on your system.
All sub-directories of the folder that you mount here will be able to be accessed by the container.
Scroll down through the Compose file until you find the example below. All volume mounting is located under the “volume:” label.
Let us quickly go over the syntax for defining a new folder for PhotoPrism to access.
/host/folder– This is the location of the folder on your host system that should be mounted to the Docker container.:– The colon symbol separates the host folder from the mount location within the container./photoprism/folder– On the right side of the colon you will specify where the folder should be mounted for PhotoPrism to access.
PhotoPrism expects all of its photo and video locations to start with “/photoprism/” so you will want to swap out “folder” with your mount name.
# "/host/folder:/photoprism/folder" # ExampleCopyFor example, if we wanted to mount our holiday photos located at “/mnt/holidayphotos” to “/photoprism/holidayphotos” we would add the following line underneath the “volumes:” header.
Another thing to remember is that this line must start with a hyphen (-) and the indentation must match.
- "/mnt/holidayphotos:/photoprism/holidayphotosCopy8. Once you have finished modifying the PhotoPrism Docker Compose file, you can save and quit out of Nano by pressing CTRL + X, Y, and then ENTER.
Starting up the PhotoPrism Docker Container
9. With the Docker Compose file now written and updated, all we need to do to start up the PhotoPrism container is to run the following command.
We use the “-d” option to detach Docker from the current terminal session. This allows PhotoPrism to continue to run in the background.
docker compose up -dCopyThis software is fairly large, so on a slow internet connection, this process can take a few minutes to complete.
Accessing the Web Interface
10. Now that you have PhotoPrism up and running, you will want to access its web interface.
If you don’t know the IP address of your machine, you can often use the hostname command to retrieve it.
hostname -ICopy11. Now within your favorite web browser, you will want to go to the following address to access this photo manager’s interface.
Ensure that you replace “<IPADDRESS>” with the device’s IP where you are hosting the software.
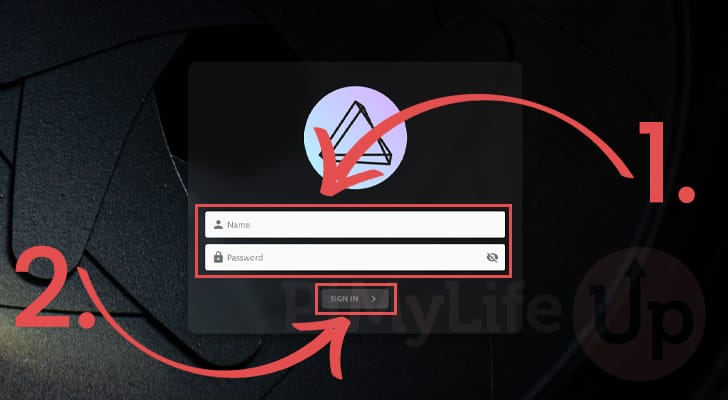
http://<IPADDRESS>:234212. The first time you load PhotoPrism, you must log in to the admin account.
The default username for this account is “admin“, and the password is the one you set within the Docker Compose file earlier in this guide (1.).
After filling out your login details, you can sign in to your account by clicking the “SIGN IN” button (2.).
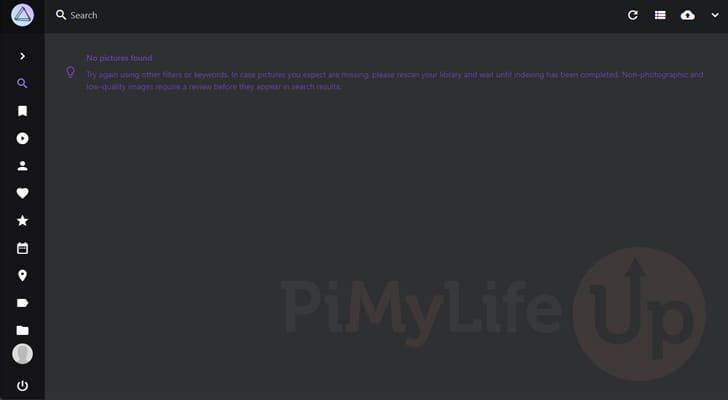
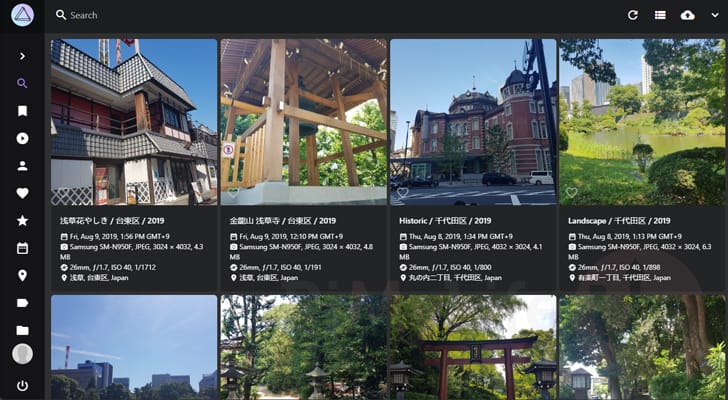
13. After you log in you will be greeted by the PhotoPrism web interface. If you are like us and don’t have any photos in your folders, you will be greeted by this empty screen.
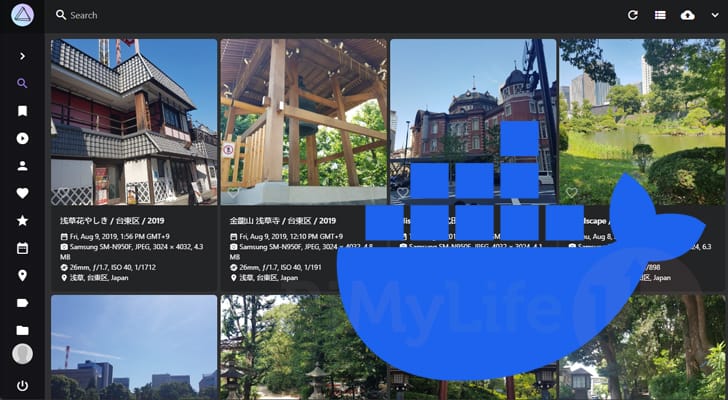
14. After uploading a few of our older photos to the PhotoPrism web app, it will all begin to come together.
Updating PhotoPrism using Docker
One of the key advantages of using Docker to self-host PhotoPrism is that updating to the newest release is usually a really simple process.
The next few steps will walk you through the simple way of updating to the latest version. These steps assume that the dev team has made no mandatory changes to the Compose file.
1. Your first step is to change to the directory where you wrote the PhotoPrism Compos file.
Assuming you followed our tutorial, you should be able to change it to the correct folder by running the following command.
cd /opt/stacks/photoprismCopy2. Using the command below, we can get Docker to pull the latest version of the PhotoPrism and MariaDB images.
Even if Docker downloads a new image, it won’t update your already running container.
docker compose pullCopy3. To get your PhotoPrism updated to the newly downloaded image, you only need to run the command below.
Docker will check over each container to see whether a new release has been downloaded. If a newer image is available, it will shut down the already-running container and start it again with the new image.
docker compose up -dCopyConclusion
By getting to this point in the guide, you should now have PhotoPrism installed and running using a Docker container.
Docker makes self-hosting software such as PhotoPrism a significantly simpler process as you don’t have to worry about setting up multiple different services. The whole update process has also been made much easier, and you don’t have to worry about your operating system breaking your image hosting.
Please feel free to drop a comment below if you have had any issues with getting PhotoPrism to run on your machine using Docker.
If you liked this tutorial, we highly recommend that you take some time to explore some of our many other Docker tutorials. A surprising number of applications can be hosted with just a few short steps.


I’m getting the following error when using
Hi Ron,
We have updated the tutorial, and the URL now points to the correct place. Thank you for lettings know!
Thanks for the great tutorial!
I’m stuck on step 9 however, I get an error that -d is unknown.
If I try without it tells me compose is not a command…
Any advice ?
Hi Liosha,
Please try following our guide on installing Docker.
Kind regards,
Emmet