In this tutorial, we will show you how to run Immich using Docker.
Immich is a self-hosted solution for backing up your photos and videos from your phone. It is designed to be a self-hosted alternative to services such as Google Photos and iCloud.
It has many features you expect from other services such as a useful web interface where you can easily browse and manage your photos and videos. Immich even has apps for both Android and iPhone.
You can even view additional information, such as where photos were taken (Assuming it has the correct metadata) and group photos based on facial recognition.
Immich is one of the most feature-packed self-hosted solutions for managing and uploading your photos, and thanks to Docker, it is also very easy to get up and running.
Using Docker to run Immich makes setting up this image backup solution a much simpler process. It also makes updating all of the various parts of this software as simple as running a couple of different commands.
We will be using the official Immich Compose file and Docker containers as they help ensure all the required services are up and running. They are also constantly updated when changes have been made to the core services.
Installing and Using Immich using Docker
Over the following sections, we will walk you through the simple steps of using the Immich Docker container on your device. Setting up this software is relatively easy, thanks to the way the Immich team provides their official Compose file.
These steps should work on almost all Linux-based systems that Docker supports.
Installing Docker on your Device
1. Before we can set up Immich in a Docker container, we must install the Docker runtime on our system. If you already have Docker installed, skip to step 2.
We have a really easy guide that walks you through installing Docker on a Linux system.
https://pimylifeup.com/linux-docker-install/Preparing your Device to run Immich using Docker
2. With Docker installed, we can start preparing your device to run the Immich Docker container.
Our first step is to create a directory where we will store the Compose and environment files for Immich.
sudo mkdir -p /opt/stacks/immichCopy3. You will now want to change to the directory we created by running the command below.
cd /opt/stacks/immichCopyGrabbing the Docker Compose file for Immich
4. Since Immich has quite a large Compose file, we will download the one attached to the latest release.
This file basically has everything we need set up. We just need to feed in information using the ".env” environment file.
Download this Compose file by using the following command in your terminal.
sudo curl -Lo compose.yaml https://github.com/immich-app/immich/releases/latest/download/docker-compose.ymlCopyConfiguring the Environment File for Immich using Docker
5. Our next step is to grab the example environment file for Immich’s Docker container.
You can grab this example file and store it as a file called “.env” by running the command below.
sudo curl -Lo .env https://github.com/immich-app/immich/releases/latest/download/example.envCopy6. With the example environment file now saved, we will need to modify it so the Immich Docker container will save files to where you want on your system.
You should have an idea of where you want all of your photos and videos to be stored before continuing.
Once you are happy to proceed, begin editing the “.env” file by using the following command.
sudo nano .envCopya. The first option in this file is where you will specify where your images and videos are backed up to on your device.
Replace “./library” with the path to where you want your images and files stored by Immich.
UPLOAD_LOCATION=./libraryCopyb. The next option you might want to adjust is the “IMMICH_VERSION“. You can change “release” to pin to a specific version of the Immich Docker container.
For most users, you are better off leaving this set to “release“. Leaving this set to release means you will always get the latest tagged release.
IMMICH_VERSION=releaseCopyc. The final option you must set is the DB password. Replace “postgres” with a unique password of your choosing.
Ensure this is secure, as it is the password Immich will use to communicate with the Postgres database that is being set up within the same Compose file.
DB_PASSWORD=postgresCopy7. After making changes to the file, save and quit by pressing CTRL + X, Y, then ENTER.
Starting Immich using Docker
8. With the Compose and environment files now written, you can start up your Immich Docker container by using the following command.
This process can take a few minutes as Docker must download Immich and its various components.
docker compose up -dCopyAccessing the Immich Web Interface
9. To access your Immich web interface, you will want to know the IP address of your machine.
You can get your machine to output its assigned IP address by using the hostname command. On a home network this is typically a local IP address such as “192.168.0.123“
hostname -ICopy10. Once you know your IP address, you will want to go to the following URL in your favourite web browser.
Ensure that you replace “<IPADDRESS>” with your IP.
http://<IPADDRESS>:2283First Time Setup Experience
11. The first time you access the Immich web interface, you must go through some initial setup steps.
To get started with this initial setup, click the “Getting Started” button.

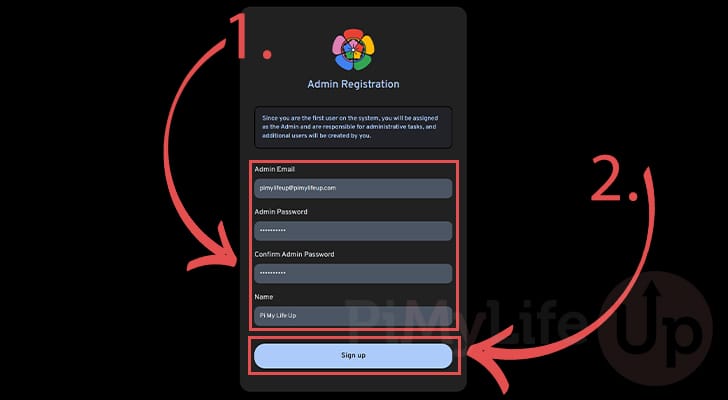
12. Your first step is to create an admin account that you will use to manage your Immich Docker installation.
Fill out the details for your account (1.). Ensure you set a secure password, as this will give someone full access to your installation.
After filling out the details for your account, click the “Sign up” button (2.).
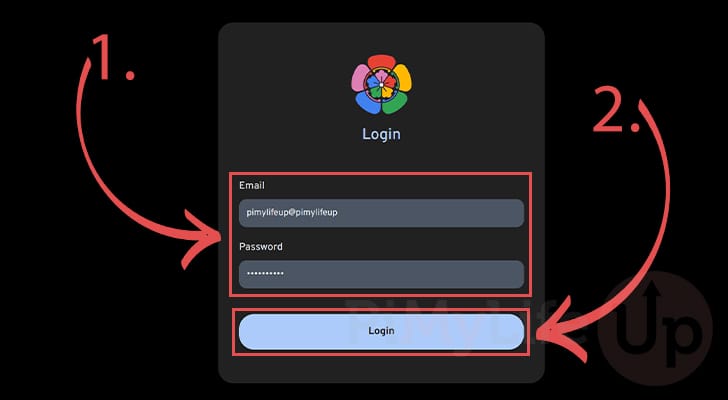
13. After creating your account, you will need to log in to proceed. Fill in the email and password you set in the previous step (1.).
Once you have typed out your username and password, click the “Login” button (2.).
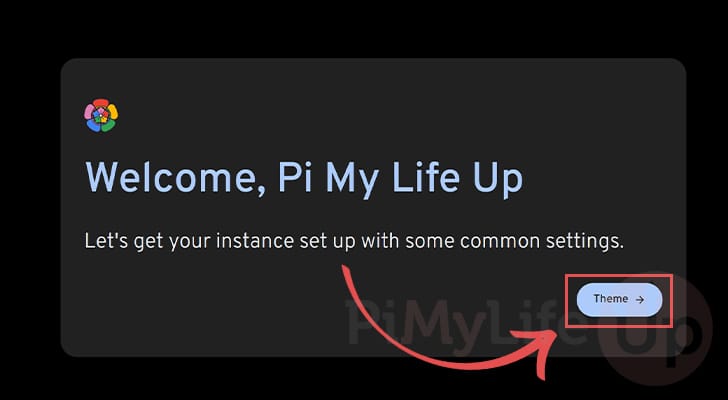
14. You will now see a welcome screen and a message saying you need to set up some common settings.
To continue with the setup process, click the “Theme” button.
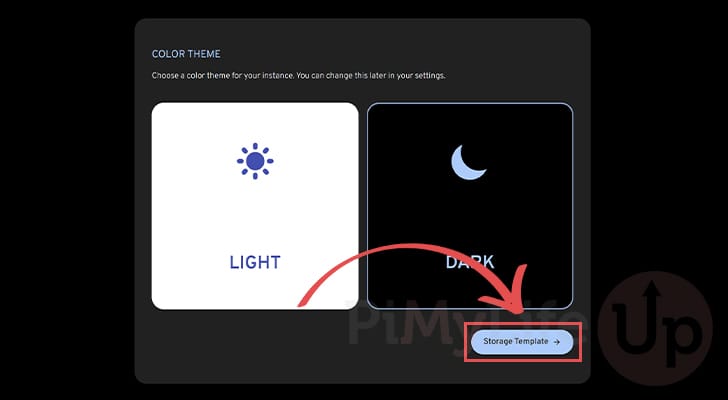
15. This first setting allows you to choose whether to use a light or dark theme with Immich.
Select whichever theme you prefer, then click the “Storage Template” button.
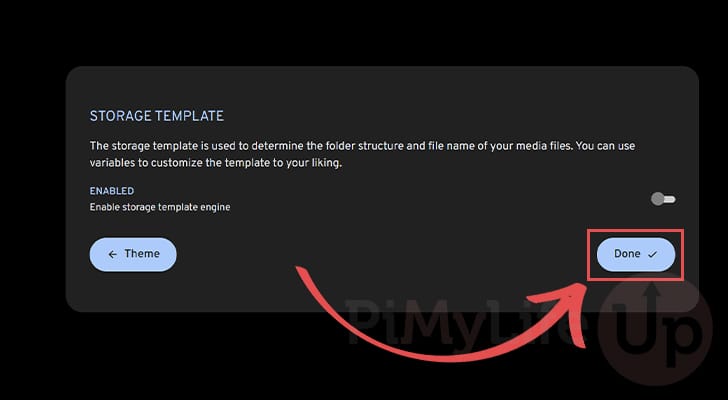
16. Within this next screen, you can set up a storage template. The storage template tells Immich how you handle the images and videos you upload.
Before proceeding, we highly recommend reading the official documentation on storage templates.
After working out whether you need to set up a storage template, click the “Done” button to continue.
17. At this point you now have Immich successfully running through a Docker container.
You can now browse the web interface and learn how it works.

Updating your Immich Docker Container
Since we are using a Docker container to run Immich, keeping the software up to date is a relatively straightforward process.
This section will walk you through updating your version of Immich to the latest stable release.
1. We first need to change to the directory where we saved the Docker Compose file for Immich.
You can change to this directory by using the following command.
cd /opt/stacks/immichCopy2. After changing to the right directory, you can get Docker to pull the latest version by running the command below.
Docker will scan the Compose file and pull new images for each container specified within the file.
docker compose pullCopy3. If Docker downloaded a new version, you only need to run the command below to upgrade to it.
Running this command will detect if any changes have occurred and restart your containers using the new version of the images.
docker compose up -dCopyConclusion
You should now have the Immich photo and backup solution up and running on your device.
This software allows you to easily upload all your photos to a single location while providing many smart features offered by cloud solutions like Google Photos and iCould.
Please leave a comment below if you have issues getting Immich to run using the Docker container.
If you found our tutorial to be helpful, we recommend checking out our many other tutorials.


Thank you for the tutorial! it helps me to make it work.
Hi,
Has anyone noticed that Immich crashes after uploading no more than 10 files, photos, or videos? It seems to be related to thumbnail generation or possibly the facial recognition process. When I installed Immich about 6 months ago, everything worked smoothly! I don’t know what has changed in the latest Docker images.
Has anyone else experienced something like this?
Greetings from Mexico!
Thank you for a great tutorial to get Immich up and running.
I did notice when using docker compose up -d that it states the DB_USERNAME variable is not set and that the immich_postgres container state is set to unhealthy.
Immich is running nicely but is the postgres issue something that needs to be resolved?
Many thanks for your help and feedback.
Hi Ken,
That is definitely a strange issue. Could you double check the contents of your “.env” file to ensure that the DB_USERNAME variable is still set within it?
Kind regards,
Emmet