In this tutorial, you will learn how to search for files within the terminal by using Linux’s find command.

The find command is an incredibly powerful and flexible tool that is crucial in administrating your Linux system.
You can use the find tool to search for files and directories within your system using a specified expression.
You can even search for files based on their specifies properties. For example, you can search for a file based on the permissions that have been set to it, or the owner, or file size.
Even more interesting, you can use find on Linux to execute actions on every file that your expression matches against.
This guide will walk you through some of the various ways to use the find tool on your Linux system.
The Syntax of the find Command on Linux
Let us start by quickly going through the syntax of the find command on Linux.
find [OPTIONS] [PATH..] [EXPRESSION]CopyAs you can see, the syntax for the tool is relatively simple. The main two things that you need to know are the path and expression.
The expression is one of the most important parts as it is how you control what the find tool finds within the specified directory.
One thing to note is that the order of your expression does matter. For example, if you wanted to execute a command, it should be located at the end of your expression. Otherwise, it will fire before a match event occurs.
Find Files on Linux by Filename
The most common way to use the find command within the Linux terminal is to search for files based on their filename.
To search for files this way, you will want to use the find commands “-name” option. This option allows you to perform a case-sensitive search of your Linux systems files.
Using the name option, you can specify the name of the file you are searching for on your system.
Below you can see the basic syntax for using the find command to search for files based on their name. With this syntax you would specify your filename where “EXPRESSION” is written”. You will also specify the directory where “DIRECTORYTOSEARCH” is located.
find <strong>DIRECTORYTOSEARCH</strong> -name <strong>EXPRESSION</strong>CopyUse the Find Command to perform a Case-Insensitive File Search
It is also possible to use the find command on Linux to perform a case-insensitive search. Instead of using “-name” you would use the “-iname” option instead.
Both use the exact same syntax. One option is case-sensitive (-name), and the other option is case-insensitive (-iname).
find <strong>DIRECTORYTOSEARCH</strong> -iname <strong>EXPRESSION</strong>CopyUsing Wildcards in your Search
The find tool even has support for wildcards so you can look for files containing part of a filename. These wildcards can be placed at the start or end of your expression.
This tool interprets the asterisk (*) symbol as the wildcard. For example, if you wanted to look for a filename that contains a particular string you would put a wildcard at the start and end of the expression.
find <strong>DIRECTORYTOSEARCH</strong> -name <strong>*EXPRESSION*</strong>CopyFiltering by File Type with the Linux Find Command
The find command on Linux allows you to filter its results by the file type. This is super useful if there is a particular type of file you are searching for.
To specify the type of file to search for, you will need to utilize the “-type” option and a letter that designates the file type.
find <strong>DIRECTORY</strong> -type <strong>FILETYPE</strong>CopyYou can use the list below to see the different file types you can specify and the letters representing that type.
f– Regular Filed– Directoryl– Symbolic LinkP– Named pipe (FIFO)b– Block (buffered) special)c– Character (unbuffered) special)s– SocketD– Door (Solaris)
From this list, the first two are the ones you are likely to use the most, those being searching for regular files (f) and directories (d).
Only Searching for Files with Find
For our first example, we will use the -type option to list the files (f) within our directory.
find /home/pimylifeup/example -type fCopyUsing this on our example directory, it will return all of the files inside it.
Searching for Directories on Linux using the Find Command
For our second example, let us try the same command as our last example, but instead of searching for files, we will search for directories.
This means that instead of using the “f” letter alongside the “-type” option, we will be using the letter “d“.
find /home/pimylifeup/example -type dCopyThis time instead of seeing all of the files located within the example directory, you will only see the directories.
Performing a Case-Sensitive Search
For our first example, we will be performing a case-sensitive filename search for a file called “pimylifeup.png“.
As we are performing a case-sensitive search, we need to use the “-name” option.
find /home/pimylifeup/example -type f -name pimylifeup.pngCopyBy running this command, the find tool will search for our directories till it finds any files with the name “pimylifeup.png“.
If there is a file called “PiMyLifeUp.png” the find command will not match it as the cases do not match.
Performing a Case Insensitive Search
Alternatively, if you don’t care if the filenames match precisely, it is possible to perform a case insensitive search with the find tool on Linux.
Instead of using the “-name” option, we will be using its alternative, “-iname“.
This time we will be searching for a file called “pImYlIFeuP.png“.
We used a mixed case as we know from our example directory that no file would have that exact casing.
find /home/pimylifeup/example -type f -iname pImYlIFeuP.pngCopyThe find command will still find a file called “pimylifeup.png” despite the filename we were searching for being “pImYlIFeuP.png“.
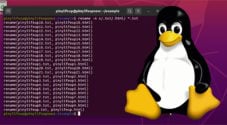
Using a Wildcard to Perform a Filename Search
The find tool on Linux allows you to use wildcards (*) within the filename. This is especially useful if you want to find files by their file extension.
For this example, let us find all files within our example that are a “.txt“. To perform this search, we will use the asterisk (*) followed by “.txt“.
find /home/pimylifeup/example -type f -name *.txtCopyFrom running this command with our sample data, you can see that it found and listed all files with the “.txt” extension.
Using the Find Command to Search by File Size
Another ability of the find tool on Linux is to search for files based on a specified size.
To specify a file size, you will need to use the “-size” option. It has a straightforward syntax and can be used alongside other options.
find <strong>DIRECTORY</strong> -size <strong>FILESIZE</strong>CopyThis option is very simple to use and even has suffixes you can use, so you don’t have to specify the size just in bytes.
b– 512-byte Blocks (Default if nothing is specified)c– Bytesw– Two-byte Blocksk– KilobytesM– MegabytesG– Gigabytes
You can even search for sizes greater than (+), or less than (- your specified value by using the minus or positive symbols in front of your number.
Searching for a Specific Sized File
To use the find command on Linux to search for a file with a specific size, all you need to do is use the -size option followed by the file size.
For this example, we want to find a file with the size of 22 Megabytes. As we are using megabytes, we will be using the letter M suffix.
find /home/pimylifeup/example -size 22MCopyList Files Greater Than Size
Using the plus symbol (+) as a prefix to your file size, you can tell the find tool to find files greater than the size.
For example, if we wanted to find all files larger than 13 Megabytes, we would use the size “+13M“.
find /home/pimylifeup/example -size +13MCopyFind Files Less Than a Specified Size
Likewise, there is also the functionality to check for files smaller than the specified size. To do this, you will need to utilize the minus symbol (-) as a prefix.
For example, if we want to use the find command to search for all files that are less than 13 Megabytes, we would down the size as “-13M“.
find /home/pimylifeup/example -size -13MCopyFind Files In Size Range
You can string multiple size parameters together so that you can find files within a certain size range.
For example, if we wanted to find all files between 12 Megabytes and 22 Megabytes, we need to use two size options.
The first option should be the smallest size we are looking for. So in our example, this will be set to “+12M“.
The second option needs to be the largest file size you are searching for. This means, for our example, we will set this option to “-22M“.
find /home/pimylifeup/example -size +12M -size -22MCopyFind Files by their Modification, Access, or Change Time on Linux
Another useful function of the Linux find command is to search for files based on when they were last modified, accessed, or changed.
In Linux, there are three different time stamps for every file. These are used to record the last time someone performed an operation on the file.
The option differs slightly depending on what operation you want to check for. Below we have listed out the three options and examples of how they are used.
-atime– This option lets you find files based on their last access time.
A file is considered to be accessed whenever its contents have been read.-mtime– By using this option, you can use find to search for files based on when they were last modified.
Linux considers files to be modified once the contents of the file have been changed.-ctime– We can use this final option to find files based on when the file’s attributes have been modified.
The changed time should not be confused with the modification time. A file is considered changed when that file’s metadata has been modified.
For example, when you change the file’s permissions, the changed timestamp will be updated.
As all of these options are used in the same way, we will be focusing on using find to search for files based on their modification date.
The basic syntax for these options is the following. The value for these options is the exact number of days since that file was modified, changed, or accessed.
find DIRECTORY -mtime DAYSSINCEMODIFIEDCopyThis option also supports the less than (-) and greater than (+) operators.
Using these operators, you can find files that were last modified later or earlier than the number of days you specified.
Searching for Files Modified on a Certain Day
The simplest way to use the modified options is to specify the exact number of days it has been since that operation occurred.
Of course, you will need to know how many days ago this action occurred for this to work.
For example, if we wanted to find a file that was modified 7 days ago, we will use the “-mtime” option alongside the number 7.
find /home/pimylifeup/example -mtime 7CopyAfter using this find command on your Linux system, it will search the directory you specified, looking for any file that has a modified date 7 days ago.
While simple to use, knowing exactly when a file has been operated on isn’t the most straightforward task. Luckily the find command allows us to have a bit more control.
Find File Modified After
To find files modified after the specified number of days, you will need to use the plus sign (+) prefix.
For example, if we wanted to use the find command to search for files modified later than five days ago, we would use “+5“.
find /home/pimylifeup/example -mtime +5CopyThis command on Linux will search the specified folder, finding all files with a modified timestamp later than five days ago.
Find Files Modified Before
Likewise, you can also find files that have been modified before a certain number of days by using the minus symbol (-).
To show you this, let us use this to find files created in the last 4 days. We need to use the number four, prefixed with the minus symbol like “-4“.
find /home/pimylifeup/example -mtime -4CopySearch by Modified in Day Range
With the find command on Linux, you can combine multiple options to find files modified between two separate dates.
For example, if we wanted to find a file that was created between 12 and 30 days ago, we can string these together.
For files created later than 12 days ago, we would need to use the option “-mtime +12“. If we only want files created before 30 days ago, we will use the option “-mtime -30“.
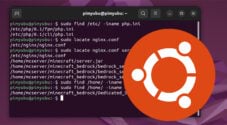
find /home/pimylifeup/example -mtime +12 -mtime -30CopySearching for Files by Owner on Linux
Using the find command on your Linux system, you can specify what user or group owns the files you are looking for.
To search for files based on the user that owns it, you will need to use the “-user” option followed by the username.
find DIRECTORYNAME -user USERNAMECopyFinding a file based on the group that owns it is very similar. You need to use “-group” followed by the name of the group.
find DIRECTORYNAME -group GROUPNAMECopyFind Files Based on Set Permissions
The find command on Linux has the functionality to search for files that have particular permissions set.
There are numerous cases where this could be very useful, especially when it comes to ensuring someone hasn’t set the folder’s or file’s permissions to 777.
To find files based on their set permissions, you will need to use the “-perm” option, followed by the numerical permission.
find DIRECTORY -perm NUMERICALPERMISSIONCopyTo give you more fine-grained control, you have two operators that you can prefix to your permission.
The first is the forward-slash symbol (/). The slash symbol tells the find command that only one of the three permission bits must be set for a file to be matched.
find DIRECTORY -perm /NUMERICALPERMISSIONCopyThe second is the minus symbol (-). With the minus symbol set, then at least the permission bits specified must be set.
find DIRECTORY -perm -NUMERICALPERMISSIONCopyFor example, if you search for “-111“, all permission groups must have the execute permission for the file to be matched.
Execute Command on Found Files using the Find Command
One of the most powerful features of the find command on Linux is that it can execute a command on the files it finds.
To execute a command on every found file, we need to use the “-exec” option followed by the command you want to execute.
find DIRECTORY -exec COMMAND RESULTPLACEHOLDER DELIMITERCopyResults Placeholder
To pass in the full pathname to the command you are executing, you will need to use two curly brackets (“{}“).
The find command will automatically replace these braces with the pathname of the found file. You can use this placeholder as much as you want within a single command.
For example, if we were to run “chmod” on all files within our directory, we can use a command like we have below.
find /home/pimylifeup -type f -exec chmod 644 {} \;CopyFrom this example, you can see that we pass the full pathname of the found file by using the two brackets.
Delimiters
The end of the execute option must have a delimiter. The delimiter tells the find command where the -exec option ends and how it should handle the returns results.
The find command on Linux has two different types of delimiters that you can utilize, both with slightly different use cases.
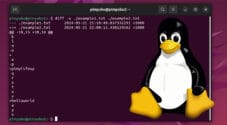
The Semicolon Delimiter
The first is the semicolon (;). The find tool will execute the “-exec” command on each individual found file separately when using the semicolon.
This delimiter needs to be escaped with a forward slash (\), so the interpreter doesn’t misinterpret it.
For example, if we wanted to echo out the pathname for every found file, we would use a command like the following.
find /home/pimylifeup/example -type f -exec echo {} \;CopyYou can see how this command works and how the echo command is fired individually for each found file.
/home/pimylifeup/example/subdir1/treeexample.png
/home/pimylifeup/example/subdir1/subsubdir2/tutorial.js
/home/pimylifeup/example/subdir1/subsubdir2/subdir3/raspberrypi.png
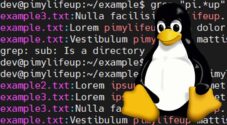
/home/pimylifeup/example/subdir1/subsubdir2/subdir3/helloworld3.cppCopyThe Plus Sign Delimiter
The alternate delimiter you can use with the find command on Linux is the plus symbol (+).
This symbol will tell the find command to join together all of the results from the find command before executing the command.
This means that the execute command will only be fired once and sent a list of the found files, each filename being separated by a space.
For example, let us try our echo command again, but this time using the plus symbol (+) delimiter.
find /home/pimylifeup/example -type f -exec echo {} +CopyYou can see the difference in behavior between the two delimiters with the example results that we have below.
/home/pimylifeup/example/subdir1/treeexample.png /home/pimylifeup/example/subdir1/subsubdir2/tutorial.js /home/pimylifeup/example/subdir1/subsubdir2/subdir3/raspberrypi.png /home/pimylifeup/example/subdir1/subsubdir2/subdir3/helloworld3.cppCopyConclusion
Hopefully, you now have a solid understanding of how you can use the find command on your Linux system.
The find command is one of the most powerful tools in your arsenal when managing your device.
Not only can it be used to search your system for files, but it can also be used to run commands on every file it finds.
For example, you can use this as an easy way to fix up permissions for files and directories.
If you have had any issues with the find command, please leave a comment below.
Be sure to check out some of our other Linux tutorials to see what else you can do on your system.