In this tutorial, we will be showing you how you can easily set up and run Tailscale on Ubuntu.
Tailscale is an easy-to-use software that enables you to easily set up a virtual private network without requiring any configuration.
In addition to requiring little to no configuration, Tailscale is really easy to install on Ubuntu. The team provides a package repository so you can ensure that you are always running the latest version.
The only downside of using Tailscale to set up and maintain your VPN network is that you rely entirely on their control servers. These servers help facilitate the connection between your Ubuntu device and any other device on your network. You can read up more about how exactly Tailscale work by visiting their website.
Thanks to how Tailscale works on your Ubuntu system, you don’t even have to open up ports in your firewall or play around with port forwarding. It achieves this through various techniques that allow it to traverse your network.
This service can be a great way to allow others to connect to game servers running off your machine. For example, if you had a Minecraft server running you could get people to join your Tailscale network rather than having to open up ports. It will also work well if you happen to use an ISP that uses CGNAT and doesn’t give you your own dedicated IP address.
The steps shown below should work on any version of Ubuntu you are using. We last tested this on Ubuntu 22.04 and 24.04.


Installing and Running Tailscale on Ubuntu
In the following sections, we will walk you through the very simple steps to installing Tailscale on the Ubuntu operating system.
For these steps, we will be utilizing the terminal. If you are running a desktop variant of Ubuntu, you can open the terminal by pressing CTRL + ALT + T on your keyboard.
Signing up for a Tailscale Account
1. For Tailscale to work on Ubuntu, you must sign up for a Tailscale account.
This is because Tailscale’s servers help establish connections. They help exchange the keys that allow each device to connect to each other. While you could avoid this by using a self-hosted control server such as Headscale, that is not something we will be covering in this guide.
You can sign up for a Tailscale account by going to the following address.
https://login.tailscale.com/startPreparing Ubuntu for Tailscale
2. Before we install Tailscale on your Ubuntu system, there are a few things we will need to do.
The first task is to ensure that our Ubuntu system is up to date by running the following two commands. The first command will update Ubuntu’s package list cache. The second will upgrade any out-of-date packages.
sudo apt update
sudo apt upgrade -yCopy
3. Once the system is updated, we must ensure that the “curl” and “lsb-release” packages are installed.
We will be using these packages to pull and download the Tailscale GPG key.
sudo apt install curl lsb-releaseCopyAdding the Official Tailscale Repository
4. Our next step is to download the official Tailscale repository GPG key to your Ubuntu machine. You can save this key by running the following command.
This GPG key is used to verify that the packages you are installing were actually from Tailscale’s repository and not a third-party attacker.
curl -fsSL https://pkgs.tailscale.com/stable/ubuntu/$(lsb_release -cs).noarmor.gpg | sudo tee /usr/share/keyrings/tailscale-archive-keyring.gpg >/dev/nullCopy5. With the GPG key now saved to our system, we can safely add the Tailscale package repository to our sources list by using the command below in the terminal.
curl -fsSL https://pkgs.tailscale.com/stable/ubuntu/$(lsb_release -cs).tailscale-keyring.list | sudo tee /etc/apt/sources.list.d/tailscale.listCopyInstalling Tailscale on Ubuntu
6. Since we changed our available package repositories, we must perform an update before we can install the latest version of Tailscale.
You can update the package list cache by using the command below.
sudo apt update7. Once the is complete, all you must do to install Tailscale on Ubuntu is run the following command.
Tailscale is relatively small, so the installation process shouldn’t take very long to complete.
sudo apt install tailscaleCopyStarting Tailscale on Ubuntu
8. With Tailscale installed, we can now connect our Ubuntu machine to the Tailscale network.
To start Tailscale, you only need to use the following command within the terminal.
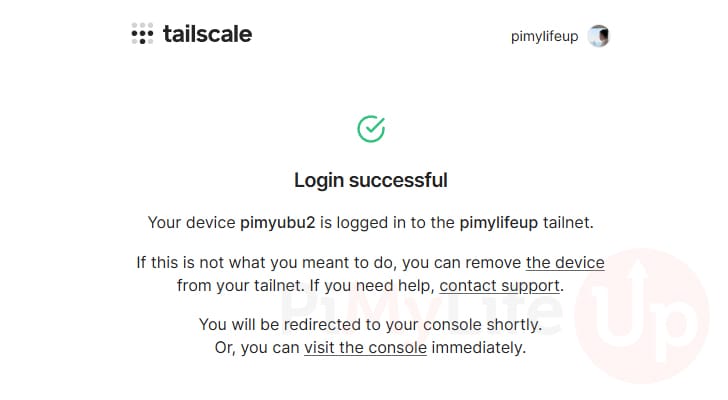
sudo tailscale upCopyBefore Tailscale can connect to the wider network, you must authenticate and claim your machine. You can begin this process by going to the URL currently displayed in your terminal.
To authenticate, visit:
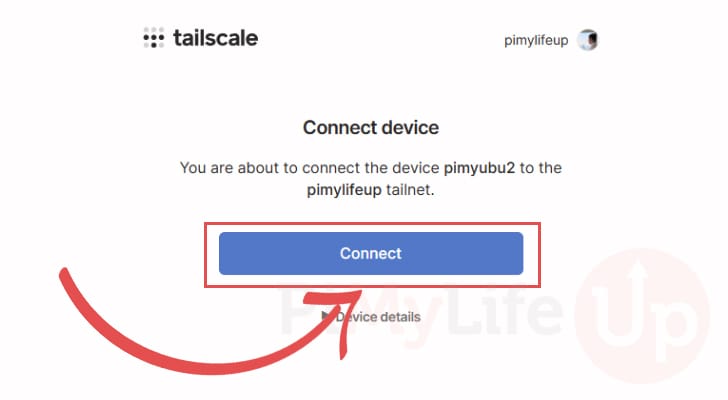
https://login.tailscale.com/a/XXXXXXXXXXXXXXX9. After logging in to your account, you will be prompted with a screen asking you to connect a device.
Verify that the device hostname looks correct. If the device you are connecting is correct, click the “Connect” button.
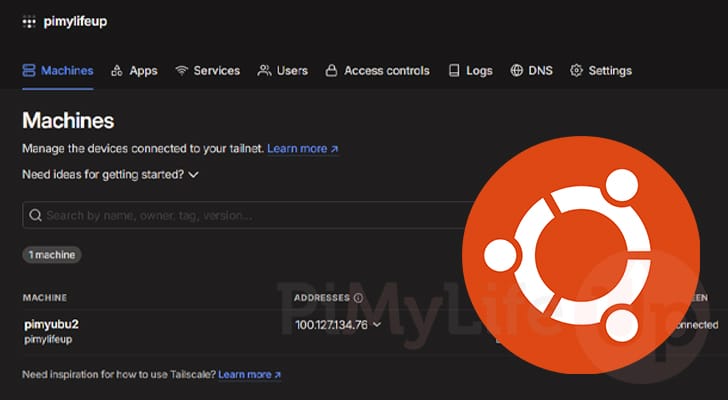
10. Your Ubuntu machine is now connected to your private Tailscale network. It will be able to connect to and talk with any other devices that you have connected to your network.
After a few seconds, you will be taken back to the Tailscale dashboard, where you can easily manage the devices that you have added to your network. It is even possible to stop the private key from expiring through this web interface which is a crucial step if you are using this on a server
11. If you look back in the terminal on Ubuntu, you should see that the Tailscale program has exited, and the last message should have been “Success.”.
This indicates to you that your machine is now communicating with Tailscale.
Success.Getting your Tailscale IP Address on Ubuntu
12. Every machine you connect to Tailscale is assigned its own IPv4 and IPv6 address. These addresses can only be used to connect to a machine if the other device is a part of the same Tailscale network.
Using the command below, you can get Tailscale to output the IPv4 address that has been assigned to your Ubuntu machine.
tailscale ip -4CopyBelow is an example of what the IP address might look like.
100.127.XXX.XX13. As mentioned before, Tailscale gives you both an IPv4 and IPv6 address. You can tell Tailcsale to output the IPv6 address by running the following command in the terminal.
tailscale ip -6CopyYou can see an example of what an IPv6 address might look like by looking below.
fd7a:XXXX:XXXX::XXXX:XXXXConclusion
Hopefully at this point in the tutorial you should now have successfully installed Tailscale and have it connected to your own private Tailscale network.
Tailscale is a great way to create a virtual private network between numerous devices easily. Its control server makes dealing with multiple devices a breeze and saves the hassle of sharing public and private keys between devices.
Please feel free to comment below if you have had any issues with installing Tailscale.
If you liked this tutorial, we recommend that you explore our list of Ubuntu projects.