This tutorial teaches you how to install and use rsync on the Ubuntu operating system.
Rsync is short for remote sync and is a handy tool for synchronizing files and directories over a network. It can also easily synchronize files on a local machine.
It is an excellent tool because it has many built-in features that help maintain file integrity when synchronizing. Additionally, it can lower the amount needing transferring as it supports only sending the changed data.
It is also a great way to create backups of your Ubuntu system because it can verify the files as it synchronizes them.
On top of being great for synchronizing files on Ubuntu over a network, it also has its uses when synchronizing files locally. While you could use the cp command, the Rsync tool has a few advantages. One of those advantages is that it will only copy the updated parts of a file rather than the entire file.
The following sections will show you how to install and use the rsync tool on your Ubuntu machine.
Installing Rsync on Ubuntu
Before you can utilize Rsync, you must install it to your Ubuntu operating system.
Luckily, as Rsync is available through the official package repository, installing this software is a breeze.
1. Your first step is to update the package list cache by running the command below in the terminal.
If we don’t do this there is a chance you run into an error when you go to download the package.
The package list cache keeps track of all the packages you can install and where they can be downloaded.
sudo apt updateCopy2. After updating the package list cache, you can now install rsync to your device.
Installing this file synchronizing tool is as simple as using the following command within the terminal.
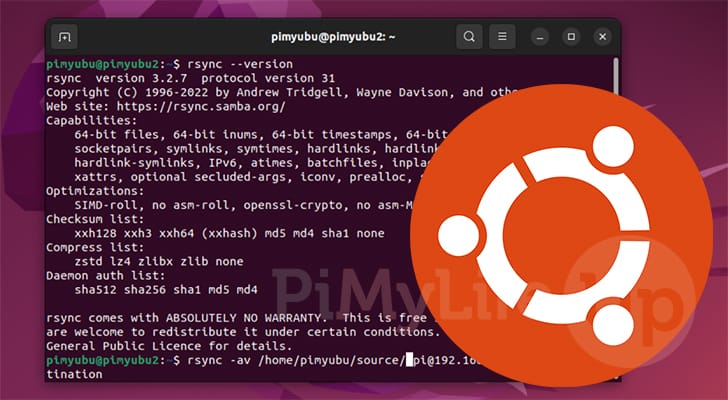
sudo apt install rsyncCopy3. You can verify that rsync is now installed on your Ubuntu system by getting it to output its version number
To get the version number, run rsync using the “--version” option as shown below.
rsync --versionCopyAt the top of the output, you should see something like the following.
rsync version 3.2.7 protocol version 31Using Rsync to Synchronize Directories on Ubuntu
Rsync is a powerful tool for your Ubuntu system. This section will cover how to use it, the syntax of the command, and its various options.
Basic Syntax of the Rsync Tool
Rsync is a very easy tool to use, which has made it a popular choice for copying files remotely between two locations.
Below is the syntax for using this tool on your Ubuntu system. The main thing you need to remember is that the source is specified first and the destination second.
rsync [OPTIONS] SOURCE... DESTINATIONBefore we proceed, let us quickly go over each of the parameters and what they are used for.
[OPTIONS]: The options parameter allows you to control how the Rsync tool operates. We will cover some of the important options you should use when using Rsync on your Ubuntu system.
If you don’t specify an option, rsync will fall back to default values.SOURCE: The first value is the location of the file or folder that you want to copy. This can be a local or remote path.
You can specify as many sources as you want but you can only specify a single destination.DESTINATION: The second required value is where you want this file or folder to be synchronized. Like the source, this can be a remote or local path.
Options of the Rsync Command on Ubuntu
In this section, we will explore some of the important options available with the Rsync tool on Ubuntu.
The option you will likely use the most here is the archive option, as it creates a better copy of your files and folders.
Recursively Sync Files
By default, the Rsync tool will not recursively copy files on your Ubuntu system. Luckily, you can easily override this behavior by specifying the “-r” or “--recursive” options.
You can see how this option can be written in our example below.
rsync -r SOURCE DESTINATIONCopyCreate an Archive
When using the rsync tool on Ubuntu, you will likely want to use the archive option. This option combines several different options, including the recursive one mentioned previously.
Using this option, the Rsync tool will preserve your symbolic links, permissions, modification times, and more. If you are creating a backup of your files, you must use this option.
rsync -a SOURCE DESTINATIONCopyPerform a Dry Run
When synchronizing large amounts of files using Rsync on Ubuntu, you may not want to run the tool immediately. This is where the dry-run option is helpful.
Using the “-n” or “--dry-run” options, the Rsync tool will check for what files need to be synchronized but it will not perform the synchronization itself.
Typically, you will want to combine this option with at least the “verbose” option. Otherwise, you won’t see the files that will be copied across.
rsync -n SOURCE DESTINATIONCopyVerbose
By default, Rsync on Ubuntu will not output any information on the files it is copying.
You will want to use the “-v” or “--verbose” options to get the tool to output additional information.
rsync -v SOURCE DESTINATIONCopyChecking Rsync Progress on Ubuntu
By default, the Rsync command doesn’t show you how it is progressing with the synchronization. Luckily, it has two different ways to expose what is happening behind the scenes.
The first option you can use to output the progress of your synchronization on Ubuntu is “--progress“. This shows the status of copying each file.
rsync --progress SOURCE DESTINATIONCopyYou can get an overall progress report by using “--info=progress2” option instead. This is useful if you don’t need to see the copying progress of individual files or folders.
rsync --info=progress2 SOURCE DESTINATIONCopyCreating a Resumable Transfer with Rsync
By default, Rsync on Ubuntu will not store partial transfers, meaning if the connection is broken, any partial transfers will be required to start over.
Using the “--partial” option, Rsync will keep copies of files that are still being transferred. This allows Rsync to resume a transfer if the connection is ever broken.
rsync --partial SOURCE DESTINATIONCopyUsing Rsync on Ubuntu to Synchronize a Remote System
Most people using the Rsync tool on Ubuntu want to synchronize files with a remote system. Rsync is fantastic at handling this as it offers support for encryption and compression and will only update files that have changes.
For this to work, you will need two things. First, SSH must be installed and set up on both systems. Second, you must also have rsync installed on both systems.
Rsync must be installed on both systems, as it will interact with the daemon to see what files need to be copied.
Syntax for Specifying a Remote Source or Destination for Rsync on Ubuntu
Before we show you how to use Rsync to synchronize files to a local or remote Ubuntu machine, let’s explore how you can use it.
The syntax below shows that to synchronize files from a remote machine, you must specify a username, followed by the machine’s IP, a colon symbol (:), and the remote directory you are synchronizing with.
<USERNAME>@<REMOTE>:<REMOTE_SOURCE_DESTINATION>CopyUse Rsync to Sync Local File to a Remote Destination
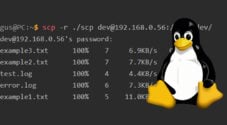
One of the more common ways to use rsync on Ubuntu is to synchronize a local file to a remote system. This tool simplifies the process as long as you have SSH and Rsync set up on both systems.
To copy a file or directory from your local system to a remote one, use the following syntax. For this to work, you will need to know the IP address of the machine you are synchronizing files to and where to save the files on the remote machine.
<LOCAL_SOURCE>: First, specify the local file or directory you want to synchronize to your remote machine.<USERNAME>: This is your username on the remote machine you are connecting to.<REMOTE>: Replace this placeholder with the IP address of the machine you want to synchronize your files to.<REMOTE_DESTINATION>: This is the location on the remote machine where the files or directories will be synchronized.
rsync [OPTIONS] <LOCAL_SOURCE> <USERNAME>@<REMOTE>:<REMOTE_DESTINATION> CopyBelow, you can see how to use rsync to copy a directory from our local Ubuntu system to our Raspberry Pi.
rsync -a /home/pimyubu/source/ pi@192.168.0.32:/home/pi/destinationCopySync a Remote File to your Local Ubuntu Machine using Rsync
Thanks to Rsync being bidirectional, you can also use the tool on Ubuntu to synchronize a file from a remote system to a local folder.
Below, you can see how the syntax is very similar to synchronizing to a remote system, but the source and location formats have been flipped around.
rsync [OPTIONS] <USERNAME>@<REMOTE>:<REMOTE_SOURCE> <LOCAL_DESTINATION>CopyThe example below shows how we copied the “source” directory off our Raspberry Pi to our local Ubuntu machine.
rsync -a pi@192.168.0.32:/home/pi/source/ /home/pimyubu/destinationCopyConclusion
Hopefully, at this stage, you will have a good understanding of how to use the rsync tool on Ubuntu.
This synchronization tool is powerful and the go-to choice for copying files over a network. It has many features that help maintain the integrity of files you copy while also having methods to speed up the transfer process.
Please feel free to comment below if you have any questions about using this tool on your system.
If you found this tutorial helpful, we highly recommend that you check out our many other Ubuntu tutorials.