This tutorial will show you how to resize a partition on the Ubuntu operating system.
The drives on your Ubuntu device are split into partitions. These partitions allow you to separate data that is stored on the same drive.
When these partitions are created, they are created to a specific size and can be as small as a few megabytes up to the total size of your drive.
If you have created a partition on your Ubuntu device that is too small, it is possible to extend its size by resizing the partition.
The easiest way to resize these partitions on your Ubuntu device is to utilize a tool called parted or GParted.
Before Resizing Partitions
Before proceeding, there are a few essential things that we need to go over. These quick points explain some caveats with expanding partitions on Ubuntu that you need to be made aware of.
- First, you cannot resize any partition while it is still mounted. This includes the system partition. If you want to resize your system partition, you will want to temporarily run something such as Ubuntu Live.
All you need to do is download Ubuntu to a USB or DVD and boot from that instead of your system drive.
When prompted you will want to select the “Try Ubunutu without installing” option. You can then resize your partitions from this temporary operating system. - Secondly, there is always the chance something goes wrong when Ubuntu resizes the partitions on your drive.
Ensure that you back up the drive or any important data before proceeding. - Third, you can only expand a partition if there is space to the right on the drive. You will see this shown graphically with the GParted interface shortly.
Resize a Partition on Ubuntu Using GParted
If you are running a desktop flavour of Ubuntu, you will find extending your partition size is a straightforward process thanks to a tool called GParted.
This tool allows you to resize partitions through a simple graphical interface. All you need to do is identify the partition you want to resize, right click and follow the prompts.
Installing GParted on Ubuntu
Before we can use GParted, we must ensure it is installed on the operating system. Luckily this is a straightforward process as it is available through the default package repository.
We will run the first couple of steps within the terminal. You can open the terminal on Ubuntu by pressing CTRL + ALT + T.
1. The first step is to update the package list. The package list tells the package manager what packages are available and where apt can download them.
To update the package list, you only need to use the following command.
sudo apt updateCopy2. Once the update completes, run the following command to install the GParted application to your Ubuntu device.
sudo apt install gpartedCopyOpening GParted
3. With GParted now installed we can move on to opening the software on your device.
You can easily open GParted straight from the terminal using the command “gparted“.
gpartedCopy4. It is also possible to open the terminal through the desktop interface. Start by opening the activities menu by clicking the bottom or top left of the screen.

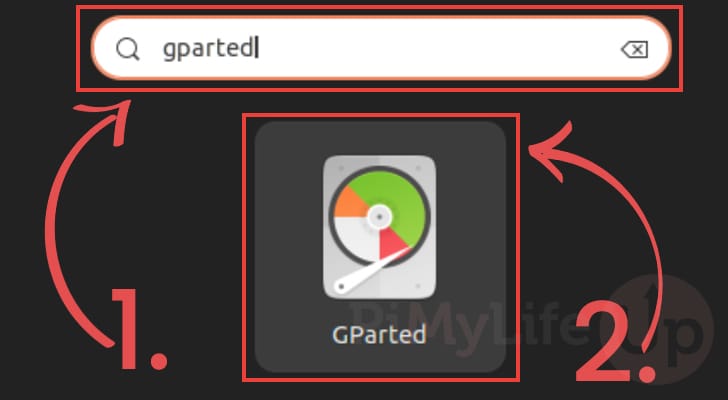
5. With the activities screen opened, search for “gparted” using the text box at the top of the screen (1.).
Once you see “GParted” appear on the screen (2.), click the application to open it.
Using GParted to Resize Partitions on Ubuntu
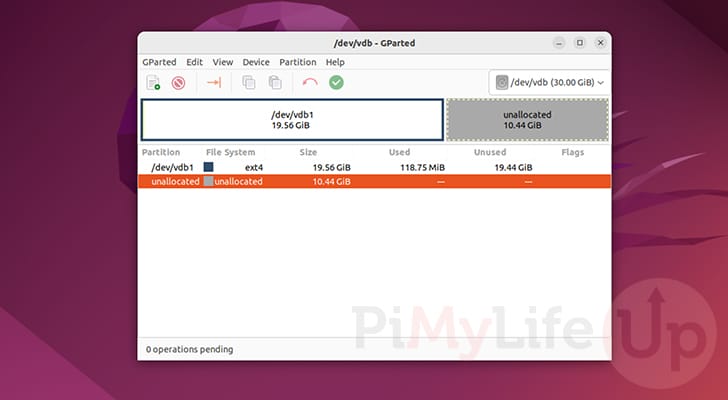
6. After opening GParted, you will be greeted by the following interface. Let us quickly go through the elements so that you can see what you are looking for.
- At the top, you will see a graphical representation of your drive. Using this, you can see each partition on your drive, the space it consumes and its location within the drive.
- Next, you can see the details of each partition on your drive directly below this graphical representation. Here you can see their names, formatting, size, and used and unused space.
If a partition shows a key next to it, it means that the partition is currently unable to be modified, likely due to it being mounted.
Additionally, you can also see how much space is unallocated on your Ubuntu drive. - You can use the select box at the top-right of the screen to change between drives on your system.
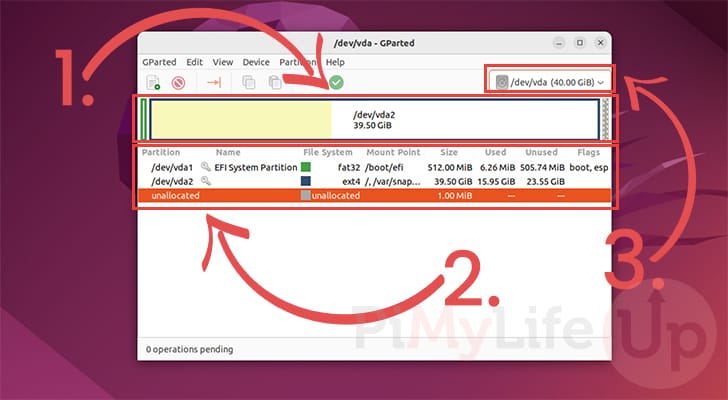
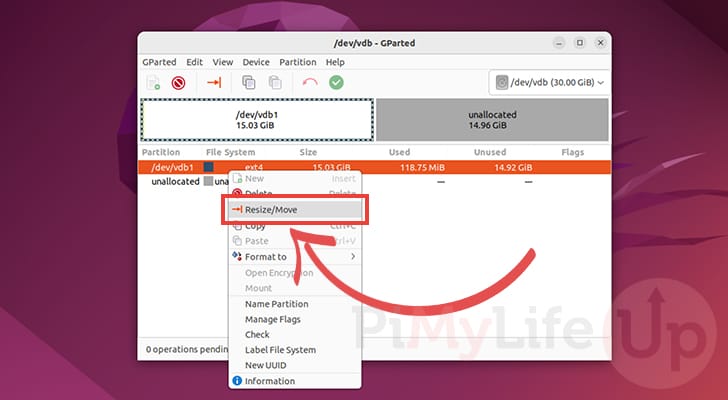
7. To resize a partition using GParted on Ubuntu, you must first identify the particular partition.
Below you can see that our example drive only has a single partition that only consumes roughly half the space on the drive.

8. Once you have identified the partition you want to resize on Ubuntu, you will want to right-click it.
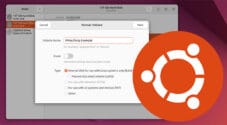
Right clicking a partition will give you a set of different options. The option you want to click is labelled “Resize/Move“.
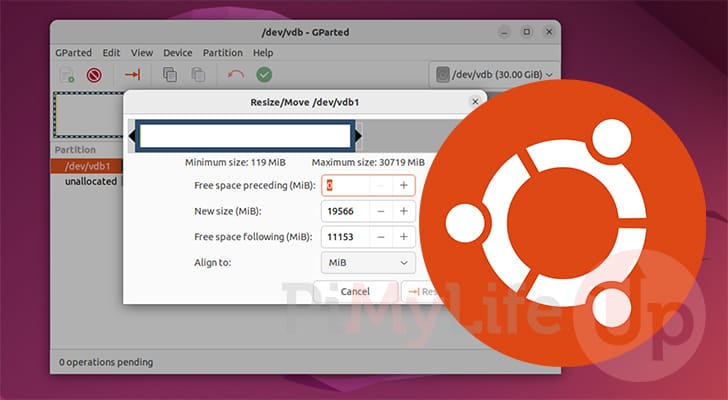
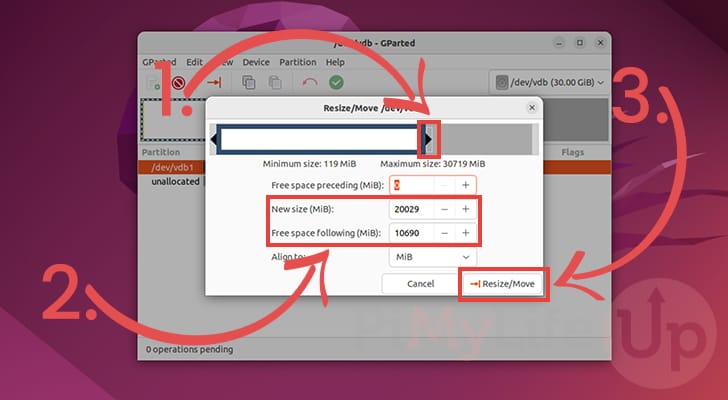
9. You can resize a partition using GParted’s interface in two ways.
First, you can click and drag the arrows on either side of the partition to increase or decrease its size (1.).
Secondly, you can specify the new size in MiB (2.) or by setting how much free space should be following the partition.
Once you have extended or reduced the partition size on Ubuntu, click the “Resize/Move” button (3.).
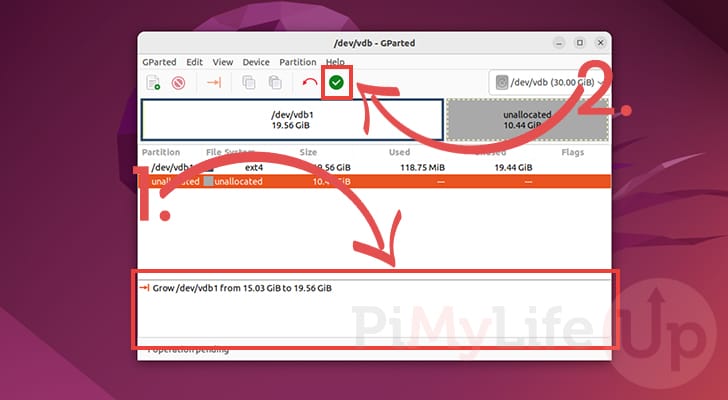
10. The changes to your partition still haven’t occurred, as you must confirm it before continuing.
At the bottom of the application, you can see a list of changes you have made that need to be confirmed (1.).
If you are happy to proceed with resizing the partition on your Ubuntu device, click the green tick (2.).
11. You will now be greeted with a warning about how any changes to a partition could lead to data loss.
If you haven’t made a backup, you should make one before proceeding.
Once you are happy to proceed, you can click the “Apply” button.

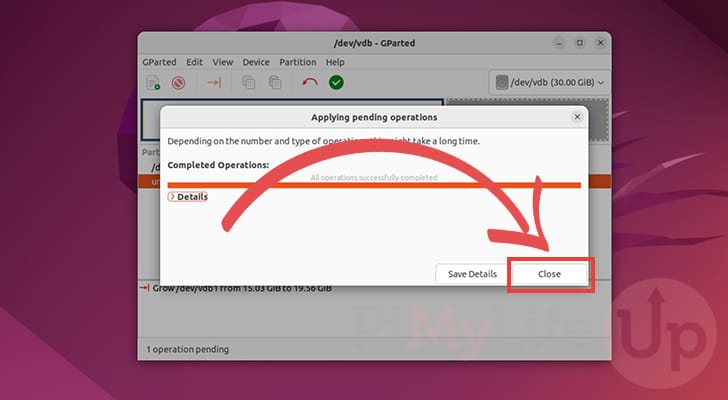
12. Once GParted completes the pending operations, you will see a message similar to the one below. The text should read, “All operations successfully completed“.
You can now safely click the close button to continue.
13. Below, you can see how we successfully resized the partition on our Ubuntu device. We resized this partition by extending it from 15.03 GiB to 19.56 GiB.
How to Resize a Partition using the Terminal on Ubuntu
It is also possible to resize a partition on Ubuntu by using the terminal. This process is beneficial when using a terminal-based operating system like Ubuntu server. Or when you need to complete these steps remotely.
Like with GParted, the partition you want to extend or reduce must not be mounted. Using Ubuntu Live to resize disks is highly recommended rather than running these from the installed operating system.
1. If you are running a desktop variant of Ubuntu, you must start by opening the terminal.
The easiest way to open the terminal on Ubuntu is to press CTRL + ALT + T on your keyboard.
2. Before continuing, we need to list the disks on our system using the following command.
sudo lsblk -d | grep diskCopyThe above command will print out something similar to the one below. Your drive names are likely to be different but make a note of the one you want to modify the partitions on.
vda    252:0    0    40G  0 disk
vdb    252:16   0    30G  0 disk
Copy
3. If that drive is currently mounted you will want to unmount it before continuing. You cannot resize a partition that is currently mounted.
Ensure that you replace “DEVICE” with the name of the drive you got in the previous step.
sudo umount /dev/DEVICECopy4. Now that you know the device names, we can launch into the parted tool using the following command.
Parted is the tool that will let us resize partitions.
sudo partedCopy5. You will need to select the drive you want to modify the partitions by using the following command.
Ensure you replace “DEVICE” with the name you got from step 2 of this section.
select /dev/DEVICECopyIf the drive has been selected, you will see a message like the one below.
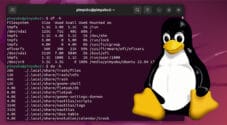
Using /dev/vdbCopy6. With the drive selected, our next step is to print out the information about the drive, including the partitions on the drive.
To print this information, you only need to use the following within the terminal.
printCopyBelow you can see the output from the above command. With that, you can see that we only have a single partition on this drive, so we don’t have to worry about extending into the range of any other partitions.
Model: Virtio Block Device (virtblk)
Disk /dev/vdb: 32.2GB
Sector size (logical/physical): 512B/512B
Partition Table: gpt
Disk Flags:

Number  Start   End     Size    File system  Name  Flags
 1      1049kB  20.5GB  20.5GB  ext4
7. To resize a partition on Ubuntu, we can finally use the following command within Parted.
This command will allow us to resize any partitions mentioned in the previous step.
resizepartCopy8. Next, you will be required to specify the partition that you want to modify.
For example, if you want to modify partition 1, type in “1” and press the ENTER key.
Partition number?Copy9. Next, you will need to specify where the drive ends. Please note that two partitions can’t intersect, so there needs to be additional space directly after this partition.
As our example drive only has a single partition, we could expand our Ubuntu partition to 32.2GB if we wanted. For our example, we will be using “30.0GB“.
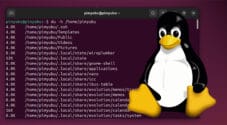
END? [20.5GB]?Copy10. You can verify that you made changes to the partition table by running the following command.
printCopyBelow you can see that our partition was increased to 30.0GB.
Model: Virtio Block Device (virtblk)
Disk /dev/vdb: 32.2GB
Sector size (logical/physical): 512B/512B
Partition Table: gpt
Disk Flags:

Number  Start   End     Size    File system  Name  Flags
 1      1049kB  30.0GB  30.0GB  ext4Copy
Conclusion
Hopefully, at this point in the guide, you will know how to resize a partition on Ubuntu.
Using the desktop interface, you can easily use GParted to resize a partition, and using the terminal, you can utilize a tool named “parted”. Both are handy tools.
Please comment below if you have had any issues resizing a partition on your system.
If you found this tutorial useful, be sure to check out our many other Ubuntu guides.