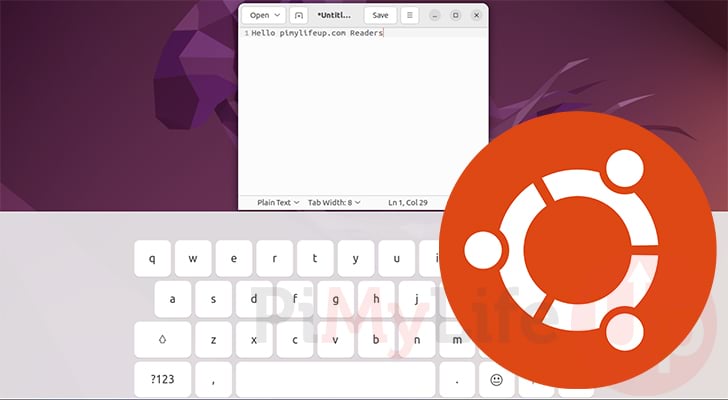
In this tutorial, we will show you how to enable the on-screen keyboard on Ubuntu.
An advantage of using the Ubuntu operating system is that it has a ton of accessibility features.
One of these accessibility features is the on-screen keyboard. An on-screen keyboard allows you to type without having a connected keyboard by clicking or tapping on the screen if you have a touchscreen.
While Ubuntu will attempt to enable the on-screen keyboard automatically when using a touch device, you have to turn it on to use it with the mouse manually.
In the following section, we will show you how to enable the on-screen keyboard in just a few short steps. We even show you commands you can use if you need to activate it through the terminal.
Additionally, if the on-screen keyboard lacks any features, we show some steps on how to install an extension that improves it.
Enabling the On-Screen Keyboard on Ubuntu
This section will show you how to enable the on-screen keyboard on Ubuntu. This whole process can be done very quickly within the desktop interface.
If you would prefer, you can also enable or disable the On-Screen keyboard using the terminal. This means you can remotely connect to Ubuntu using SSH to enable the keyboard.
Enabling the On-Screen Keyboard Through the Settings Panel
The desktop interface makes enabling Ubuntu’s accessibility features, such as the on-screen keyboard, very straightforward.
In a few short clicks, you can enable the on-screen keyboard.
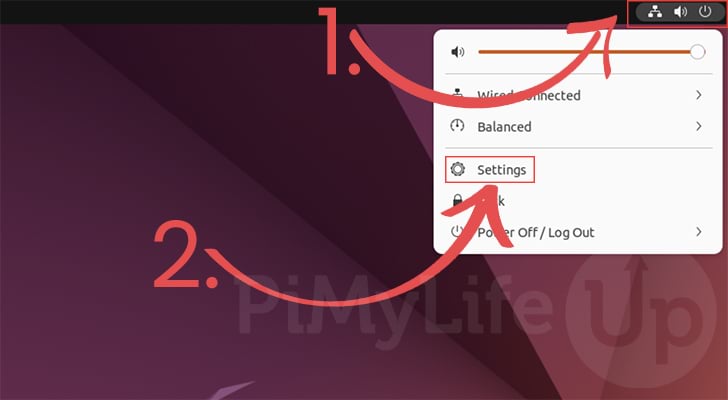
1. Before enabling the on-screen keyboard on Ubuntu we will need to open the settings screen.
The easiest way to open the settings page is to click the top-right corner (1.) to bring up the quick access menu.
With the quick access menu open, click the “Settings” (2.) option.
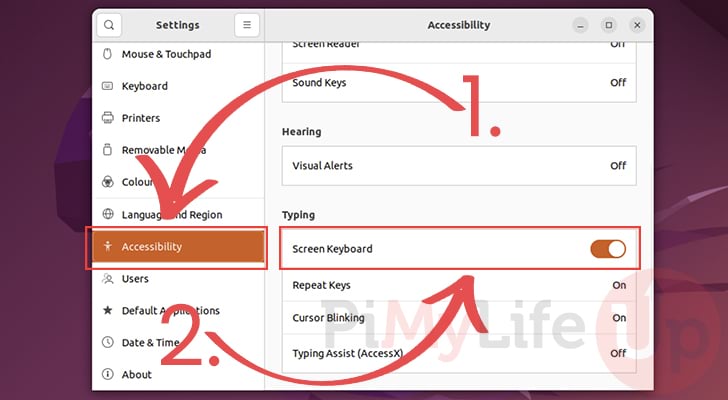
2. With the settings page open, you need to change to the “Accessibility” tab (1.). This may also be called “Universal Access” on older releases of Ubuntu.
Once you are on the “Accessibility” tab, scroll down until you find the “Typing” section. Within this section, you will find “Screen Keyboard” (2.). Click the toggle to enable Ubuntu’s on-screen keyboard.
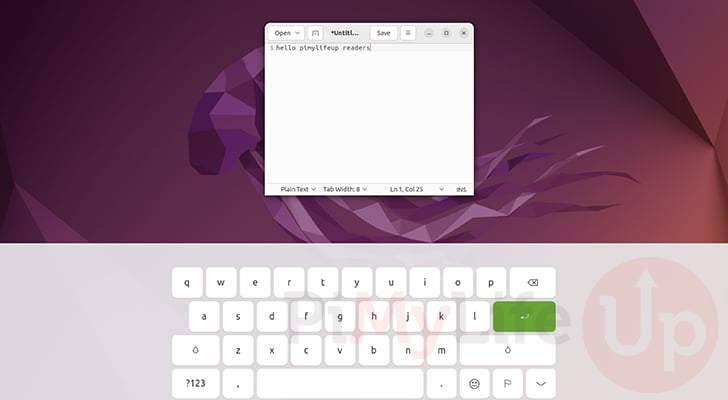
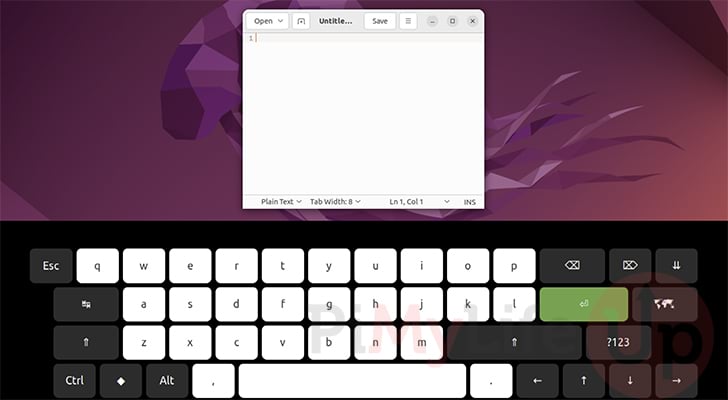
3. Now that you have enabled Ubuntu’s built-in on-screen keyboard, it will automatically pop up when you click into textboxes like shown below.
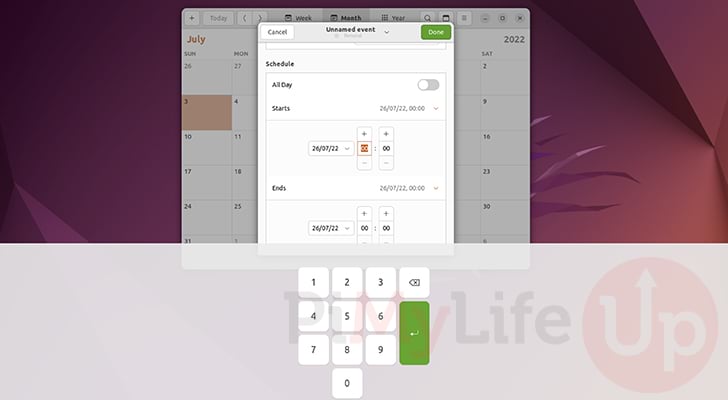
4. The keyboard is also context-sensitive. So if you select a text field that only takes numbers, then the on-screen keyboard will show up as a number pad, like shown in the screenshot below.
Enabling and Disabling the On-Screen Keyboard using the Terminal
It is also possible to enable and disable Ubuntu’s on-screen keyboard from the terminal. The advantage of this is that you can even control this remotely.
Of course, to run any of the following commands, you will need to open the terminal on Ubuntu. However, you can open the terminal quickly by pressing CTRL + ALT + T.
1. To enable the on-screen keyboard on Ubuntu while within the terminal, you can use the following command.
This command utilizes the “gsettings” application to enable the on-screen keyboard by setting its value to true.
gsettings set org.gnome.desktop.a11y.applications screen-keyboard-enabled trueCopy2. It is also possible to use the terminal to disable the on-screen keyboard.
To disable the keyboard, you can use the following command. You can see it’s similar to the last one, but we used “false” instead of “true“.
gsettings set org.gnome.desktop.a11y.applications screen-keyboard-enabled falseCopyExtending the On-Screen Keyboard Functionality
If you find Ubuntu’s inbuilt on-screen keyboard a bit lacking, then don’t worry, as it is possible to extend its functionality.
This section will show you how to install a plugin that adds additional functionality to the keyboard.
Installing the GNOME Extension Manager
We will need to install an application called the “GNOME Extension Manager” to install extensions to components of the Ubuntu interface.
Without this manager, installing an extension to the on-screen keyboard on Ubuntu is tedious.
1. Before beginning this part of the guide, you will need to have Flatpak installed on Ubuntu.
Flatpak is an alternate package manager, which we will use to install the GNOME extension manager.
2. To utilize Flatpak on Ubuntu you will need to open up the terminal. You can open the terminal by pressing CTRL + ALT + T.
3. Once you have the terminal open, we can utilize Flatpak to install the GNOME Extension manager. This manager will allow us to install packages that extend the functionality of the on-screen keyboard.
sudo flatpak install flathub com.mattjakeman.ExtensionManagerCopy4. You will be prompted with a message asking if you want to install this package.
Verify that everything looks right, then type “Y” followed by pressing the ENTER key to continue.
Looking for matches…
Required runtime for com.mattjakeman.ExtensionManager/x86_64/stable (runtime/org.gnome.Platform/x86_64/42) found in remote flathub
Do you want to install it? [Y/n]:
5. You will now be greeted with a message showing you all the permissions that the extension manager requires. These permissions give it access to various systems, including the network and desktop interface.
To continue with this installation, type in “Y“, then press the ENTER key.
com.mattjakeman.ExtensionManager permissions:
    ipc      network      fallback-x11         wayland
    x11      dri          dbus access [1]

    [1] org.gnome.SessionManager, org.gnome.Shell.Extensions


        ID                                      Branch Op Remote  Download
 1.     com.mattjakeman.ExtensionManager.Locale stable i  flathub  < 63.1 kB (part         ial)
 2.     org.gnome.Platform.Locale               42     i  flathub < 336.0 MB (part         ial)
 3.     org.gnome.Platform                      42     i  flathub < 276.2 MB
 4.     com.mattjakeman.ExtensionManager        stable i  flathub < 280.9 kB

Proceed with these changes to the system installation? [Y/n]:
Installing Required Packages
While we now have the extension manager installed, we do need to do some additional work.
1. While the terminal is still open, we will need to install an additional package on which the extension we are using relies.
This extension adds some additional fonts to Ubuntu that will be used in the extended on-screen keyboard.
Before installing this package, the package list must be updated using the command below.
sudo apt updateCopy2. Now, using the command below, you can install the “ttf-ancient-fonts-symbola” package.
This package contains the extra fonts the “OSK Improved” extension requires.
sudo apt install ttf-ancient-fonts-symbolaCopyInstalling the OSK Improved Extension
We can finally install the OSK improved extension. This extension adds a ton of functionality to Ubuntu’s on-screen keyboard.
1. With everything ready, let us install the OSK Improved extension.
Before we can do this, we must use the terminal again to launch the GNOME extension manager we installed earlier.
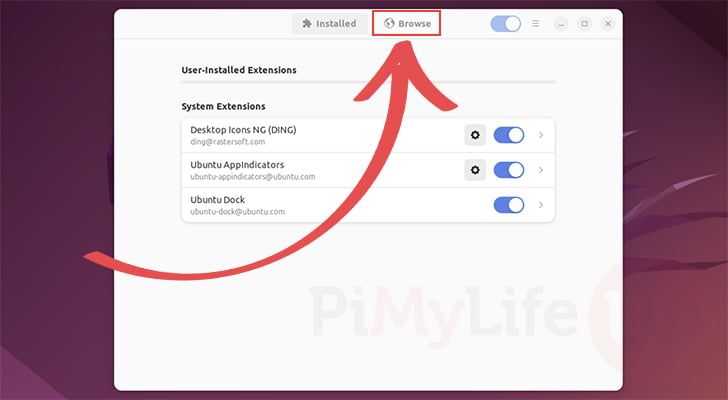
sudo flatpak run com.mattjakeman.ExtensionManagerCopy2. With the GNOME extension manager open, change to the “Browse” tab.
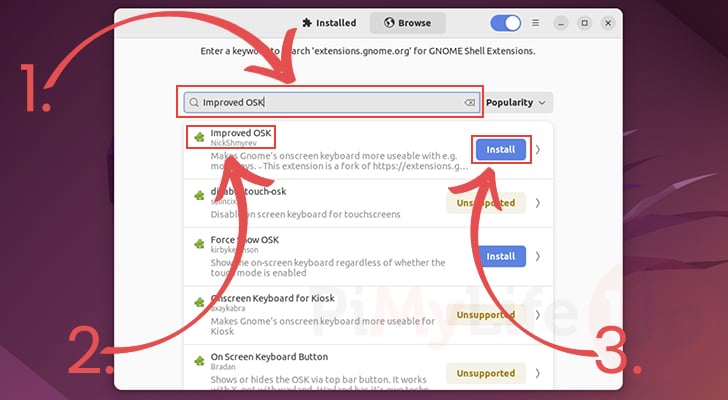
3. Next, use the search bar to look for “OSK Improved” (1.).
Within the search results, you should see “Improved OSK“, with the author’s name “NickShmyrev” (2.).
Once you have found the correct result, click the “Install” button (3.).
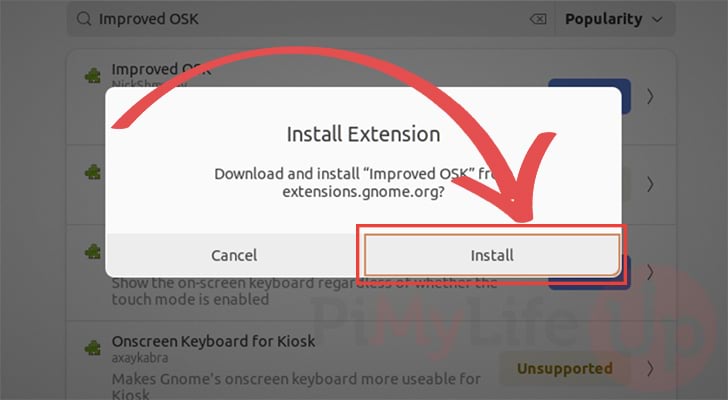
4. You will get a prompt asking if you want to download and install the “Improved OSK” extension to Ubuntu.
You need to click the “Install” button to finalize the installation.
5. After installing the extension, you may need to restart Ubuntu. Otherwise, the changes may not affect the on-screen keyboard.
You can restart by clicking the top-right corner of Ubuntu and clicking “Power Off / Log Out“, then click the “Restart” option.
Alternatively, you can restart your device using the following command within the terminal.
sudo rebootCopy6. After the restart, you will get the improved on-screen keyboard on Ubuntu when you click into a textbox.
You will notice that immediately the keyboard has a lot more functionality.
Conclusion
Throughout this tutorial we showed you how to enable the on-screen keyboard on Ubuntu.
In addition to showing you how to enable this keyboard, we also showed you how to install extensions that improve its functionality.
Please comment below if you have any questions about the on-screen keyboard functionality of Ubuntu.
Check out our many other Ubuntu tutorials to improve your knowledge of the OS. We also have general Linux guides that cover many valuable commands.


Thank you so very much. My number two button was not working and my password required me to have the number two button working so I am very grateful so very grateful thank you thank you it worked for me and I’m not not to be selfish I had to come back to the space to say thank you muchas Gracia in our language in Uganda the most common language in Uganda we say Webale nyo
That worked like a charm. Thanks Emmet!
This tutorial seems to be broken. I am using Ubuntu 22.04LTS. When I try to install flathub, it appears that it is not available. A 404: Not found error is displayed in the terminal.
Hi Jeff,
Sorry to hear that you are having issues with this tutorial. Can you try ensuring that flathub is an available flatpak repository by using the command below.
Please let me know if this solves the issue you are facing.
Cheers,
Emmet