This tutorial will show you how to disable or enable Wayland on the Ubuntu operating system.
Since the release of Ubuntu 22.04, Wayland replaced XOrg as the communication layer between the display server and clients.
Wayland is meant to introduce several significant improvements. Most of these benefits won’t be super obvious to the average end user, but it is meant to be significantly more secure and simpler to use.
However, while Wayland brings with it several significant improvements, it can cause compatibility issues with older software. Software and drivers need to be updated to properly use Wayland. Some GPUs, for example, have been known to have issues with Wayland.
For example, with our Chromium kiosk tutorial, getting it running with Wayland is significantly trickier due to a lack of supported software.
Luckily, at the time of publishing, Ubuntu makes it incredibly easy to disable Wayland and move back to the older X window system.
By the end of this guide, you will understand how to easily disable Wayland on your Ubuntu system.
How to Disable Wayland on Ubuntu
This section will walk you through the very simple steps to disable Wayland.
When you disable Wayland, your Ubuntu system will automatically switch back to using the older window system. This functionality might be removed in future versions, but hopefully, by then, all of the issues with using Wayland will have been ironed out.
1. To disable Wayland on your system you will need to use the terminal. There is no system option that you can use to toggle this functionality.
The easiest way to open the terminal on Ubuntu is to use the CTRL + ALT + T shortcut.
2. With the terminal open your next step is to begin editing the configuration file for GNOME. GNOME is the default desktop environment for Ubuntu and is also what will start and talk with either Wayland or XOrg.
You can begin editing this configuration file by using the following command. We use nano as it is one of the easiest terminal text editors to use.
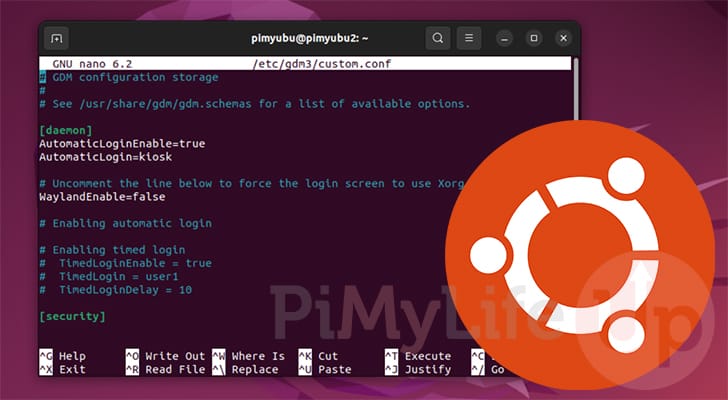
sudo nano /etc/gdm3/custom.confCopy3. In this file, you will want to find the “WaylandEnable” option. This option controls whether Ubuntu will use Wayland or X. By default, this option is commented out and defaults to “true“.
#WaylandEnable=falseCopy4. To disable Wayland on Ubuntu, you only need remove the hashtag (#) from the start of the line.
The option should look like what we have shown below.
WaylandEnable=falseCopyIf you ever want to re-enable Wayland, you can either comment this line out or simply replace “false” with “true“.
5. Once you have finished making this change to your configuration file, save and quit by pressing CTRL + X, Y, and then ENTER.
6. While Wayland is now disabled within the configuration, the change will only take effect if we restart the Gnome desktop manager.
Luckily, we can restart this service on Ubuntu by using the following command.
sudo systemctl restart gdm3CopyAlternatively, if that doesn’t work, you can restart your Ubuntu machine by using the command below.
sudo rebootCopyConclusion
Hopefully, by this point in the tutorial, you will have a good understanding of how to disable Wayland on Ubuntu.
While Wayland introduces several improvements in how operating systems like Ubuntu operate, it has drawbacks. Luckily, at this stage, Ubuntu has made it fairly easy to change back to using XOrg if you run into issues.
Please feel free to drop a message in the comments section below if you have any issues enabling or disabling Wayland.
If you liked this tutorial, we highly recommend exploring our many other Ubuntu projects and guides.