This tutorial will show you how to set up a Minecraft server on a VPS.
This guide will show you how to set up a Minecraft Server on a VPS. We will walk you through the process of provisioning a VPS, setting it up, and getting your server running.
There are various reasons why you might want to set up a Minecraft server on a VPS over a home server. Such as better networking, less security risk, and easier to keep online 24/7.
This guide will focus primarily on using the VPS provider Vultr. They are an affordable provider that utilizes solid hardware, a good network backbone, and a diverse range of locations, meaning you can get a server close to where you live.
Setting up a Minecraft Server on a VPS is a straightforward process, and we will have you up and running in no time.
Signing up to Vultr
For the first part of this process, you will need to create an account with Vultr. If you already have an account, you can skip to the next section.
1. Within your favorite web browser, go to the Vultr website by clicking the button below
Please note, that by using our affiliate link, we get a small commission when you remain signed up.
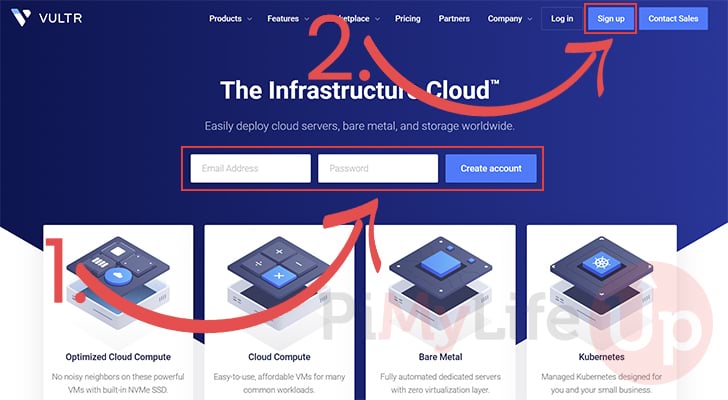
2. Once you are on the Vultr website, you will need to sign up using an email and password.
You can do this using either the form on the front page (1.) or by clicking the “Sign up” button (2.) and using the form on the following page.
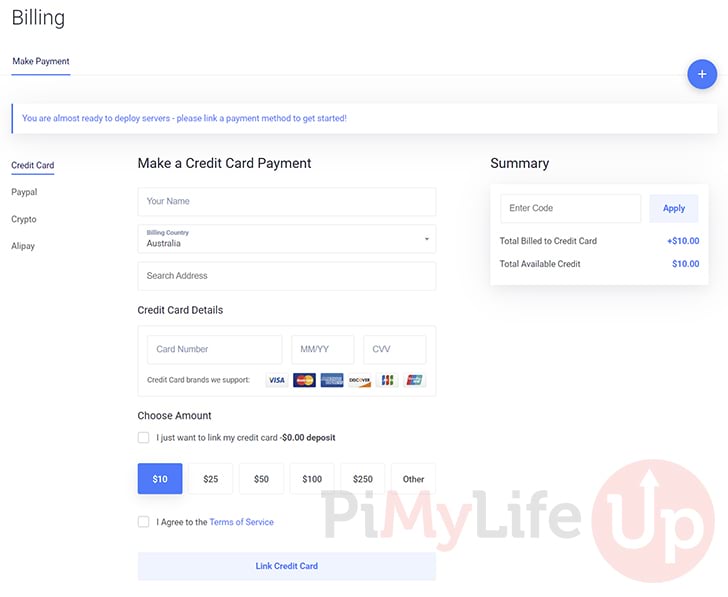
3. After signing up to Vultr, you will need to enter payment details before you can set up your VPS for Minecraft.
You will have the option of initially loading up your account with a deposit. By default, this is set to $10, but you can choose only to link the card itself.
There are other payment methods such as PayPal, Crypto, and Alipay.
Provisioning a VPS with Vultr
Our next step is to provision a VPS from Vultr, where we will run our Minecraft server.
Within this step, we will determine the server size best suits your needs. Before proceeding, you should work out roughly how many players you would like on your server.
Typically, the Minecraft server is more memory intensive than it is CPU intensive.
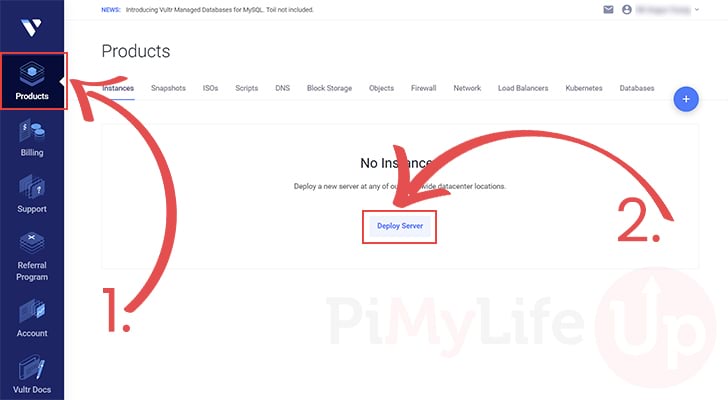
1. To create your new Vultr VPS you need to start by changing to the “Products” tab (1.).
Once on this screen, you will want to click the “Deploy Server” button (2.).
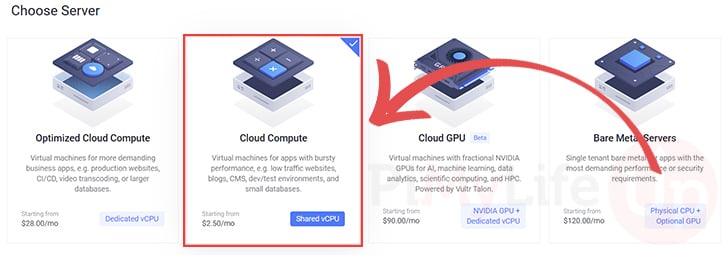
2. You now have the choice between three different types of servers. These vary drastically in price, with the more expensive servers having considerably more power.
The type of server that we are after is the “Cloud Compute” option, so click it. These Vultr VPSs have more than enough power to handle most Minecraft servers.
3. The next thing you will want to do is select the “CPU & Storage Technology“.
For a small price increase, the “AMD High-Performance” or “Intel High-Performance” options are the best. They offer a strong CPU with super fast storage, a great combination for our Minecraft server.
However, you can still use the “Intel Regular Performance” option if you want to save on money.
Personally, we went with Vultr’s Intel High-Performance VPS option.

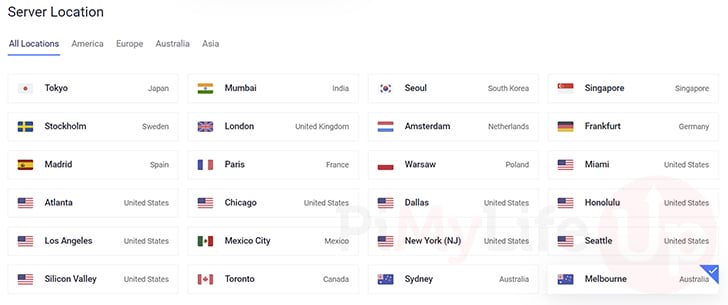
4. After choosing the type of VPS you want to use for your Minecraft server, the next thing to do is select the location.
Here you can see that Vultr offers VPSs in a wide range of locations. So the best thing to do is select the one closest to where you live.
For example, if we lived in Hobart, Australia, we would select the “Melbourne” location.
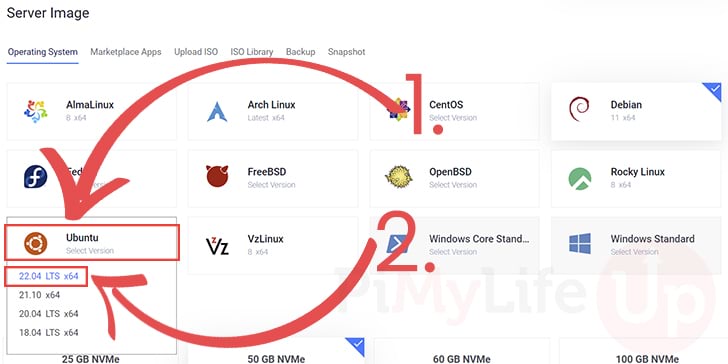
5. What we need to do next is select the Operating system that Vultr will install to our new VPS. We are big fans of Ubuntu Server, so we will be going with that.
First, find “Ubuntu” and click it to bring up a list of versions (1.).
Look for the latest LTS release from this list of versions and select it (2.). In our example, we selected the “22.04 LTS x64” option.
LTS stands for “long-term-support“, meaning you can continue using this operating system version for years before worrying about upgrading to the latest.
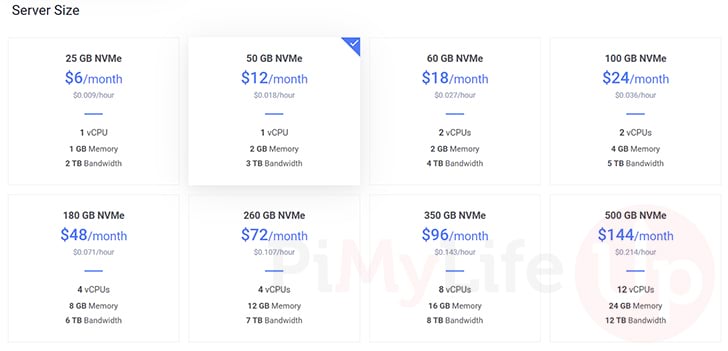
6. We can now choose what size of a VPS we want to run our Minecraft server on.
What size is dictated by how many players you want on your server at any time. So, for example, if you only want a couple of players, you could get away with the cheapest VPS with only 1 GB of memory.
Roughly for every 15 players, you will want an extra 2 GB of memory.
So for 1 – 15 players, you will want 2 GB of memory. For 15 – 30 players, you would want 4 GB of memory.
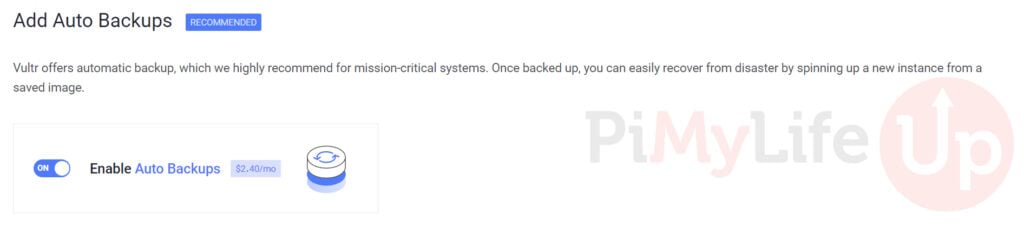
7. Next you will need to decide if you want to enable auto backups. With this enabled Vultr will automatically make a backup of your entire instance. Backups can be daily, weekly, or monthly.
With this option enabled, you will be charged an extra fee which is roughly 20% of the chosen server’s fee.
8. Scroll down until you see the “Additional Features” section. There are a couple of options that you may want to enable.
First, you need to decide if you want your server to have an IPv6 address (1.). These addresses are entirely free to have.
Next, decide if you want DDOS protection. This protection costs an additional amount every month but is very useful if you plan on your Minecraft server being public (2.).
A DDOS attack is a targeted attack designed to overwhelm the server and bring it offline.

9. The last option we need to set is the hostname for the server.
You can name this whatever you like, but it is often good to use something that will remind you what it is used for.

10. With everything now set up, we can deploy our new VPS.
To deploy your Vultr VPS, click the “Deploy Now” button at the bottom of the page.

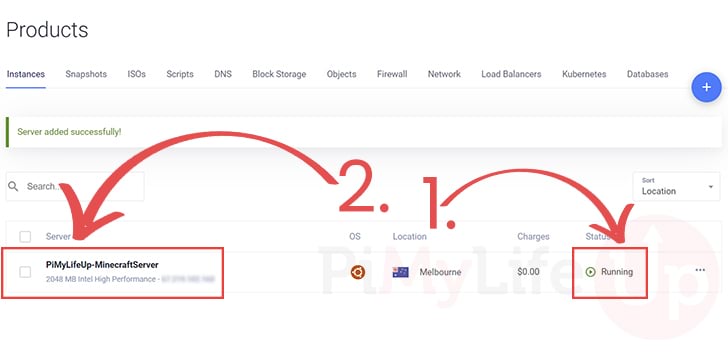
11. We now need to wait for Vultr to set up the server. Wait patiently until your server is marked as “Running” in the status column (1.).
Once the VPS server is running, click it (2.) so that you can go into its management page.
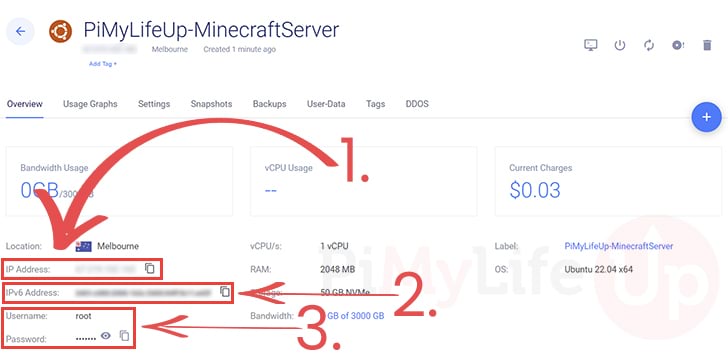
12. On this screen, you will find all the details for your VPS server. We will quickly go through the details you want to know immediately.
- First is the IPv4 address (1.). You will use this address to connect to your server within the next section.
- If you enabled an IPv6 address (2.), you would also find that address on this page.
- Finally, you will also find your account username and password (3.).
These are the details you will use to log in to your server. Make sure you keep both private and do not share them with anyone.
Connecting to your New VPS over SSH
After setting up your new VPS with Vultr, you will now want to connect to it over SSH. The SSH connection will allow us to set up the Minecraft server as it gives us remote access to the VPS.
1. Before we begin, you will need an SSH client to connect to your server. We will show you how to use Putty in the following steps.
You can download the latest version of Putty from their official website.
2. Once you have downloaded and installed Putty, open it, and you will see the following screen.
On this screen, you need to type in the IP address for your server within the hostname box (1.).
With your hostname typed in, click the “Open” button (2.) to begin the SSH connection to your VPS.

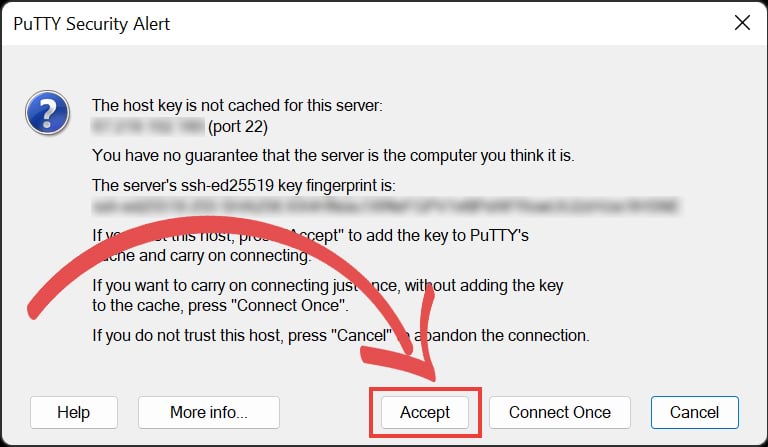
3. Since this is the first time you are connecting to your server over SSH, you will need to accept the new SSH key.
You need to click the “Accept” button to continue with the connection to the server.
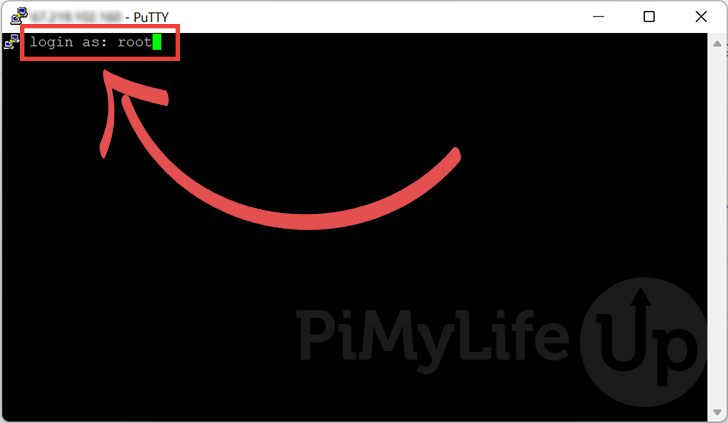
4. Upon connecting, you will be prompted to enter the name of the user you are trying to log in with.
With Vultr, this user will typically be called “root“, so type in that to continue.
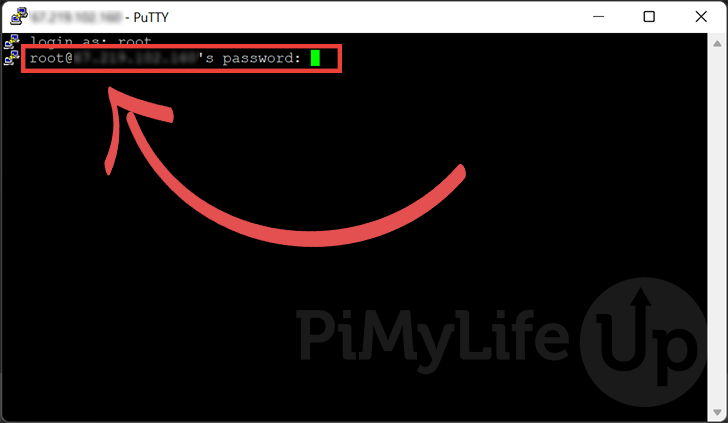
5. Finally, to complete the connection, you will need to enter the password for your user.
You will have gotten this password through the Vultr web interface.
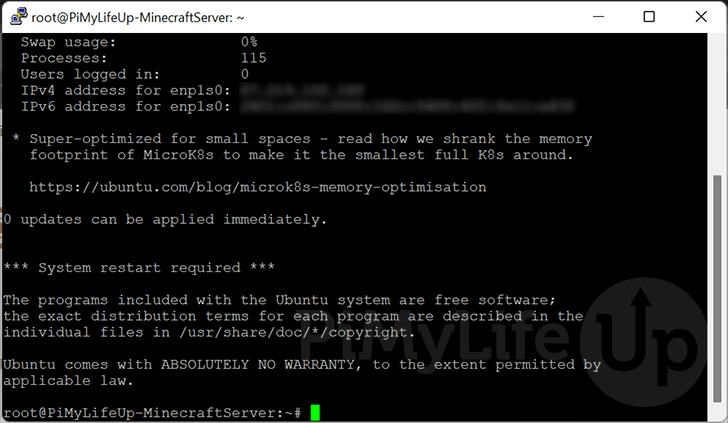
6. You are now successfully connected to your Vultr VPS over SSH.
With this SSH connection, we can use the terminal to set up the Minecraft Server.
Preparing your new VPS for Minecraft
Before we install the Minecraft server to our new VPS, we should do some preparatory work.. This work includes setting up the Ubuntu Firewall.
1. Before we begin, let us ensure we have a completely up-to-date server.
We can update the package list and upgrade all installed packages using the following two commands.
sudo apt update
sudo apt upgrade -yCopy
2. With our next step, we should allow our SSH connection through the firewall. This way, we won’t accidentally lock ourselves out when we enable it later.
Use the command below to allow SSH through the firewall.
sudo ufw allow sshCopy3. At this point, you need to decide which version of Minecraft you are hosting on your Vultr VPS.
Minecraft Bedrock is the version available on Xbox, PlayStation, Switch, Mobile, and Windows PC.
On the other hand Minecraft Java is only available on any PC device that has access to the Java runtime.
Minecraft Bedrock
If you plan to set up a Minecraft Bedrock server, run the following command to allow its default ports.
- Port
19132is the default used for IPv4 connections to the Bedrock server. - Port
19133is the default port used for IPv6 connections.
Additionally, Bedrock only uses the UDP protocol for connections, so we will only be opening these ports for that specific protocol.
sudo ufw allow 19132/udp
sudo ufw allow 19133/udpCopy
Minecraft Java
If you want to run a server for Minecraft Java, then there is only a single port we need to allow through the firewall.
Use the following command to allow port 25565 through the firewall. We restrict access only through the TCP protocol.
sudo ufw allow 25565/tcpCopy4. Now that we have added all our new firewall rules, we can use the following command to enable the firewall.
sudo ufw enableCopySetting up your Minecraft Server on a VPS
Now with the VPS finally prepared, we can move on to setting up the Minecraft server on the VPS. This process is reasonably straightforward.
1. We have two separate guides covering the Minecraft server. These cover installing all the required software, configuring them, and setting up a service.
a. Follow our guide on installing the Minecraft Java server on Ubuntu if you are setting up a server for the Java edition.
b. Alternatively, we also have a guide that shows you how to install the Minecraft Bedrock server on Ubuntu.
2. Once you have installed your desired version of the Minecraft server, everything should be ready.
You can now connect to your Minecraft server using either the IPv4 or IPv6 address of your Vultr VPS.
Conclusion
This tutorial showed you how to set up a Minecraft server on a Vultr VPS.
There are various advantages to using a VPS over your personal computer to host a server. One of those is that you don’t have to worry about it compromising your home network.
Additionally, VPSs like Vultr have way better networking than most homes have. So you will often get a better ping.
Please comment below if you have questions about setting up a Minecraft server with Vultr.