In this tutorial, we will show you how to set up NordVPN’s Meshnet on your Raspberry Pi.
Meshnet is a service provided by NordVPN for free that allows you to connect multiple devices easily over the internet.
This works by creating a virtual private network between all your devices. This allows devices to act and function as if they were connected over the same LAN network despite potentially being in a completely different location.
If you have ever used other services such as Tailscale or Zerotier then you will be somewhat familiar with how NordVPN’s Meshnet works.
Best of all, you don’t actually need an active NordVPN subscription to utilize the Meshnet service. It is offered for free to anyone; all you need is a NordVPN account.
In addition, NordVPN offers some fairly decent limitations for their Meshnet. You can link up to 10 devices from one account and another 50 if you include other people within your network.
Of course, NordVPN is an excellent choice as a VPN provider. Follow our link for a discount on signing up to NordVPN (Affiliate Link).


Equipment
Below is a list of the equipment we used to set up the NordVPN Meshnet on our Raspberry Pi.
Recommended
- Raspberry Pi Amazon
- Micro SD Card Amazon
- Power Supply Amazon
- NordVPN Subscription NordVPN
- Ethernet Cable Amazon or Wi-Fi Amazon
Optional
This tutorial was last tested on a Raspberry Pi 5, running the latest version of Raspberry Pi OS Bookworm.
Installing and Running NordVPN Meshnet on the Raspberry Pi
In the following sections, we will walk you through installing and running Meshnet on your Raspberry Pi.
These tutorials will all be completed within the terminal. If you are running a desktop flavor, you will want to open the terminal by pressing CTRL + ALT + T.
Preparing your Raspberry Pi
1. Before we set up the NordVPN Meshnet on our Raspberry Pi, we will ensure that our operating system is up to date.
You can update the package list cache and upgrade any out-of-date packages by running the following two commands.
sudo apt update
sudo apt upgrade -yCopy
2. The only package we require to set up this networking tool is curl. We will be using curl to execute the NordVPN install script.
Typically, curl will come pre-installed with Raspberry Pi OS, but you can ensure it is installed by using the command below in the terminal.
sudo apt install curlCopyInstalling NordVPN to Access Meshnet on your Raspberry Pi
4. With your Pi now prepared, all you need to do to install the NordVPN client on your Raspberry Pi is to run the command below.
This command uses curl to grab the official install script from the NordVPN CDN. It then passes this installation script back to the shell where it is executed.
sh <(curl -sSf https://downloads.nordcdn.com/apps/linux/install.sh)CopyThe script we are running adds the NordVPN package repository to your system and then automatically installs the NordVPN client. It will also add your current user to the new “nordvpn” group.
5. Before you can proceed with setting up Meshnet on your Raspberry Pi, you will need to restart it.
You can restart your Pi by using the reboot command.
sudo rebootCopyLogging into NordVPN
6. Once your Pi has finished restarting, you can now log in to NordVPN using your account by running the following command.
As mentioned earlier, you must log in to a NordVPN account. However, you don’t require an active subscription to use Meshnet.
You can begin the login process by using the following command within the terminal
nordvpn loginCopyAfter running the previous command, you will get a message asking you to go to a URL. Open this URL in your favorite browser to continue.
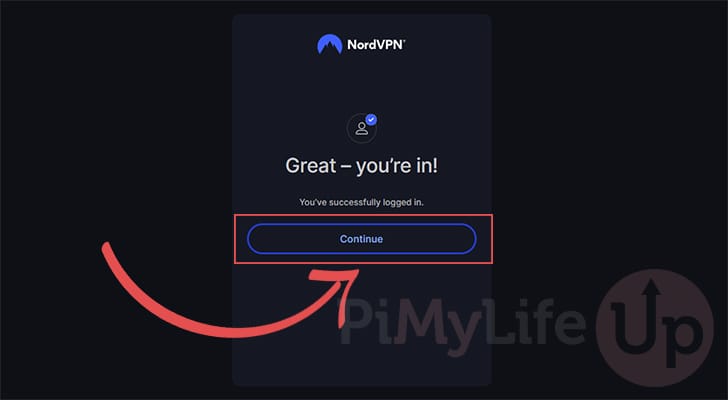
Continue in the browser: https://api.nordvpn.com/v1/users/oauth/login-redirect?attempt=XXXXXXXX-XXXX-XXXX-XXXX-XXXXXXXXXXXXX7. Once logged in, you will be greeted with a big “Continue” button.
Right-click the “Continue” button and click the “Copy link” option. You need this link to complete the login process within the terminal.
The URL should look like the one we have shown below. You will need this URL for the next step.
nordvpn://login?action=login&exchange_token=MGFlY2E1N
mE4YjM2NDM4NjUzN2VjOWIzYWM3ZTU3ZDliNDdiNzRjZTMwMjE5Yjk
zZTNhNTI3ZWZlOTIwMGJlOQ%3D%3D&status=done
8. Back in the terminal, use the following command to log in your Raspberry Pi into the NordVPN network. This will also be what will allow us to enable the Meshnet service.
Ensure you replace “<URL>” with the URL you got in the previous step.
nordvpn login --callback "<URL>"CopyAn example of how this command would look with a valid login URL is shown below.
nordvpn login --callback "nordvpn://login?action=login&exchange_token=MGFlY2E1N
mE4YjM2NDM4NjUzN2VjOWIzYWM3ZTU3ZDliNDdiNzRjZTMwMjE5Yjk
zZTNhNTI3ZWZlOTIwMGJlOQ%3D%3D&status=done"Copy
9. If you have successfully logged in to the NordVPN network, you should see the following message within the terminal.
This means we can finally move on to enabling the Meshnet feature on our Raspberry Pi.
Welcome to NordVPN! You can now connect to VPN by using 'nordvpn connect'.Turning on Meshnet on the Raspberry Pi
10. Now that we have installed the NordVPN command line tool, enabling the Meshnet feature on our Raspberry Pi is as simple as using the following command within the terminal.
Running this command will enable Meshnet and then connect you to any other devices you have Meshnet set up on.
nordvpn set meshnet onCopyBelow, you can see that “Meshnet” has been enabled successfully.
Meshnet is set to 'enabled' successfully.11. You can ensure that you have Meshnet enabled by running the following command in the terminal.
This command will print out details of your current device, as well as any peers you are connected with.
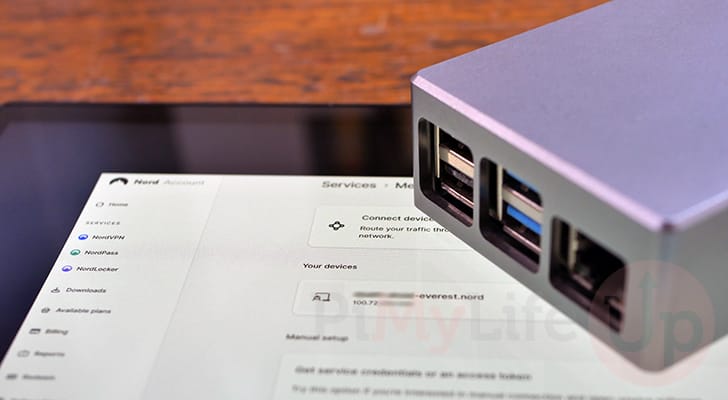
nordvpn meshnet peer listCopyBelow, you can see how we can easily see the hostname and IP address that Meshnet assigned to our Raspberry Pi. We can use the hostname or IP address to connect to this machine as long as we are part of the same Meshnet network.
This device:
Hostname: examplename-everest.nord
Nickname: -
IP: XXX.XX.XXX.234
Public Key: XXXXXXXXX0YXXXgpd6Xs/XX0M/58ZbXXXXXQ6mXXX=
OS: linux
Distribution: Debian GNU/Linux

Local Peers:
[no peers]

External Peers:
[no peers]
Conclusion
By this point in the tutorial, you should now have NordVPN’s Meshnet set up and running on your Raspberry Pi.
Meshnet is a super neat technology that makes setting up a virtual network between your devices a simple process.
Please feel free to comment below if you have questions about using Meshnet on your Pi.
If you found this project to be helpful, we recommend that you check out our many other Raspberry Pi projects.


This was quite helpful thankyou, I was struggling with the syntax of the callback command.
IMO worth mentioning the other command used to enable automatic acceptance of file transfers.
nordvpn meshnet peer auto-accept enable DEVICE.NAME.OR.IP
I have followed the tutorial and when i try to use my to route traffic I am getting the error message that this device is unknown
Hi Michael,
That definitely does not sound like the intended behaviour. I quickly ran back over this to try and work out what exactly might be causing this issue.
1. If you run the following command do you see that your device is listed there?
The value you want to use when connecting is either the hostname (E.G., pimylifeup-alps.nord) or. the IP address (E.G., 100.73.XXX.87).
2. Once you have the hostname or Meshnet assigned IP address then you may also need to set it to allow traffic routing. (You may need to also do the same on the device)
You can do this by using the following command in the terminal, where the IP address is the device you plan on routing through. Replace “” with the value you retrieved in the previous step.
3. Now if everything is working properly, you should then be able to route through it using the command below.
This command will initiate the connection and start routing your traffic through the selected device.
Please let me know if this helps resolve the issue you are running into. Something like Tailscale might be a bit easier to manage depending on your use case.
Kind regards,
Emmet
I did have it working then I stupidly reformatted the SD card as I also tried tailscale which didn’t work at all and caused issues.I then tried Meshnet again and it wont work.
Nickname: RaspPi
Hostname: xxxxxxxxxxx-everest.nord
This is what it shows
I then get device unknown if I try your fix
Hi Michael,
From what you have shared, I’m not entirely sure what would be happening here. Especially since you used to have it working fine, I’ve tried to comb more through the NordVPN documentation to see if there is anything else that might help
It might be worth trying to run a refresh of the peer list to see if that helps, as I did actually experience some weirdness when re-installing NordVPN in my testing.
You can refresh the peer list by using the command below.
Then list out the peers again and ensure that both devices are being listed.
Kind regards,
Emmet
Thanks for your reply,
I’m still getting the same error message. When I Look on my Mac I have enabled all the permissions. i’m just started using the Pi and have little experience with coding. I remember now that I found a website that did allow me to solve this issue. Of course I can’t remember where lol. I have a green circle on my mac which I presume means the link is live.
I am truly stumped.
regards,
michael
Hi Michael,
If you have the app open on your mac, within the Meshnet tab you should see your devices listed. On here each device will have like four icons next to it. The globe icon should have a green arrow on it to indicate that routing is allowed. I think an up arrow indicates you can route through that device and a down arrow indicates it can route through your device.
I’m a bit stumped here as well, as it seems to be all working fine on a fresh installation which makes it more confusing.
I’ll try a do a bit more research on this but can’t seem to find many other users racing into the same issue.
Kind regards,
Emmet
Thanks Emmet I appreciate this
michael
so i have solved the issue.
1. allow the peer routing to all other nodes on the pi
2. goto mac and allow all permissions on the pi
3. all sorted
Hi Michael,
Really glad to hear that you managed to work out exactly what was going wrong, and thank you very much for posting your solution!
Kind regards,
Emmet