In this quick Linux guide, we will show you how to enable or disable IP forwarding functionality.
IP Forwarding is a system that allows a device such as your Linux one to accept network traffic and forward it to another device.
This functionality is intended to allow the Linux operating system to act as a router, firewall, or NAT device, as it will enable packets to be routed correctly. If you intend to run a VPN server on your Linux system, you will likely need to enable IPv4 or IPv6 forwarding.
Most Linux-based operating systems disable IP forwarding by default. This means that when it receives a packet that wasn’t intended for your device, Linux will discard it.
Luckily, enabling or disabling IP forwarding is made pretty simple on Linux. All we need to do is adjust a setting called “net.ipv4.ip_forward” for IPv4 forwarding and “net.ipv6.conf.all.forwarding” for IPv6 forwarding.
All of the steps that we are covering in this guide will be using the terminal. If you are using an operating system with a desktop interface, you can typically bring up the terminal by pressing CTRL + ALT + T.


Checking if IP Forwarding is Enabled
Before you start enabling or disabling IP forwarding on your Linux machine, you should check what it is already set to. By default, most operating systems will have IPv4 and IPv6 forwarding disabled, as most users do not require this functionality.
Luckily, using the terminal, verifying whether the IP forwarding functionality has been enabled is pretty easy and quick.
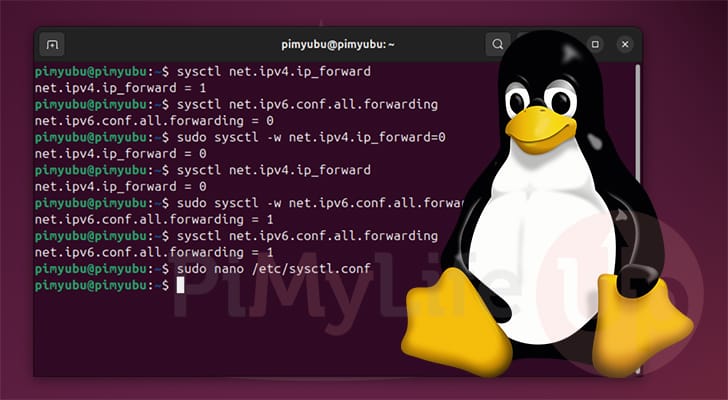
1. For this first command, let’s check to see whether our Linux system has IPv4 IP forwarding enabled.
All we need to do to check this is to use the command below. With this command, we use the “sysctl” tool to poll the “net.ipv4.ip_forward” option.
sysctl net.ipv4.ip_forwardCopyWithin the terminal, you should get a response similar to the one below.
If the value is 0, IPv4 Forwarding is disabled; if it is 1, the functionality is enabled.
net.ipv4.ip_forward = 02. On Linux, IP forwarding for IPv6 is under a different option called “net.ipv6.conf.all.forwarding“.
We can use the sysctl tool to poll the value of this option by running the following command in the terminal.
sysctl net.ipv6.conf.all.forwardingCopyBelow, you can see that our system has IPv6 forwarding disabled because the value equals 0. If this were set to 1, we would know that our Linux system has IPv6 forwarding enabled.
net.ipv6.conf.all.forwarding = 0Enabling or Disabling IP Forwarding on Linux
Linux makes disabling or enabling IPv4 and IPv6 forwarding a reasonably straightforward process. You must decide whether you want this IP forwarding enabled permanently or temporarily.
If you choose the temporary route, the IP forwarding change will only stick until you restart your Linux system. This is useful when you only need this functionality temporarily.
The permanent change involves adding the IPv4 and IPv6 forwarding settings to a config file that is loaded when your Linux system reboots. This means the settings will persist whenever you restart your system. If you are planning to route traffic through your Linux system, then this is the route you will want to take.
Please note that you must be a superuser to adjust the IP forwarding settings on Linux.
Temporarily Enabling or Disabling Forwarding
Over the next couple of sections, we will quickly show you how to temporarily enable or disable IP forwarding on your Linux system.
Remember that these are only temporary. When you restart your Linux device, these option changes will be reset back to their defaults.
Enabling or Disabling IPv4 Forwarding Temporarily
To temporarily enable IPv4 forwarding on Linux, we need to use the “systctl” command to set the “net.ipv4.ip_forward” option to “1” by running the following command.
Here, we are using the “-w” option, which tells the “sysctl” command to write our new value to the option.
sudo sysctl -w net.ipv4.ip_forward=1CopyIf you want to temporarily disable IPv4 forwarding, you can simply use “0” instead of “1” as shown below.
sudo sysctl -w net.ipv4.ip_forward=0CopyUsing the Terminal to Enable or Disable IPv6 Forwarding Temporarily
Linux also allows you to enable or disable IPv6 forwarding. This is only really useful if you intend to handle traffic through IPv6 addresses.
To temporarily enable IPv6 forwarding, all you need to do is use the “sysctl” command to set the “net.ipv6.conf.all.forwarding” option to “1“, as shown below.
We use the “-w” option to tell the “sysctl” tool we want to write this new value.
sudo sysctl -w net.ipv6.conf.all.forwarding=1CopyLikewise, to disable IPv6 forwarding on Linux, you simply need to set the option to “0” instead of “1.”
sudo sysctl -w net.ipv6.conf.all.forwarding=0CopyPermanently Enabling or Disabling IP Forwarding on Linux
If you want your IP forwarding setting to stick on Linux, you will need to edit a configuration file. In particular, we will want to edit the config file for “sysctl“.
When your Linux system boots, it reads from the sysctl configuration file and applies any settings changes to the kernel. This makes it the perfect place for us to enable or disable IP forwarding on your Linux system permanently.
1. Your first step is to begin editing the “syctl.conf” configuration file by running the following command.
We are using the nano text editor in this example, but you can use whichever text editor you feel most comfortable with.
sudo nano /etc/sysctl.confCopy2. Once you are within this configuration file, to enable IPv4 forwarding on your Linux system, you will want to add the following line to the bottom of the file.
If you want to disable IP forwarding rather than enable it, replace “1” with “0“.
net.ipv4.ip_forward=1CopyLikewise, to enable IPv6 forwarding on Linux, you must add the following line to the bottom of the file.
Alternatively, replace “1” with “0” to disable this functionality.
net.ipv6.conf.all.forwarding=1Copy3. With the config line added to the bottom of the file, you can save and quit out of Nano by pressing CTRL + X, Y, and then ENTER.
4. Even though we have added those lines to the configuration file, those changes will not normally be read until you restart your system.
To get Linux to re-read the configuration file and enable or disable the IP forwarding functionality immediately, run the command below.
The “-p” option basically tells the tool to re-read the main config file.
sudo sysctl -pCopy5. You can verify that you have successfully enabled or disabled IPv4 or IPv6 forwarding on your Linux system by skipping back to the start of this guide.
The starting section shows you how to quickly and easily view the currently set IP forwarding settings.
Conclusion
Hopefully, by this point in the tutorial, you will have successfully learned how to enable or disable the IP forwarding functionality built into the Linux kernel.
IPv4 forwarding is useful in several different cases. Luckily, Linux has made controlling this functionality quick and easy.
Please drop a comment below if you have had any issues with getting this option to enable or disable.
If you liked this quick guide, we highly recommend you take some time to explore our many other Linux tutorials.