In this tutorial, I will be going through the process of installing and setting up Windows 10 IoT Core for the Raspberry Pi.
For those who don’t know Windows 10 IoT Core is a version of the Windows 10 operating system built just for IoT devices such as the Raspberry Pi. It is very useful if you plan on utilizing something like UWP to write your application, it also gives you access to Windows 10’s core and its wide variety of features.
I very briefly go into coding and pushing applications to the device. If you need to learn more about how to do things, then I highly recommend looking at some of Microsoft’s documentation as it is extensive.
Please note to complete this tutorial you will need either a Raspberry Pi 2 or a Raspberry Pi 3. This operating system is unsupported on other versions of the Raspberry Pi.
The software this tutorial relies on is no longer actively maintained. This tutorial is left online for archive purposes only.
Equipment
To be able to install Windows 10 IoT on the Raspberry Pi correctly you will need the following pieces of equipment.
Recommended
Optional
You will also need a computer running Windows 10 to be able to complete the following process.
Installing Windows 10 IoT on your Raspberry Pi
Please note, the software this tutorial relies on is no longer actively maintained. This tutorial is left online for archive purposes only.
1. To begin, we will first need to download and install the Windows 10 IoT Core Dashboard. To download this, we need to go to the Windows 10 IoT website here.
This piece of software is what will download the correct system for our Raspberry Pi and format it.
2. Insert your SD card into the computer or laptop’s SD card reader and check the drive letter allocated to it, e.g. G:/. You will need to know this to ensure that you are formatting the correct drive, as you don’t want to be doing this to any important data.
3. Now that you have inserted your SD Card into your computer/laptop, we will need to run the “Windows 10 IoT Core Dashboard” software. If you can’t find this easily after installing it, then try running a search.
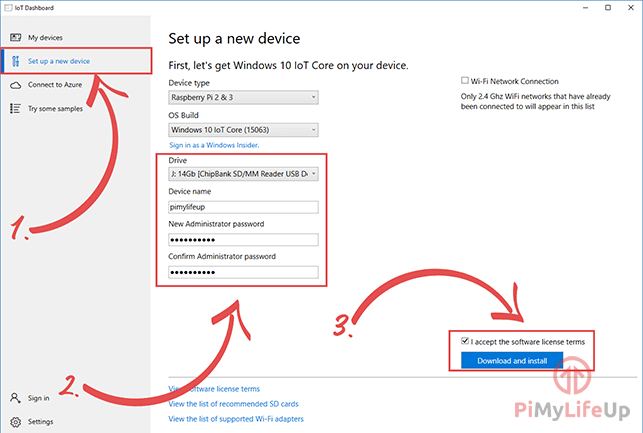
With the software loaded up, we need to go into the “Set up a new device” (1.) screen as shown below.
On here you will want to set your “Device name” and set the “New Administration password“. Make sure that you set the password to something you can remember easily, but is secure, as this password is what you will use to connect to your Raspberry Pi (2.) remotely.
Before we continue, make sure that “Drive” is set to the correct drive, make sure that the drive letter is the same as the SD Card that you inserted in step 2.
When you have filled in your information, tick the “I accept the software license terms” and then press the “Download and install” button (3.).
4. Once the software has finished downloading and installing Windows 10 IoT Core for the Raspberry Pi, we can proceed on with this tutorial. Now safely to out your Micro SD card from your computer so you can put it into your Raspberry Pi.
Booting and setting up your Windows 10 IoT device
1. Now that we have successfully downloaded and written the image to our Raspberry Pi’s Micro SD card we can insert the SD Card back into the Raspberry Pi.
2. Before we power back on the device, make sure that you plug in an HDMI cable and a mouse and keyboard, we will need all 3 of these if you intend on utilizing Wi-Fi on your Raspberry Pi Windows 10 IoT device.
Once done you can plug your Raspberry Pi back into power and allow it to start booting up.
3. Now is the long wait for your Raspberry Pi to start up, when I did this it took a fair while for the Raspberry Pi to start up on boot, don’t be afraid if you think it may have frozen, it takes some serious time to do the initial setup and startup.
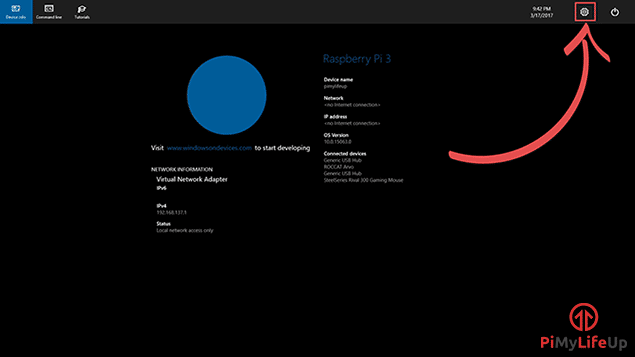
4. Once it has finished starting up, you should be greeted with a screen like below. Now to set up a WiFi connection, we need to click the cog in the top right-hand corner.
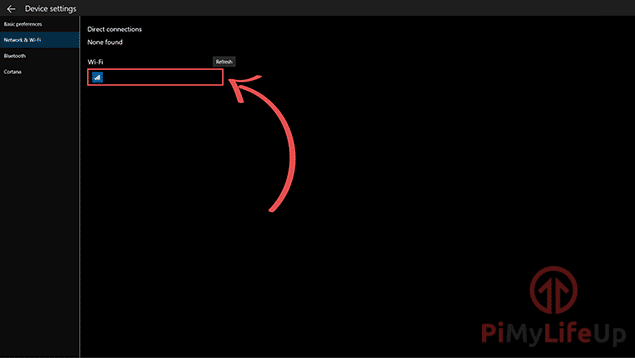
5. Now in the next menu, we need to go to “WiFi and Network“, and select the WiFi access point you want to connect to, you will receive a prompt asking you to enter your network password.
Once you have connected to your WiFi network, you can return to the main screen to grab your Raspberry Pi’s IP Address, as we will need this further along in the tutorial.
Connecting to Your Device
Now there are three ways you’re able to connect to your Raspberry Pi Windows 10 IoT device. I will quickly mention each method now.
Web Browser
First off is utilizing your web browser to talk with the Raspberry Pi, it is probably the easiest out of the three main ways to deal with. All you simply need to do is point your Web Browser to your Raspberry Pi’s IP Address on port 8080.
For example, my Raspberry Pi’s local IP address is 192.168.0.143, so in my favorite web browser I would type in http://192.168.0.43:8080
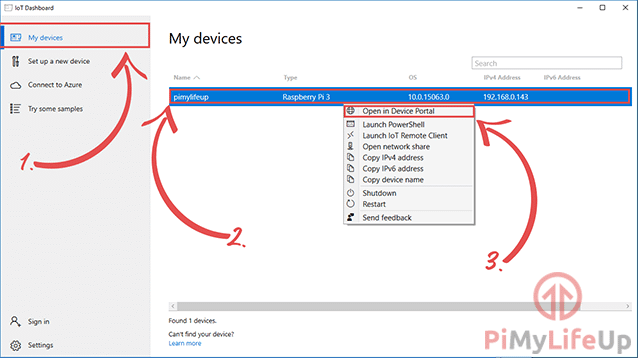
You can also use the “Windows 10 IoT Core Dashboard” tool, to be able to click to get to the devices web page as well. Simply load up the application, go to the “My Devices” (1.) tab in the left sidebar, right-click (2.) on the device you want to connect to and click “Open in Device Portal” (3.).
Upon either going to your Raspberry Pi’s IP Address or using the Windows 10 IoT Core Dashboard tool, you will be first asked to log in. Make sure you use administrator as the username, and the password you set at the beginning of this tutorial as the password.
Upon successfully logging in you should be greeted with the screen below. We recommend exploring around as the web tool does offer a fair bit of access and incite to your device. You can debug and see real-time performance through this interface which is incredibly helpful to see what you Raspberry Pi is doing.

PowerShell
PowerShell is not a tool that many will be too familiar with, but it is Microsoft’s more advanced version of command prompt giving you access to a wealth of tools including the ability to administer remote systems, a feature we will be making use of shortly.
PowerShell makes it rather simple to interact with your Raspberry Pi Windows 10 IoT device as we will show shortly. There are two ways of connecting to your device through PowerShell. The easier way relies on the “Windows 10 IoT Core Dashboard” tool (Steps 1a+), the other way is utilizing PowerShell to do everything (Steps 1b+).
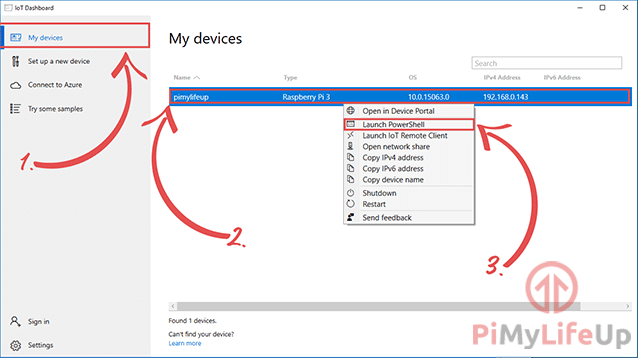
1a. First off, we will explain the simple way, first load up the “Windows 10 IoT Core Dashboard” tool. With the application open, go to the “My Devices” (1.) tab in the sidebar, right-click (2.) on the device you want to connect to and click “Launch PowerShell” (3.).
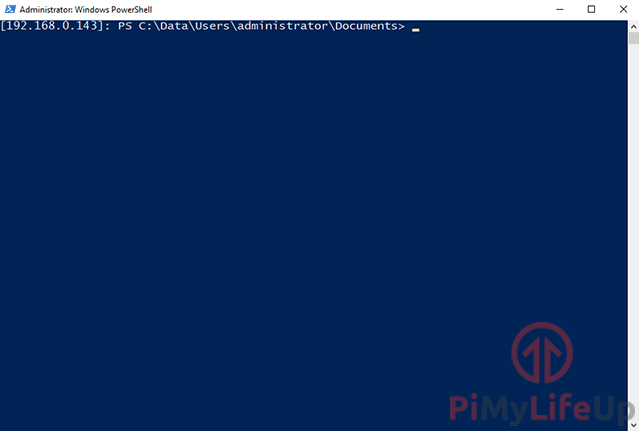
2a. This process will launch a PowerShell session that will automatically begin to connect to your Raspberry Pi. When prompted enter the password we set at the start of this tutorial. You should be greeted with a PowerShell window like shown below when you have been successfully connected.
1b. The second way of connecting to your Raspberry Pi is slightly more complicated and utilizes PowerShell completely. To open PowerShell on Windows 10, right-click the windows Icon and select “Windows Powershell (Admin)“.
2b. In here we want to type in the following command, this adds our Raspberry Pi as a trusted device for PowerShell to connect to. Make sure you replace [YOUR _PI_IP_ADDRESS] with your Raspberry Pi’s local IP address.
Set-Item WSMan:\localhost\Client\TrustedHosts -Value [YOUR _PI_IP_ADDRESS]Copy3b. With that done, we can now start a PowerShell session with our Raspberry Pi Windows 10 IoT device. To do this enter the command below into PowerShell, making sure you replace [YOUR _PI_IP_ADDRESS] with your Raspberry Pi’s local IP address.
Enter-PSSession -ComputerName [YOUR _PI_IP_ADDRESS] -Credential [YOUR _PI_IP_ADDRESS]\AdministratorCopy4b. You will be asked to enter the password you set earlier in this tutorial. Enter that to continue.
5b. After about 30 seconds, PowerShell should have now successfully made the connection, and you should see a screen like below.
SSH
The third main way of interacting with your Raspberry Pi Windows 10 IoT device is to utilize SSH. The main advantage of this is that it is a widely available protocol and is something most users of the Raspberry Pi will be thoroughly familiar with.
You can also follow the SSH instructions below to use SSH to connect to your device.
1. To start off make sure you have an SSH client installed, on Windows I highly recommend using either Putty or MobaXterm.
2. Now in your SSH Client connect to your Raspberry Pi’s IP address on port 22 (The default SSH port).
3. When asked to enter the username you want to log in with, make sure you use administrator, as this is the default login username for Windows 10 IoT Core.
4. You will now be asked to enter the password associated with the account, the password you want to use is the one you would have set within the Windows 10 IoT Core Dashboard at the start of this tutorial.
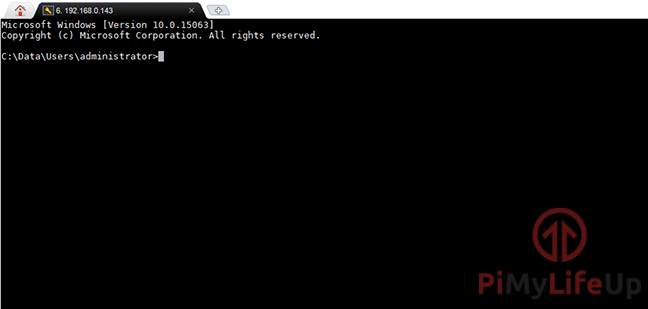
5. You should now be successfully logged into your Raspberry Pi Windows 10 IoT Core device and should be greeted with a screen like what is shown below.
If you want to learn more about utilizing SSH and some of the commands you can use within the session then make sure you take a look at Microsoft’s own IoT documentation here.
Setting up Visual Studio for Windows 10 IOT Core
Lastly, you are most likely going to want to setup Visual Studio Community. The reason for this is so that you can start developing your own applications for Windows 10 IoT Core.
Installation
1. First, we must download and install Visual Studio Community, and luckily this is easily available on Microsoft’s website, you can find Visual Studio Community by going to the visual studio community.
Be warned that the download and installation of Visual Studio Community can take some time especially on slow internet connections.
2. Once the installation process has completed, you can continue this with the tutorial. Start by launching up Visual Studio Community. It will ask you to do some configuration, and it should be fine to use the default settings.
3. You will notice that there aren’t any IoT templates in the default installation. Click on the here link next to install Windows 10 IOT core project templates back on the page linked back.
4. Now one of the things you will find that is currently missing is any project templates for Windows 10 IoT Core. We can grab and install these by going to the Visual Studio marketplace.
5. Once you have downloaded and installed the templates, close and re-open Visual Studio, you need to do this for Visual Studio to load them in.
6. Upon creating the new project, you will be prompted to activate developer mode on your Windows 10 device. Simply follow the prompts provided to activate it.
7. Everything should now be ready for you to code your new application. You can find documentation on certain features of Windows 10 IoT Core by going to their documentation page. You can also find a document that explains how to utilize the GPIO pins from within Windows 10 IoT by going to their GPIO documentation.
Pushing Code to the Device
1. Once you have your new application in a state in which you want to deploy it to your Raspberry Pi Windows 10 IoT device, go up to the tab that has a green arrow in it.
2. Click the black drop-down arrow, and select “remote machine”.
3. Now in here, you should be able to select your Raspberry Pi underneath automatic configuration. However, in some cases, this will not function correctly, and you will have to enter the IP of your Raspberry Pi manually.
4. You should now be able to push code/applications to your Windows 10 IoT Raspberry Pi.
I hope you now have learned how to install Windows 10 IoT core for the Raspberry Pi. If I have missed anything, or if you are having troubles or anything else you would like to share then be sure to drop a comment below.


Hi, I want to develop a GUI based application in C#.Net, that has Winforms for GUI. Would WPF applications can run on Raspberry PI?
Windows IOT Core can only run Windows UWP applications. It cannot run windows forms or WPF applications.
If I installed windows10 OS then can I install any Visual Basic software in it like we are doing in computer?
Hi.
Nice article. I would like ask you to explain more about official RaspberryPi Display and W_IoT . I have one , it works with Raspbian, however is black with W_IoT . My W_IoT is working, because I am able to see it with hdmi display connected to RaspberryPI2 …. but nothing is showed on official RaspberryPi Display . Is there some special settings required ?
Lubo.