In this tutorial, we will show you how to set up an Orb network monitor sensor using Docker.
Orb is an awesome piece of software that makes monitoring and tracking the performance of your entire network easy.
The key advantage of Orb is that it has been designed to be distributed, even when used in the same network. For example, you could set up an Orb sensor that monitors your Ethernet connection or another one that just monitors your Wi-Fi connection.
Instead of just monitoring your internet speed and latency, Orb takes other factors into account, including the overall uptime of the connection. A fast connection can be useless if it constantly drops out. Another place that Orb monitors your network is the latency between your device and the router, as that can also be a source of issues in many cases.
Docker is a perfect tool for running an Orb sensor because it simplifies the whole process. This means you can easily begin monitoring your network from anywhere you are running a Docker container.
The Orb team even provides builds for the vast majority of available system architectures. This means you can use Docker to run your Orb sensor on an ARM device like the Raspberry Pi.


Installing and Using the Orb Sensor Using Docker
Over the following few sections, we will walk you through all the steps needed to set up and run an Orb sensor using Docker.
These steps should work for any Linux-based operating system that you are using. We personally tested this on both Ubuntu Server and Raspberry Pi OS.
Preparing the Orb App
1. Now, before we can install Docker and use it to run the Orb sensor, you must have the Orb app installed on a compatible device.
This device can be anything you like as Orb does support the vast majority of devices. For example, it could be your Windows PC, iOS device, or Android. You will need this app to connect your Orb sensor to your account.
Orb provides a list of devices it supports on its website.
https://orb.net/get-orb2. Once you have installed the Orb app, you should be greeted with the dashboard screen like the one shown below.
Once you see this screen, you can safely proceed to setting up the sensor.

Preparing your Linux System for the Orb Sensor
3. With the Orb app installed, the next part you will require is Docker. Luckily, installing Docker onto a Linux machine is a straightforward process that can be completed in just a few short steps.
If you don’t have Docker installed, we highly recommend our guide, which will walk you through all the steps of installing and testing Docker on Linux.
https://pimylifeup.com/linux-docker-install/4. After installing Docker, we will create a directory where we can store the Compose file for the Orb sensor on our machine.
We can create this directory by using the mkdir command within the terminal. We are using “/opt/stacks/” as the base directory, as we find it an easy place to organize our various Docker compose files. You can place this Compose file whenever you would like. Remember that you may need to adjust steps later in this guide.
sudo mkdir -p /opt/stacks/orbsensorCopy5. Once the folder has been created, change into it by using the cd command. You will need to be in this folder for when we start up the Orb sensor’s container.
cd /opt/stacks/orbsensorCopyWriting a Docker Compose File for the Orb Network Sensor
6. We are finally at the point where we can write the Docker Compose file to set up and manage the Orb network sensor. Compose files are great for managing Docker containers, just like this one.
We can begin to write this file using the Nano text editor by running the following command.
sudo nano compose.yamlCopy7. Add the following lines to this file. These lines define a singular service called “orb-docker.” We set this to download and use the official Orb Docker container.
Next, we set this container’s network mode to “host.” This means that it will act as if it were a program running natively on your device and not through Dockers’ networking layer.
We define a single volume with the network mode set so that the Orb network sensors configuration data persists between restarts. Any file Orb saves will be stored within the “/data” directory.
Finally, we set the “restart” mode for this Docker container to “always” to ensure that Docker will keep your Orb network sensor running no matter what.
services:
  orb-docker:
    image: orbforge/orb:latest
    container_name: orb-sensor
    network_mode: host
    volumes:
      - ./data:/root/.config/orb
    restart: alwaysCopy
8. Once you have finished writing the file, save and quit by pressing CTRL + X, Y, and then ENTER.
Starting up the Orb Network Sensor Docker Container
9. After writing the Docker Compose, starting up the Orb Network sensor \container is as simple as using the following command within the terminal.
The container should only take a few minutes to start up, as Orb is a relatively small piece of software. If you are having any issues with the container starting, remove the “-d” option will help show any errors that are occurring.
docker compose up -dCopyConnecting your Orb Sensor to your Account
10. With the Orb network sensor Docker container now up and running, it will have automatically begun monitoring your network. To see that data, you need to claim your sensor with your Orb account.
Return to the Orb app that you will have installed at the start of this tutorial. Within this app, you should hopefully now see that it has automatically detected an unlinked Orb sensor on your network (1.). To link this sensor to your account, click the “Link to my account” button (2.).

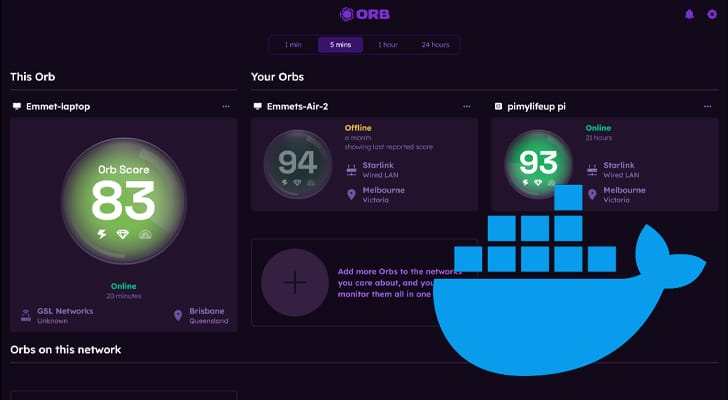
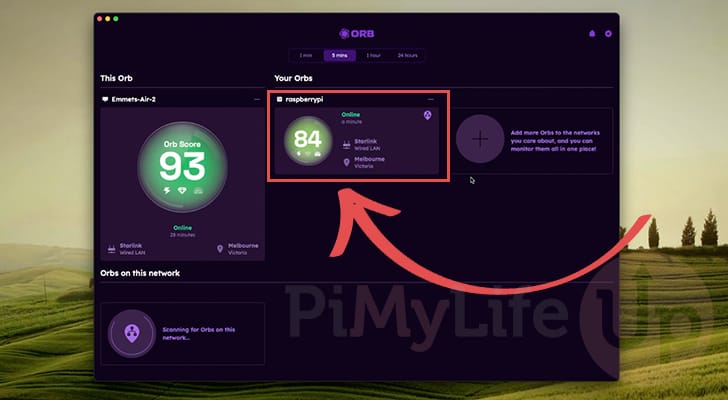
11. It might take a moment for Orb to link this sensor, but once it does, it should appear under the “Your Orbs” header. This card will give you a brief overview of your sensor, including its current Orb score. The Orb score is calculated based on your device’s network speed, reliability, and latency.
If you want more detailed information about your network, simply click the sensor.
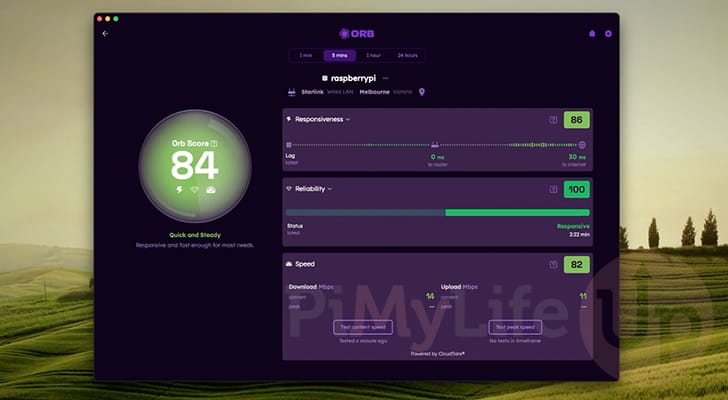
12. By clicking a particular sensor, you will see a significant amount of information about your network, including its performance over time.
This more detailed screen can better show whether your network is struggling at a specific time and provide a better breakdown of what is being used to calculate your device’s Orb score.
Updating the Orb Sensor Docker Container
1. One key benefit of using Docker to run your Orb network sensor is that updating to the latest release is straightforward.
These next few steps will show you just how easy it is to update your sensor. First, you will want to change to the directory where you wrote the Compose file for the Orb sensor to begin with.
If you have followed our tutorial, you should be able to get to the right folder by using the command below.
cd /opt/stacks/orbsensorCopy2. Once we are in the correct folder, we will want to get Docker to download the latest Orb sensor image. We can use the command below to get Docker to do this.
This will download the latest image but won’t automatically update your existing container.
docker compose pullCopy3. Now update your already running container to the new release of the Orb sensor by using the command below. Docker will detect when a new image is available, stop the current running container, and then start it up again using the new image.
docker compose up -dCopyConclusion
If you have reached this point in the tutorial, you should hopefully have successfully installed an Orb sensor running in a Docker container.
Docker is one of the best ways to run the Orb network sensor. It is super simple to start the sensor while having Docker ensure it keeps running.
If you have had any issues with getting the Orb sensor working, please feel free to leave a comment below, and we will try to help out where we can.
If you liked this guide on using Docker to run an Orb network sensor, we highly recommend checking out our many other Docker guides. Docker is a great way to self-host software on your device.