In this tutorial, we will show you how to log in as a root user on Ubuntu.
By default, most variants of the Ubuntu operating system have the ability to login to the root user disabled.
This tutorial will show you how to restore the ability to log in to the root user.
Before you do this, there are some critical reasons that Ubuntu desktop has the root user disabled. Most importantly, it is significantly more secure when this user’s login functionality is turned off. Allowing access opens a new attack vector. A root user instantly has full access to everything on your system without the need to type in your password to escalate privileges.
Additionally, there is no need to log in to the root user if your user has superuser privileges. With superuser privileges, you can use sudo to elevate a command to being run as a superuser. You can even change to operating the whole terminal as the superuser, giving you the same access as the root user would provide you.
With that said, if you still want to be able to log in with the root user on Ubuntu, continue with this guide to see how you can do this.
This guide is focusing on the desktop variant of Ubuntu as that is where logging in as the root user makes the biggest difference. If you are using the terminal, swapping to the root user from your current user is simple and doesn’t require any configuration changes.
Restoring Login Access to the Root User on Ubuntu
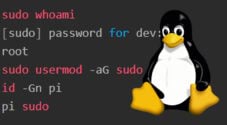
To restore login access for the root user on Ubuntu, you will need to have access to a user who is part of the sudo group. This will typically be the first user created on your system. However, it is possible to add additional users to the sudoers group.
The following steps will be run within the terminal. If you are running the desktop variant of Ubuntu, you can bring up the terminal by pressing CTRL + ALT + T on your keyboard.
Setting a Password for the Ubuntu Root User
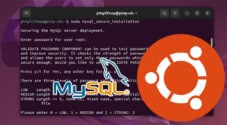
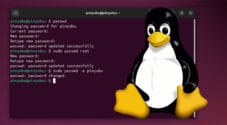
1. The first thing you must do is set a password for your root user on Ubuntu. By default, this user has no password set which blocks anyone from being able to login with the root user.
Setting a new password for the root user is as straightforward as using the passwd command on the “root” user.
sudo passwd rootCopy2. You will now be prompted to specify a password that you will use to log in to the root user with.
Ensure you set this to something secure, as the root user has full control over the Ubuntu operating system.
New password:3. To ensure you don’t accidentally set an incorrect password for your user, you will be asked to re-enter the password again.
Retype new password:4. If you have successfully set a password for the root Ubuntu user, you should see the following message appear within the terminal.
passwd: password updated successfullyIf you ever want to return the root user to be unable to be logged in, you can delete the password you just set using the following command.
Once the password is deleted, your root user will be locked up again.
sudo passwd -d rootCopyAllowing Root Login Access through the Ubuntu Desktop Interface
5. Even though we have now assigned a password to the root user, Ubuntu’s desktop manager called GDM3 is set to block access to the root user.
Luckily, thanks to this system being fairly configurable we can reconfigure the system to allow root access. To do this we must edit the “custom.conf” file using the following command.
sudo nano /etc/gdm3/custom.confCopy6. With the file opened in Nano, you will want to scroll down until you find the following line.
# TimedLoginDelay = 10CopyAfter finding the line above, add the following directly below it. This line tells Ubuntu’s desktop manager to allow the root user to log in.
AllowRoot=TrueCopy7. After making changes to the file, save and quit by pressing CTRL + X, Y, and then ENTER.
8. We must change one other configuration file to allow the root user to log in on Ubuntu. The next is the configuration file for the “gdm-password” service. Ubuntu uses this service to help handle logins and unlocks.
You can edit this configuration file using Nano by running the following command in the terminal.
sudo nano /etc/pam.d/gdm-passwordCopy9. Within this file, you will find the following line near the top. This line basically stops the root user from logging in to Ubuntu regardless of whether the password they entered was correct.
auth required pam_succeed_if.so user != root quiet_successTo disable this line, you only need to add a hashtag (#) to the front of the line.
#auth required pam_succeed_if.so user != root quiet_success10. Once you finished making this change, save and quit out of Nano by pressing CTRL + X, Y, and then ENTER.
11. To ensure that all changes take effect, restart your Ubuntu system using the reboot command.
sudo rebootCopyLogging in Using the Root User on Ubuntu
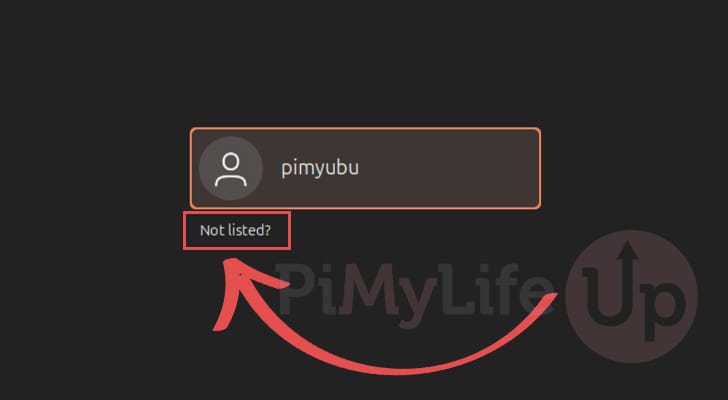
12. Now that you have reconfigured your Ubuntu system to log in with the root user, you may want to know how to actually do that.
Within the login screen, you will want to click the “Not Listed?” option.
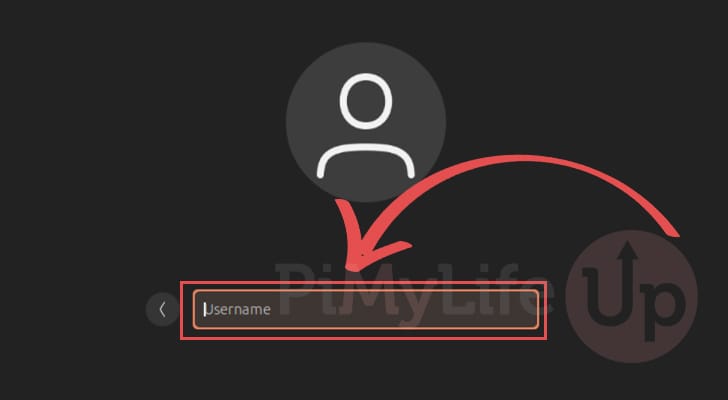
13. You will now be prompted to enter the name of the user you want to login as.
Since we want to use the root user we just allowed access to you will want to specify “root“.
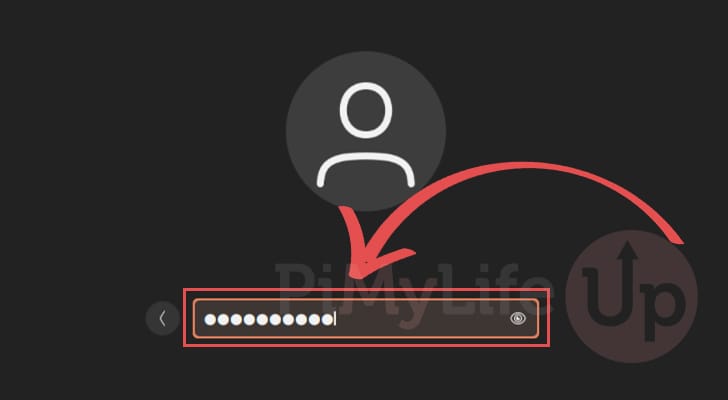
14. Next, type in the password you set for your Ubuntu root user earlier and press the ENTER key.
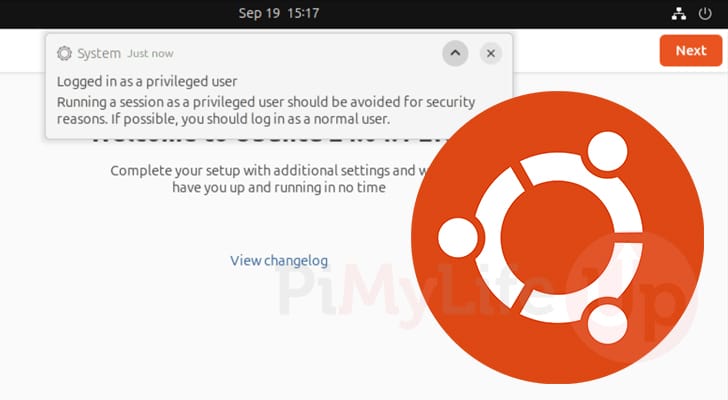
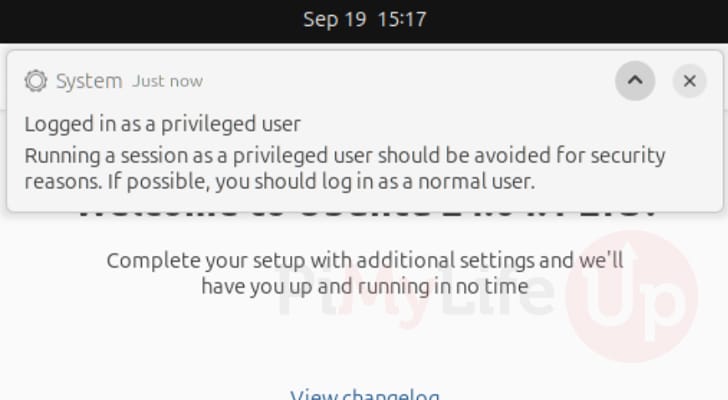
15. Once you log in as the root user, Ubuntu will print a message at the top of the screen warning you that you are running this session as a privileged user.
As this message points out, running this as the root user is something that should be avoided where possible.
Switching to the Root User in the Terminal
If you want to switch to the root user within the Ubuntu terminal, you don’t have to edit any configuration settings or reduce the security of your system by allowing access to the root user.
1. All you need is for your current user to have superuser privileges.
If your user does, swapping to the root user is as simple as running the following command within the terminal. With this command, we elevate to the superuser and then swap over to the root user.
sudo suCopy2. You can verify you are now running as the root user as the Ubuntu terminal will change so that the terminal prompt looks somewhat similar to what we have shown below.
root@pimyubu2:Copy3. If you are done with using the root user within the terminal, you can return to your normal user by using the “exit” command.
exitCopyConclusion
Hopefully at this stage you will now have a good idea of how you can configure Ubuntu to allow access to the root user.
Ubuntu, by default, will block direct access to the root user since it can be rather insecure, especially for those who aren’t too familiar with dealing with Linux. Additionally, everything you can do with the root user can simply be done by elevating to the superuser with the sudo command.
Please comment below if you have had any issues accessing the root user.
If you found this tutorial helpful, we highly recommend exploring our many other Ubuntu guides.