This quick guide will show you how to enable Wayland on the Ubuntu operating system.
Wayland is the replacement many operating systems are starting to use instead of the older X11 window system.
This software is a modern communication protocol between the display server and client. It is meant to bring numerous benefits over X11, such as improved security, significantly improved code base, performance, and more.
It also has opened up to some newer software such as Waydroid that utilize some of the new functionality introduced by Wayland. However, don’t expect the most seamless move to Wayland, there is plenty of software that will no longer function.
Wayland is available for any user that is running Ubuntu 18.04 or newer. If you have Ubuntu 22.04 or newer, you don’t need to do anything to enable Wayland as it is enabled by default.
If you run an older version of Ubuntu than 18.04, you are out of luck with enabling Waydroid. Older versions are missing this functionality, so it simply can’t be enabled without some significant effort.
Of course, for these steps to enable Wayland to function you will need to be running a desktop version of Ubuntu. The server variant of Ubuntu obviously doesn’t have a desktop manager.


Quick Steps to Enable Wayland on Ubuntu
Enabling the Wayland communications protocol on Ubuntu is a fairly easy process requiring us to edit a single configuration file. The reason this process is this simple is that GDM3 has support for both Wayland and X11.
1. To enable Wayland on Ubuntu, you must be using the terminal. Ubuntu doesn’t allow you to control this setting through its settings app.
You can press CTRL + ALT + T on your keyboard to open the terminal quickly on Ubuntu,
2. With the terminal open, we will want to edit the configuration file for Ubuntu’s GNOME desktop environment called GDM3. This configuration file is where you can tell the environment whether Wayland or XOrg should be used.
You can use Nano to begin editing this configuration file by running the following command in the terminal.
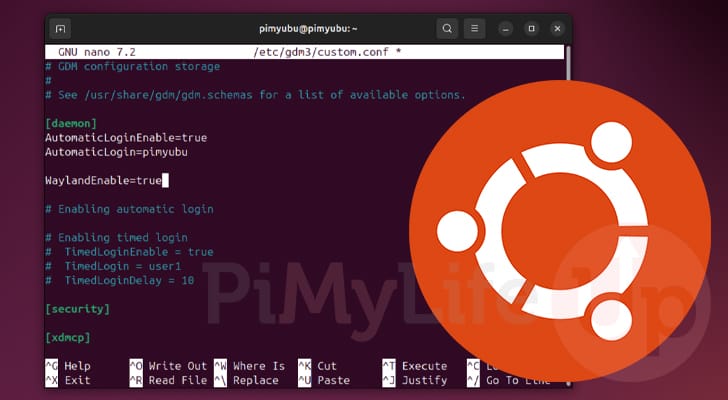
sudo nano /etc/gdm3/custom.confCopy3. Once the configuration file is opened, you will want to scroll down until you find an option that looks like the following.
This option is commented out thanks to the hashtag in front of it. Being commented out means it will resort to the default setting for your version of Ubuntu.
#WaylandEnable=falseCopyTo enable Wayland on Ubuntu you will want to remove the hashtag from the front of this line and ensure that the value is set to “true“.
Below is an example of what this option should look like after you enable Wayland.
WaylandEnable=trueCopyIf you ever want to disable Wayland on Ubuntu, swap “true” with “false“.
4. After making this change to enable Wayland, you will want to save the file and exit by pressing CTRL + X, Y, and then ENTER.
5. Even though we have changed configuration file, the system will be completely unaware until we restart the desktop manager.
You can restart the GDM3 service from the terminal by using the following command in the terminal.
sudo systemctl restart gdm3CopyIf, for some reason, you still haven’t moved over to Wayland, you can restart your system by using the reboot command instead.
sudo rebootCopy6. You can verify that you have successfully enabled Wayland on Ubuntu by using the echo command on the “XDG_SESSION_TYPE” environment variable.
echo $XDG_SESSION_TYPECopyIf everything has worked properly, you should see the value “wayland” printed out to the terminal.
waylandConclusion
Hopefully, at this point in this quick guide, you will have successfully enabled Wayland on your Ubuntu system.
While modern versions of Ubuntu now enable Wayland by default, some old releases that have the functionality keep it disabled. While y
Please feel free to comment below if you have had any issues enabling Wayland.
We recommend exploring our many other Ubuntu guides if you like this quick guide.