In this quick guide, we will show you how to record gameplay on your Steam Deck.
The Steam Deck’s operating system has a feature called “Game Recording”. This feature allows you to easily record and edit gameplay directly on your Steam Deck without ever having to leave gaming mode.
This screen recorder has a wealth of neat features that Steam covers in their blog post. One of the most standout features is that it allows background recording. Background recording means that your games can be constantly recorded without any input from you, allowing you to capture unexpected gameplay moments on your Deck.
If you don’t like the thought of your Steam Deck recording everything that happens within a game, don’t worry. You can change it to only record on demand. Recording on demand requires you to press a defined shortcut to start or stop the recording process.
Best of all, this will record any game you have running through the Steam Deck gaming mode. So, if you add an app as a non-steam game, it will also be recorded when you play.


How to Enable Game Recording on the Steam Deck
In this section, we will show you how to enable your Steam Deck’s game recording functionality.
This screen recording offers several different options. Each has an advantage and disadvantage that we will cover as well.
Turning on the Game Recording Feature of the Steam Deck
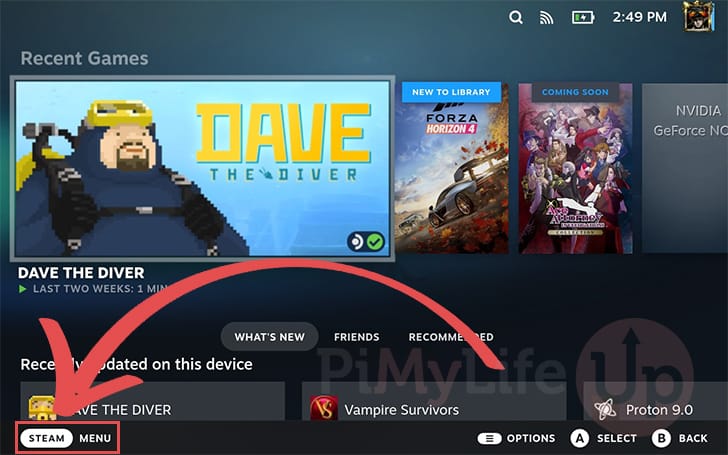
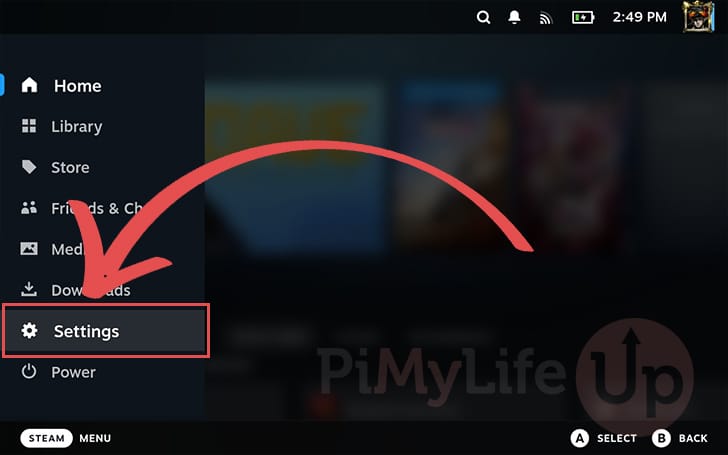
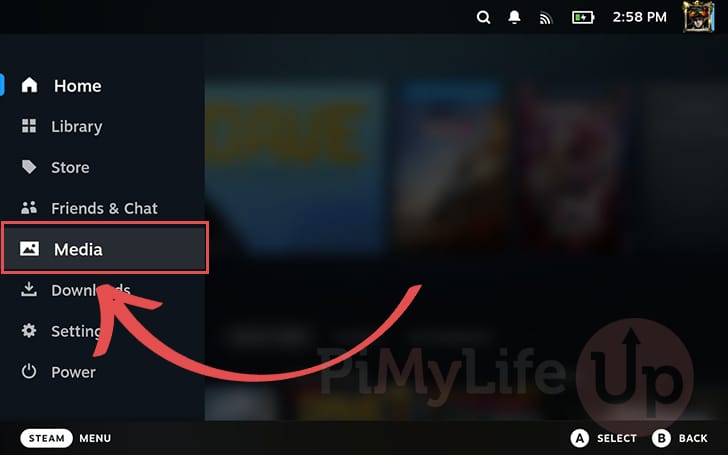
1. To turn on the game recording feature of your Steam Deck, you must first open the “STEAM MENU“.
You can open this menu by tapping “STEAM MENU” in the bottom-left corner or pressing the STEAM button on your Deck.
2. Now that you have the STEAM Menu open, you will want to use the menu to change to the “Settings” screen.
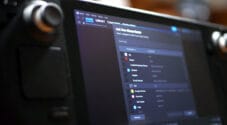
3. Once you are on the settings screen, use the sidebar to access the “Game Recording” menu.
If this option is missing from the menu, you must install the latest Steam Deck beta.
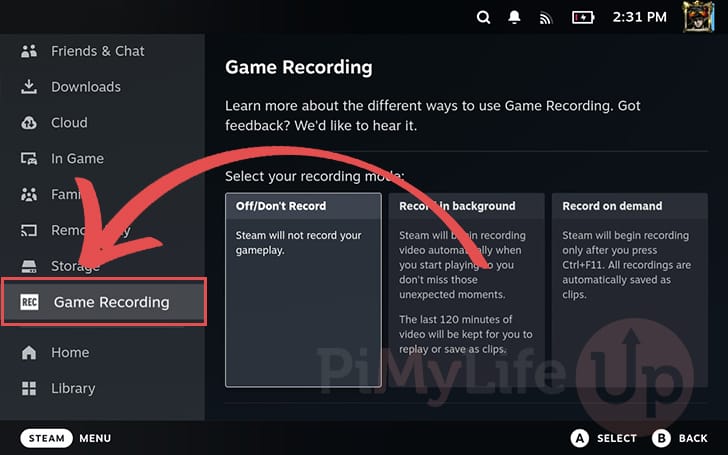
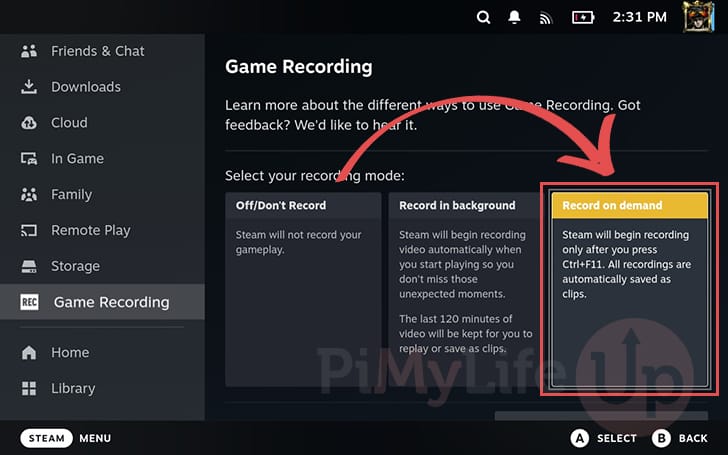
4. You will now be presented with three different options. Let us quickly review them so you understand what they are and what they do.
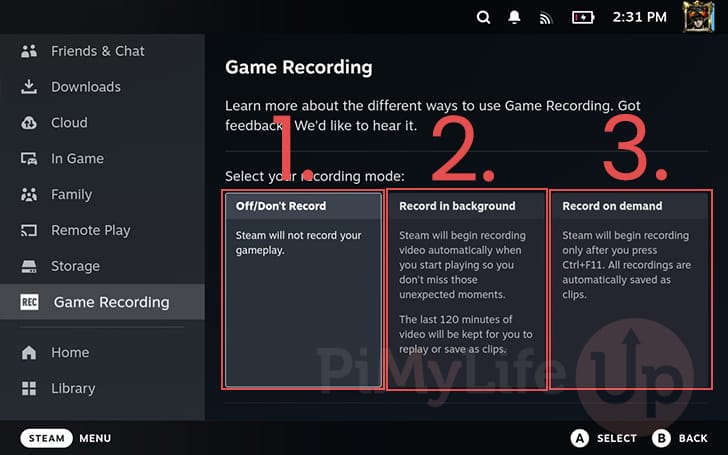
Off/Don't Record: The most obvious option is the first and is the default behaviour of your Steam Deck. This tells the Steam client to turn off game recording and not record any gameplay.Record in background: The most useful part of the Steam Deck’s game recording functionality is its ability to record in the background.
Steam will start recording a game when you use this mode as soon as you start playing one. By running in the background, you don’t have to worry about pressing a shortcut to start or stop the recording process and ensure you won’t miss any gameplay moment.
By default, this option will record the last 120 minutes of gameplay. You can cut and edit these as smaller clips directly from your Steam Deck if you wanted.Record on demand: The final option is more of the standard way of recording gameplay on a device like the Steam Deck. With this mode, you must press a particular shortcut for the Steam client to record any gameplay. You must then press the shortcut again to stop the recording.
By default, the shortcut used for on-demand game recording is STEAM + A. However, it is possible to change this shortcut.
Turning on Record in Background
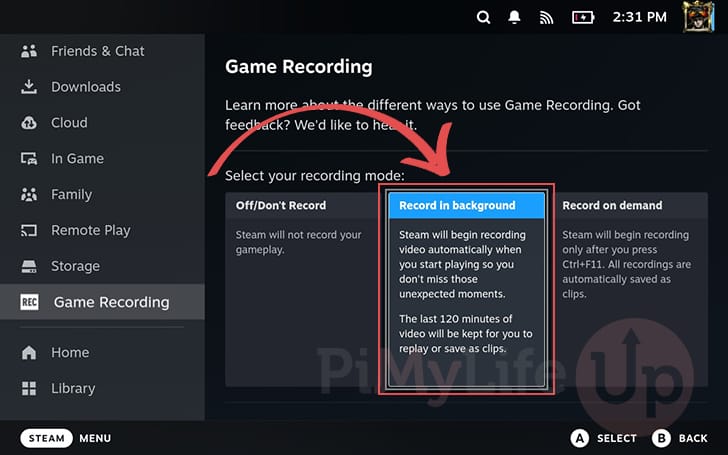
a. If you have decided that you want to record your gameplay in the background then you will want to select the second option.
This is the most useful of the three, as it means you don’t have to stress about hitting any shortcuts mid-gameplay to create a recording.
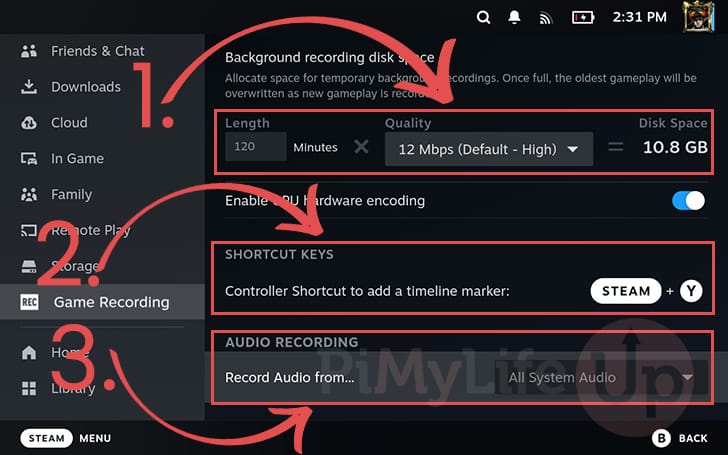
b. After selecting the “Record in background” option, you will be able to control how much gameplay it records and the quality it should use for its recordings.
- By default, your Steam Deck will record the last 120 minutes of gameplay at what is considered “
High” quality. This will consume 10.8 GB of space on your Deck.
You can increase or decrease the length of gameplay that your Deck will record.
You can also increase or decrease the quality of these recordings. The higher the quality, the more space these gameplay recordings consume on your Deck. - The Deck also allows you to easily change the shortcut key to add a marker to the timeline. This is useful if something happens, and you easily want to find it within the recorded gameplay.
By default, pressing STEAM + Y, the Deck will add a marker at that exact moment. - Finally, you can control what audio your Steam Deck will record. By default, the recording function is set to record all system audio.
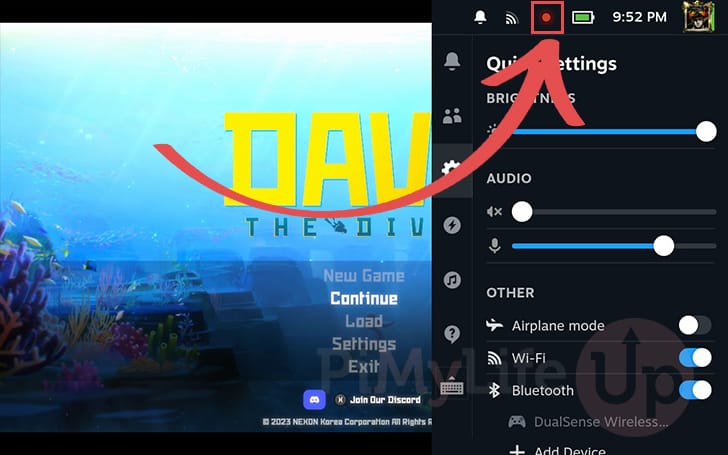
c. You can verify that background recording is enabled anytime by opening up the quick panel (Button with the three dots on your Deck) with a game open.
With the quick panel open, you should see a red icon next to the battery and Wi-Fi signal icons.
Enabling on Demand Game Recording
a. If you would prefer to remain in control of when you record gameplay on your Steam Deck then you will want to use the “record on demand” option.
With this option selected, you can use a shortcut key to start and stop gameplay recording at any point. This option is the most useful if you have a good idea of when you will want to record gameplay.
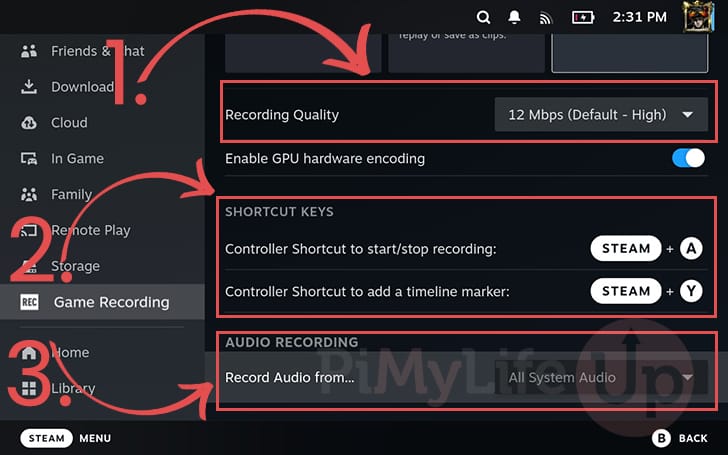
b. After turning on the “record on demand” option, several options will appear underneath it.
- The first option allows you to control the quality of the gameplay recording. The higher the quality, the more space the recording will consume on your Steam Deck. For most use cases, the default setting is good enough.
- The most important option for on-demand recording on your Steam Deck is the shortcut keys. Use these options to control which keys need to be pressed to start or stop recording.
By default, pressing STEAM + A will start or stop the gameplay recording. You can also add a timeline marker by pressing CTRL + Y. - The final option will allow you to dictate what audio is recorded by your Steam Deck. By default, it will record all gameplay.
Using on Demand Screen Recording on the Steam Deck
In this section, we will quickly explain how to use your Steam Deck’s on-demand screen recording functionality.
Of course, if you are using background recording, then these steps are useless for you as your Steam client is already constantly recording.
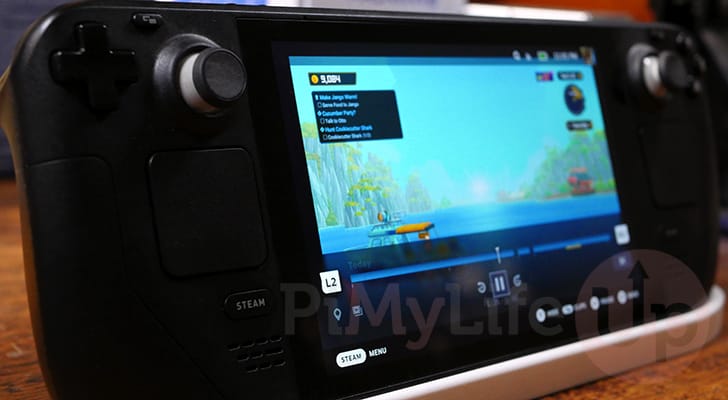
1. First, launch any game or application that you want to record footage of.
In our case, we will be playing Dave the Diver, but this functionality will work in anything launched while in Steam Deck gaming mode.
2. With a game running, you will want to press the record-on-demand shortcut. If you stuck with the default key bind, you will want to press the STEAM + A buttons.
After pressing the record buttons, you should see “Recording Started” pop up in the bottom-left hand corner of the screen. Don’t worry, as this message won’t actually appear in your clip.

3. Once you have reached the point where you want to stop recording, you simply need to press the same shortcut you used to start recording.
After stopping, the gameplay clip will automatically be saved to your Steam Deck’s media folders.
Finding your Recorded Game Clips on the Steam Deck
After making a recording, you will want to know where to find it. This section will show you where all your clips are accessed while you are in the Steam Deck’s gaming mode.
1. First, you will want to open the STEAM Menu on your Deck. You can open this by tapping “STEAM MENU” or pressing the STEAM button.
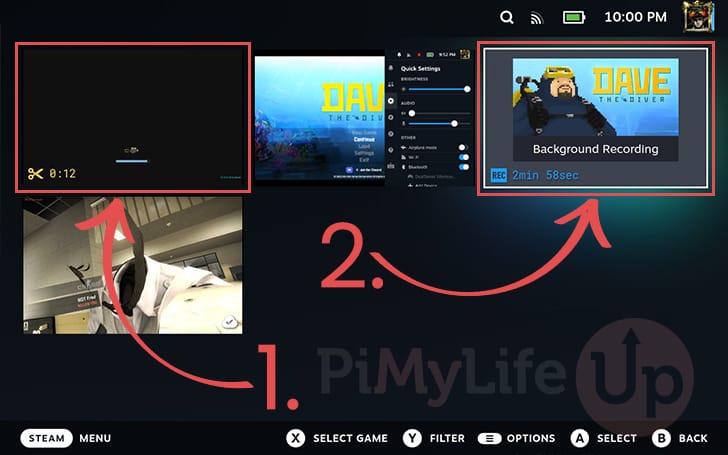
Once open, navigate to the “Media” tab. This tab is where your Steam Deck will show you all of your gameplay recordings and screenshots.
2. Now that you are on the media screen, you will find a list of all of your screenshots and gameplay recordings.
You can identify game clips within this screen by the yellow scissor icon followed by the timestamp (1.).
Background recordings stick out even more as they are labeled “Background Recording” and a blue “REC” icon followed by how long that recording is (2.). For this example, we are opening up the background recording.
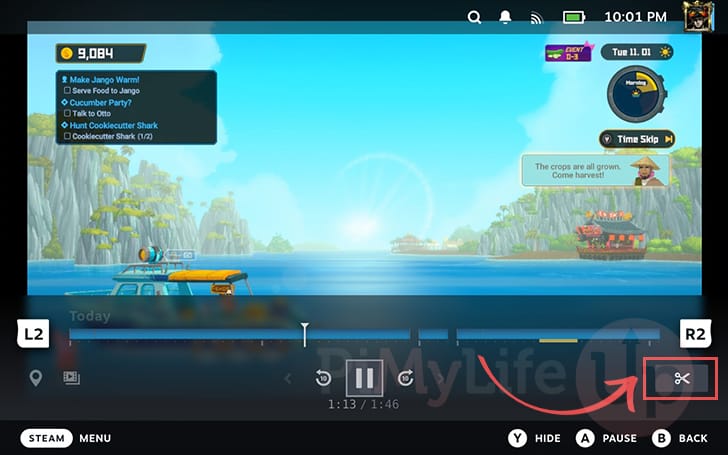
3. Below, you can see that our background gameplay recording is now open on our Steam Deck. We can use this screen to play back the recording or even create clips by clicking the scissor icon.
How to Install the Game Recording Feature
At the time of publishing, the Steam Deck’s game recording feature was only released in beta. This means that you will need to change to the “beta” branch to gain access to it.
Luckily, Steam had made changing the release mode of your Deck a really easy process so you will have access to the ability to record your gameplay.
1. On your Deck, you must first bring up the STEAM Menu by tapping “STEAM Menu” or by pressing the STEAM button.
2. After opening the STEAM menu, change to the “Settings” screen.
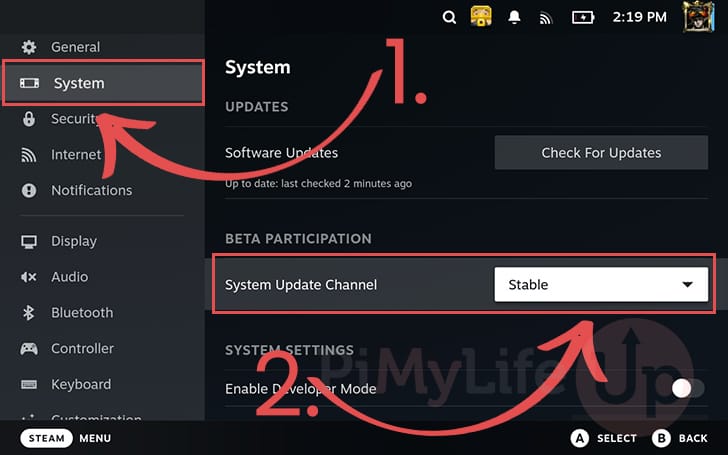
3. Once you are in the settings screen, you will want to swap to the “System” tab (1.) using the sidebar.
After changing to the system tab, select the “System Update Channel” (2.) and select the “Beta” option.
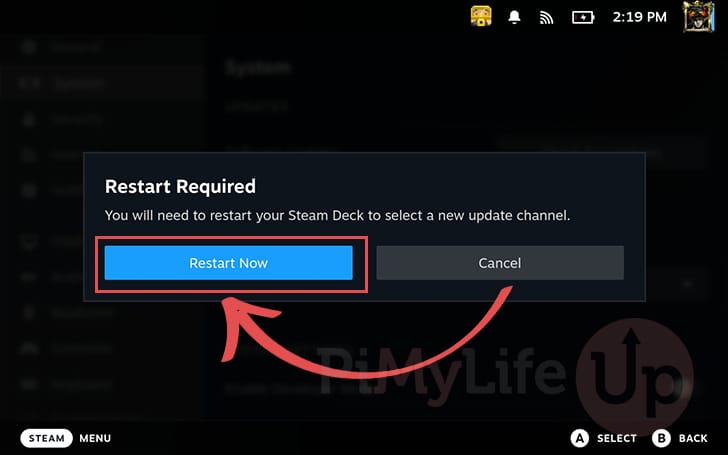
4. You will be prompted to restart because you have changed the update channel. Tap the “Restart Now” button to continue.
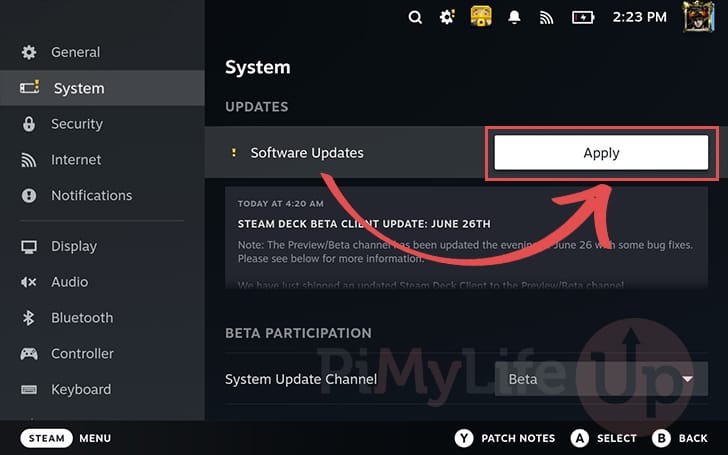
5. When your Steam Deck has finished restarting, you should return to the “System” menu.
After changing back to this screen, you should have a pending update that will install the game recording function on your Steam Deck. Tap the “Apply” button to start downloading and installing this update to your Deck.
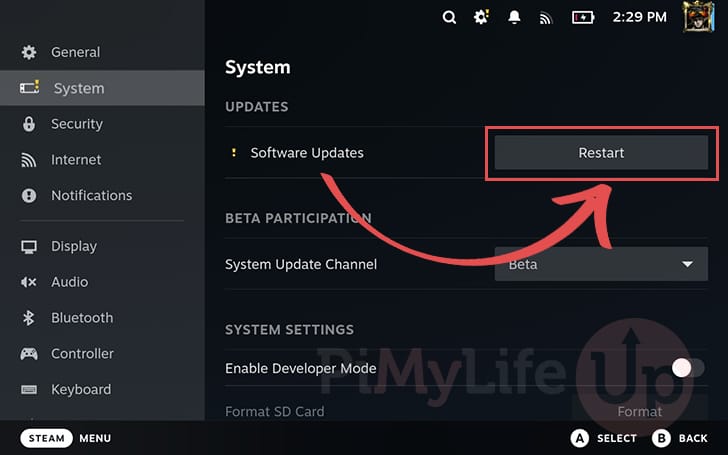
6. Once the update has been downloaded, tap the “Restart” button to complete the update process.
7. When your Steam Deck powers back on, you should now have access to the game recording function. Return to the start of our tutorial to see how you can turn on and utilize this feature.
Conclusion
By this point in the guide, you should have a good idea of how to enable and use game recording on your Steam Deck.
Recording your gameplay easily is a useful feature baked directly into your Steam Decks interface. You can even enable background recording, so you can always access those unexpected moments in your games.
Please post a comment below if you have had any issues with recording your screen on the Steam Deck.
If you like this tutorial, we highly recommend you check out our many other Steam Deck guides.