In this tutorial you will learn how to set up a server for Sonic fan game Sonic Robo Blast 2 (SRB2) on your Raspberry Pi.
Sonic Robo Blast 2 (SRB2) is a popular Sonic fan game developed by a group that goes by the name Sonic Team Junior.
The original 2D Sonic games for the SEGA Mega Drive inspired this fan game. The team tried to take the gameplay style of the original games and imagine it in a 3D game world.
One of the unique features of this game is its multiplayer mode. You can play the entirety of the game online with other players.
This tutorial will walk you through a few different steps as you will need to compile SRB2 on your Raspberry Pi before you can run the game as a server.
Please note that if you want your server to be available to the public you will need to portforward the port 5029 for the UDP protocol.
Equipment List
Here is a list of the equipment we recommend for this tutorial on setting up an SRB2 server.
Recommended
- Raspberry Pi Amazon 1, 2, 3 or 4
- Micro SD Card Amazon
- Power Supply Amazon
- Ethernet Cable Amazon or Wi-Fi Amazon
Optional
We tested this tutorial on setting up an SRB2 server on a Raspberry Pi 4 running the latest version of Raspbian Buster.
Preparing Your Raspberry Pi for SRB2
1. Before we begin, let’s update the existing packages on the Raspberry Pi.
sudo apt update
sudo apt upgradeCopy
2. Our next step is to install the packages we need to compile the Sonic Robo Blast 2 source code on our Raspberry Pi.
We cut out some of the libraries required as we are purely using this copy for a dedicated server, so anything that handles music or images isn’t needed.
sudo apt install git build-essential p7zip libsdl2-dev screenCopy3. Now we need to clone the code from the SRB2 repository to our Raspberry Pi.
To clone the code to your Pi, run the following command.
git clone https://github.com/STJr/SRB2.git ~/src/srb2CopyCompiling SRB2 on Your Raspberry Pi
1. Let’s now change to the “~/src/srb2/src” directory by using the command below.
cd ~/src/srb2/srcCopy2. Now that we are within the src directory for SRB2, we can run the following command.
This command will compile the game with a variety of libraries disabled.
We disable these libraries to reduce the compilation time as they are not needed while running as a dedicated server.
cd ~/src/srb2/src && make -j$(nproc) \
  LINUX=1 \
  NONX86=1 \
  NOHS=1 \
  NOHW=1 \
  NOPNG=1 \
  NOMIXER=1 \
  NOGME=1 \
  NOOPENMPT=1 \
  NOASM=1 \
  GCC83=1Copy
This compilation process will take some time to complete, especially on older Raspberry Pi’s.
3. Once Sonic Robo Blast 2 has finished compiling, let’s make a directory to store it in by running the command below.
This directory is where we will store the newly compiled binaries and the asset files needed to run the server.
mkdir ~/srb2/Copy4. Now, using the cp command, copy the binaries over to the ~/srb2/ folder from the src folder where we compiled SRB2. Next, change into the srb2 directory.
cp ~/src/srb2/bin/Linux/Release/* ~/srb2/
cd ~/srb2/Copy
5. Let’s now download the assets for Sonic Robo Blast 2. These assets contain all the data that we need to run the server.
wget https://files.pimylifeup.com/srb2/srb2-assets-2.2.9.7zCopy6. We now need to extract the assets to the current directory by making use of the p7zip package we installed earlier.
Run the following command to extract the assets to your Raspberry Pi.
p7zip -d -f srb2-assets-2.2.9.7zCopyOnce the extraction process has finished, your Raspberry Pi is now ready to run SRB2 as a dedicated server.
Running SRB2 as a Dedicated Server
1. Before we run the server, let’s retrieve our Pi’s local IP address.
You can use this IP address to connect to your SRB2 server locally.
To run SRB2 as a dedicated server, all you need to do is run the following command.
/home/pi/srb2/lsdl2srb2 -dedicatedCopyThe server should now come online, and you will be able to access it from your Sonic Robo Blast 2 game client.
2. If you want your server to appear in the official SRB2 master server list, then you need to use an additional argument.
That argument is -room ID.
There are three different ID’s that you can use with this argument:
33is the ID used for the “Standard” room.28is the ID used for the “Casual” room.38is the ID used for the “Hugs” room.
Below is an example of launching the server with the room set to “standard“.
/home/pi/srb2/lsdl2srb2 -dedicated -room 33Copy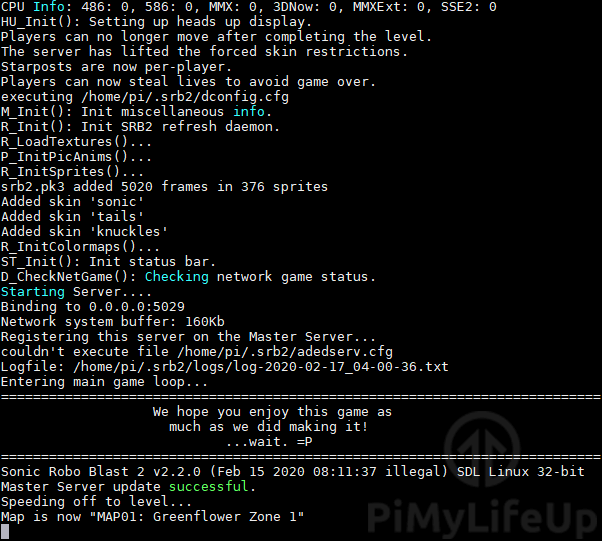
Setting up a Service for Your SRB2 Server
In this section, we will show you how to set up a service that automatically starts the SRB2 server on your Raspberry Pi.
1. Let’s start by creating a service file within the /etc/systemd/system/ directory.
We will call this service file “srb2.service“.
sudo nano /etc/systemd/system/srb2.serviceCopy2. In this file, enter the following lines.
[Unit]
Description=SRB2 Dedicated Server
Wants=network-online.target
After=network-online.target

[Service]
Type=forking
User=pi
Group=pi
ExecStart=/usr/bin/screen -d -m -S srb2 /home/pi/srb2/lsdl2srb2 -dedicated -room 33
ExecStop=/usr/bin/pkill -f /home/pi/srb2/lsrb2sdl
WorkingDirectory=/home/pi/srb2
Restart=always

[Install]
WantedBy=multi-user.targetCopy
These lines define our service, when it should start, what commands it should execute, what user should run it, and what command to execute when the service is stopped.
With this service, we use the screen tool to start up the SRB2 server. By doing this, it is possible to access the servers command line.
3. Now save the file by pressing CTRL + X, followed by Y, then ENTER.
4. Let’s go ahead and enable and start the service with the following two commands
Enabling the service will allow it to start at boot up automatically.
sudo systemctl enable srb2
sudo systemctl start srb2Copy
5. If you want to bring up the SRB2 Dedicated servers terminal, run the following command.
screen -r srb2Copy6. Once you are done, you need to press the following key combination, CTRL + A then CTRL + D.
Configuring Your SRB2 Server
It is possible to change the settings for your SRB2 server.
1. Let’s start by creating a basic configuration file with some basic options set.
nano /home/pi/.srb2/addserver.cfgCopy2. In this file, add the following lines.
These are just some basic settings. You can find all the available options on the SRB2 Wiki.
servername "PiMyLifeUp SRB2 server"
showping "Warning"
pingtimeout "10"
maxping "0"
cpusleep "1"
skipmapcheck "Off"
jointimeout "350"
nettimeout "350"
blamecfail "Off"
showjoinaddress "On"
joinnextround "Off"
allowjoin "On"
downloadspeed "16"
noticedownload "Off"
maxsend "4096"
resynchattempts "10"
maxplayers "8"
masterserver "ms.srb2.org:28900"Copy
You can modify the “servername” line to change the name for your server.
3. Save the file by pressing CTRL + X, then Y, followed by ENTER.
4. If you are running SRB2 as a service, you should now restart it by running the command below.
Your new settings will be loaded by the server when it starts back up.
sudo systemctl restart srb2CopyAdding Mods to Your SRB2 Dedicated Server
It is also possible to add mods to your Raspberry Pi-powered SRB2 server.
1. To add addons to your server, you need first to make a folder to store them in.
By default, the SRB2 server software automatically looks for the “addons” folder where it executable lives, so let’s start by creating it.
mkdir /home/pi/srb2/addonsCopy2. Now copy any addons you would like to install to this folder.
You can find various addons for Sonic Robot Blast 2 on the SRB2 official forums.
Updating your SRB2 Server
In this section, we will be showing you how to update your SRB2 server using a few simple commands.
1. To update the server we will need to first run the following command within the /src/srb2/ directory.
cd ~/src/srb2/
git pullCopy
Running these two commands will retrieve the latest version of the source code.
2. Now, let’s recompile the source code and copy over the resulting binaries into the folders we set up in the first section of this tutorial.
make -j$(nproc) LINUX=1NONX86=1 \
  NOHS=1 \
  NOHW=1 \
  NOPNG=1 \
  NOMIXER=1 \
  NOGME=1 \
  NOOPENMPT=1 \
  NOASM=1 \
  GCC83=1
cp ~/src/srb2/bin/Linux/Release/* ~/srb2/
cd ~/srb2/Copy
3. Finally, you may need to replace the SRB2 assets if they have been modified since the last release.
Below we will download and extract the latest version of the assets that we have stored in our CDN.
These commands will also remove any existing .pk3 files from the base directory.
wget https://files.pimylifeup.com/srb2/srb2-assets-2.2.9.7z
rm -f *.pk3
p7zip -d -f srb2-assets-2.2.9.7zCopy
If this version is out of date, you can copy the required files directly from your installation of SRB2 to your Raspberry Pi.
Hopefully, at this point, you will now have SRB2 running as a dedicated server on your Raspberry Pi.
If you have run into any issues or have any feedback, feel free to post a comment below.
Thanks to community member Ozzyrockin for suggesting and providing us with the base for this tutorial.


2.2.4 has been released!
Hi Ozzy,
Thank you for letting me know, I’ve updated the assets so that they should now work with that release.
Cheers,
Emmet
2.2.2 was released how to update?
Hi Ozzy,
We have added steps on how to update the SRB2 server to the latest available code.
Let us know if you run into any issues with this.
Cheers,
Emmet
Hello! Thanks for the write up! I wanted to share how I made the pi server but I’m not exactly good at typing up tutorials and I didn’t know how to optimize the install. (for those wonder the original instructions were really rough)
Not making this comment just for that, if I have a USB drive mounted to save space in the SD card how do I go about making sure everything is in the mount directory and working fine? (mainly want this is mine is also a samba share for easy mod moving)
My mounted drive was already in /home/pi so just had to make sure to add it to file paths and it works fine!