This tutorial will show you how to easily self-host Paperless-NGX using a Docker container.
Paperless-NGX is one of the most popular open-source document management systems. It is designed to make converting your physical documents into a searchable online archive as simple as possible.
This tool is packed with functionality meant to help you store your documents. It includes performing OCR on your documents so that they can all be converted into searchable text. Thanks to Paperless utilizing Tesseract, it can perform this OCR on over 100 different languages.
In addition to supporting physical documents, Paperless-NGX contains full support for various digital formats, such as PDFs, images, plain text files, and even Office documents from either Microsoft’s products or LibreOffice.
One of the easiest ways to get Paperless-NGX up and running on your machine is to utilize Docker. Docker enables you to run the software and its required database in just a few minutes.
The other advantage of using Docker to host this software is that updating to the latest release is as simple as running a couple of commands. You don’t have to stress about installing any additional software, as everything you need is typically included within the container.

Using Docker to Install Paperless-NGX
In the following sections, we will walk you through the steps of setting up and installing Paperless-NGX using Docker.
You can even follow these steps on a Raspberry Pi if you like. Just be warned that Paperless-NGX does require a 64-bit operating system to function.
If you want to see a more visual guide on how to install Paperless-ngx, be sure to check out the video that we have embedded below. Of course, if you prefer to follow along at your own pace, we have our written steps included below as well.
Preparing your Device for Paperless-NGX
1. For us to run Paperless-NGX with Docker, you must have the Docker runtime installed on your machine.
If you haven’t installed Docker before, we have some great guides to walk you through this process.
https://pimylifeup.com/linux-docker-install/2. Once you have Docker installed, we will move on to create a directory where we will store the Docker Compose file for Paperless alongside its data.
We will create this directory at “/opt/stacks/paperless-ngx” by utilizing the mkdir command and its “-p” option. We use “/opt/stacks/” as our base directory as it provides a convenient place to organize our Compose files. It also works with Dockge out-of-the-box.
sudo mkdir -p /opt/stacks/paperless-ngxCopy3. After creating the directory, we will want to change into it. The rest of this guide will expect you to be in this folder as it’s where we need to write and run the Compose file.
You can change into this new directory using the cd command below.
cd /opt/stacks/paperless-ngxCopyCreating A Compose File for Paperless-NGX
4. One of the great things about Paperless-NGX is that it doesn’t actually require many additional containers to work. In fact, it only requires two additional containers.
The first is a database that stores all of your data. In our case, we will use the Postgres DB database container and set up the Redis Docker container. Paperless-NGX uses this as its cache.
To begin writing this Compose file, run the following command. We are using Nano because it is one of the easiest terminal-based text editors.
sudo nano compose.yamlCopy5. Fill out the following lines within this file. These lines define the three different containers that we will be using and where the data should be stored.
services:
  broker:
    image: docker.io/library/redis:7
    restart: unless-stopped
    volumes:
      - redisdata:/data

  db:
    image: docker.io/library/postgres:17
    restart: unless-stopped
    volumes:
      - pgdata:/var/lib/postgresql/data
    environment:
      POSTGRES_DB: paperless
      POSTGRES_USER: paperless
      POSTGRES_PASSWORD: paperless

  webserver:
    image: ghcr.io/paperless-ngx/paperless-ngx:latest
    restart: unless-stopped
    depends_on:
      - db
      - broker
    ports:
      - "8000:8000"
    volumes:
      - data:/usr/src/paperless/data
      - media:/usr/src/paperless/media
      - ./export:/usr/src/paperless/export
      - ./consume:/usr/src/paperless/consume
    environment:
      PAPERLESS_REDIS: redis://broker:6379
      PAPERLESS_DBHOST: db

volumes:
  data:
  media:
  pgdata:
  redisdata:Copy
6. After filling out the Compose file, you can save and quit out of Nano by pressing CTRL + X, Y, and then ENTER.
Configuring your Paperless-NGX Docker Container
7. Before we begin configuring our Paperless-NGX Docker container, you will need to get your user’s ID. Luckily, this is as simple as running the following command in the terminal.
id -uCopyBelow is an example of what this ID will look like. You will need this in a couple of steps, so write it down.
10008. With the Compose file now written, we will need to write an Environment file that your containers will read. This environment file sets things such as the user ID to use, the secret key used to encrypt your data, and your time zone.
You can begin writing the environment file by running the command below.
sudo nano .envCopy9. Within this file, you will want to fill out the following information. While filling this out, you must replace the following placeholders.
<USERID>: Replace this with your user’s ID. For the default user, this value is commonly1000.<URL>: This option is actually optional but is there for you to specify a URL on which your Paperless-NGX Docker container should be reachable. Please note that if you are planning for outside access, you will want to set up something like an NGINX Reverse proxy to have HTTPS.
An example of a valid value here might be something like “https://paperless.pimylifeup.com“.
You can remove this line entirely if you don’t intend to use a URL.<SECRETKEY>: This placeholder must be replaced with a long random key that will be used for various parts of Paperless-NGX. It’s crucial that this key is long and unique.
This key does not need to be memorable.<TIMEZONE>: Next, we must set the timezone that Paperless-NGX will utilize. This needs to be a valid TZ Identifier. If you don’t know yours, you can find a list of them on Wikipedia.
For example, based on where we live, we would use “Australia/Hobart” as our timezone.<DEFAULT_LANGUAGE>: You must replace this with the language that you want Paperless to use by default when performing OCR on the documents you scan in. This is represented as a three-letter code for your language.
The Docker container we are using comes preloaded with languages for English (eng), German (deu), Italian (ita), Spanish (spa), and French (fra).
For example, we would use “eng” for English.<DOWNLOAD_LANGUAGES>: If your language is not included with Paperless NGX by default, you can specify them. If your language is supported, simply delete this line.
Alternatively, replace this placeholder with the three-letter code for your language. Tesseract provides a list of languages that it supports. Please note that if the name contains an underscore (_), you should replace it with a hyphen (-).
For example, if you wanted to support Japanese, you would use “jpan“, or if you wanted to support Dutch, you would use “nld“.
To add support for both, you would write “jpan nld” instead.
USERMAP_UID=<USERID>
USERMAP_GID=<USERID>

PAPERLESS_URL=<URL>
PAPERLESS_SECRET_KEY=<SECRETKEY>
PAPERLESS_TIME_ZONE=<TIMEZONE>
PAPERLESS_OCR_LANGUAGE=<DEFAULT_LANGUAGE>
PAPERLESS_OCR_LANGUAGES=<DOWNLOAD_LANGUAGES>Copy
10. With the environment file now written, you can save and quit by pressing CTRL + X, Y, and then ENTER.
Starting up the Paperless-NGX Docker Container
11. With the Docker Compose file and its configuration file written, starting up the Paperless-NGX Docker container is now super straightforward.
To get the software up and running, all you must do now is run the following command within the terminal. We are using the “-d” option here as it tells
docker compose up -dCopyIf you get an error about “compose” not being available, or the “-d” option not valid, it is likely you are running an out-of-date version of Docker.
Accessing the Web Interface
12. With the Paperless-NGX Docker container now up and running on your machine, you will now want to access its web interface, which you will use to utilize the software.
If you don’t know your machine’s IP address, you can retrieve it using the hostname command.
hostname -ICopy13. In your favorite web browser, you will want to go to the following address. Ensure that you replace “<IPADDRESS>” with your IP.
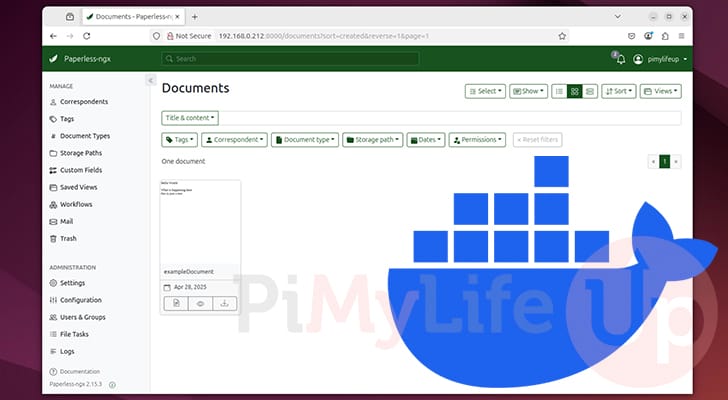
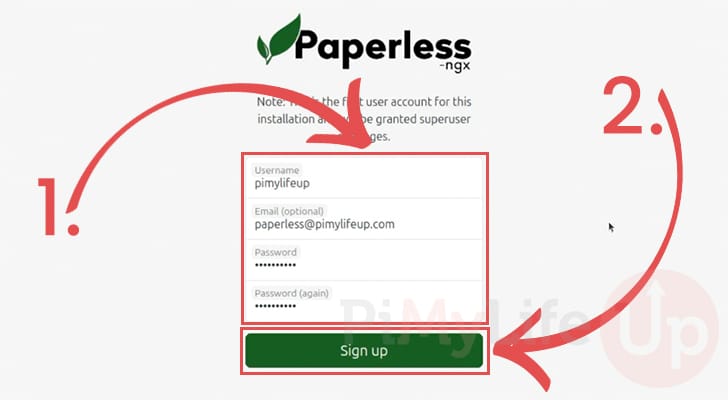
http://<IPADDRESS>:800014. The first time you load up the Paperless-ngx web interface, you will be prompted to create an admin account. Fill out a username and password that you will use to access Paperless (1.).
After filling out your details, click the “Sign up” button (2.). The first time you click that button, you will be automatically logged in.
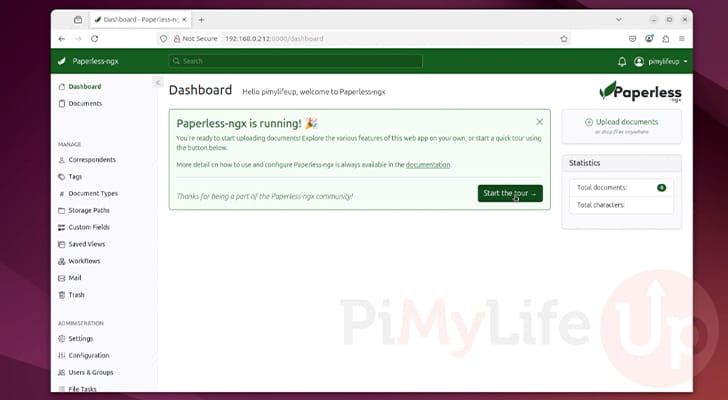
15. At this point, you have successfully installed Paperless-ngx by utilizing a Docker container. You can now begin to upload and process your documents. This tool quickly shows how powerful and useful it can be, especially if you have a ton of paperwork to work through.
Updating the Paperless-NGX Docker Container
One key advantage of using Docker to run Paperless-NGX is that it simplifies the update process. The next few steps will show you how you can easily pull the latest container and run it.
1. To update to the latest release of Paperless-NGX, we must first change the directory where we wrote the Docker Compose file in this tutorial.
You can change to this folder by using the following command command.
cd /opt/stacks/paperless-ngxCopy2. Once you are in the correct directory, we will want to pull the latest release of the container by using the command below.
This will download the newest image, but it won’t upgrade the already running container, which requires another command.
docker compose pullCopy3. With the newest image downloaded, you can use the command below to stop the already-running container and move to the new release.
Once the container finishes restarting, you should be on the latest release of Paperless-NGX.
docker compose up -dCopyConclusion
If you have reached this point in the tutorial, you will have successfully installed and set up Paperless-NGX using a Docker container.
Paperless is a really neat piece of software. It is one of the best ways to digitize your documents and reduce your reliance on paper. In addition to reducing your paper reliance, it also helps organize all of your information. It has built-in OCR support and machine learning-based tagging.
If you want to expand this further, you may want to consider setting up something like the Nginx Proxy Manager to help provide HTTPS support.
Please feel free to leave a comment below if you have run into any issues with getting this software running with Docker.
If you found this tutorial helpful, we highly recommend checking out the other projects you can run with Docker.