In this tutorial, we will be showing you how to use the ping command on macOS.
Ping is a valuable tool for testing the network connection of your macOS device.
A ping is a specially formatted packet sent from your device to another on your network. If the remote device accepts pings, it will send the request back, allowing us to work out several details.
You can test several aspects of your network connection by performing a ping from your Mac.
- First, you can check whether your Mac can even connect to that specific destination. If the ping can’t be completed, then you can try performing a traceroute instead to see where the break happens.
Please note some servers will actively block ping requests giving the illusion of a broken connection - You can check how long it takes for your Mac to complete a connection. The tool times how long it takes for your Mac to send the ping request and then for your device to receive a response.
This time is often called your connection’s latency or “ping”. Even on a local network, you will notice that a Wi-Fi connection will have a higher ping than an Ethernet connection. - The ping tool is also useful for checking whether your Mac is experiencing packet loss.
Packet loss is calculated by counting how many times a ping is sent, but your Mac never receives a response.
Over the following sections, we will show you how you can perform a ping within the terminal.
macOS used to have an application called Network Utility that you could use to perform a ping. However, that application no longer exists on newer versions of macOS.
Sending a Ping on macOS from the Terminal
Using macOS to send a ping is a relatively straightforward process once you have the terminal open on your device.
Over the following steps, we will show you how to open the terminal and then use the ping command to ping Google’s servers.
Opening the Terminal on macOS
Before we can test the network connection of your Mac by using the ping command, we will need to open the terminal.
1. The easiest way to open up the terminal on a Mac device is to use Spotlight. Spotlight is a nifty feature that allows us to perform quick system-wide searches.
Open Spotlight on your Mac by pressing COMMAND + SPACE.
2. With Spotlight open on your device, type in “terminal“, then press the ENTER key to open it.

Alternatively, you can open the terminal by using the “Finder” application, looking in the “Applications” directory and opening “Terminal” through that.
Using the ping Command on macOS
With the terminal now open on your Mac, let us show you how exactly you can use the ping command and the results returned by it.
By the end of this section, you should understand how you can ping another device from your Mac device and interpret the data it returns.
Syntax of the ping command
Before we use the ping command, let us explore its basic syntax when used on Mac. If this command is used without any options, it will continue to ping the destination until you terminate the process.
At its most basic usage, you only need to type in “ping” followed by the destination you want to send a ping to.
The destination can be an IP address or a domain name like “pimylifeup.com“. The tool will automatically resolve domain names to their IP address by performing a DNS lookup.
ping [OPTIONS] DESTINATIONCopySending a Ping from your Mac
Let us now put the ping command to use so we can perform a ping request from our Mac to Google’s servers.
We are using “google.com” as an example because it allows ping requests and has a very distributed series of servers. If you are having trouble connecting to a website like Google, there is likely something significantly wrong with your networking.
To send a ping from our Mac to “google.com“, we need to use the following command within the terminal.
ping google.comCopyYou will need to press CTRL + C on your keyboard to stop the system from sending more pings.
Analyzing what is returned on each ping
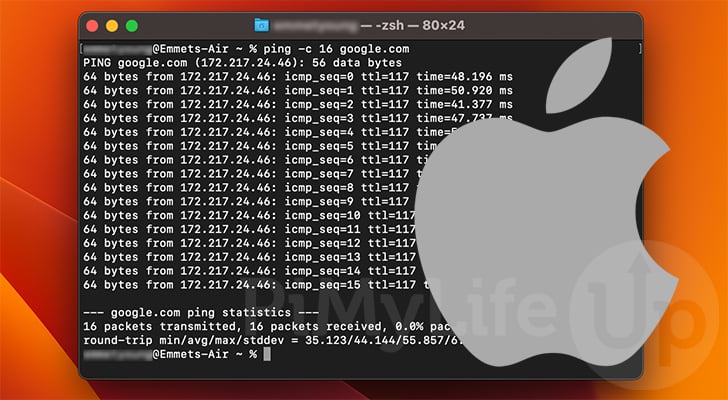
Every time your Mac sends a ping and gets a response, you will see some data like the following appear within the terminal.
Each line tells us several different things about your network connection to the chosen destination.
64 bytes from 172.217.24.46: icmp_seq=0 ttl=117 time=56.968 msLet us break down this line, so you understand what each piece tells you.
64 bytes from– The start of each line tells you how much data was sent in the ping response from the destination server.127.217.24.46– The next part of the line tells us the IP address that returned our Mac’s ping. If you use a domain name, this is typically the IP address resolved from that.icmp_seq=0– The “icmp_seq” value tells us what ping number this is a response to. Each time a ping is sent, this value is increased by one.ttl=117– The TTL or time-to-live tells us how many hops this ping is allowed to make before it is considered dead. Each time the ping is routed, this value is subtracted by one. It is mainly intended to stop a request from infinitely being sent between routers.time=56.968 ms– The time is the value you will likely be most interested in as it tells you how long this request takes to complete.
The timer starts when your ping is sent from your Mac and stops when a response is received.
Summary Ping Data
Once the ping command on Mac hits either the ping limit or you terminate the process, you will be given a summary of the pings you have sent. These details are helpful if you want to see how your system performs after several ping requests.
This information tells you how many ping packets were sent, how many were received, and the percentage of packet loss that occurred.
Additionally, it gives you the minimum, average, maximum, and standard deviation for the ping times.
--- google.com ping statistics ---
18 packets transmitted, 17 packets received, 5.6% packet loss
round-trip min/avg/mag/stddev = 39.229/115.739/170.563/33.378
Limiting the Number of Pings Your Mac Sends
By default, when you use the ping command on your Mac, it will continue to send pings until you terminate the process.
However, you can work around this by utilizing the “-c” option. This option allows you to specify the exact number of pings to be sent.
ping -c NUMBER DESTINATIONCopyFor example, if you wanted to send 15 pings to “google.com“, you would use the following command in the terminal.
ping -c 15 google.comCopyConclusion
Within this tutorial, we have shown you how you can perform a ping request from your Mac to a destination server.
A ping can tell you numerous details about the connection quality of your Mac. Some of these details include latency and packet loss when reaching a specified location.
Please comment below if you have questions about sending a ping from your Mac.
If you find this tutorial useful, please check out our other macOS guides.