In this tutorial, we will show you how to use Docker to quickly and easily deploy an Nginx-based reverse proxy on your system.
A reverse proxy is a service that sits in front of other web servers and handles requests from clients. These requests are then forwarded to the web servers, and the responses are sent back to the client. The end user is left entirely unaware of this whole process.
There are various reasons why you might want to set up a reverse proxy. One is to easily run multiple services under one server even when they might be dependent on a different web server. Another is easily providing HTTPS support. Many self-hosted services, especially ones that run within a Docker container, are set up only to handle HTTP.
Luckily, thanks to some very neat and easy-to-use Docker containers, setting up an Nginx reverse proxy has never been easier.
With Docker, you can easily have an Nginx-powered reverse proxy up and running with just a few lines of configuration. Routing your other containers through it just requires adding a few extra lines to their Compose file.
In particular, we will be using the Nginx Proxy Docker container. You can find more about this container about checking out its official GitHub page.


Setting up an Nginx Reverse Proxy using Docker.
Over the following sections, we will walk you through the process of setting up an Nginx reverse proxy using Docker. We will also show you an example of how to modify an existing container to run through your proxy server.
Before proceeding any further, you must have a domain name in mind that you intend to route through your reverse proxy. Additionally, it would help if you also had this domain pointed towards your server.
Finally, if you are running this from your home network, ensure you have ports 80 and 443 forwarded to your server. The NGINX proxy will use these and must be open for the SSL certificate to be generated.
Installing Docker on your Machine
1. Before starting with this tutorial, you will be required to have Docker installed on your machine.
If you haven’t yet installed this runtime, we highly recommend following our Docker installation guide
https://pimylifeup.com/linux-docker-install/Setting up your System for the Reverse Proxy
2. Our next step is to use the mkdir command to create a directory to store the Docker Compose file for the NGINX Reverse proxy.
We like to keep all of our Docker Compose files within the “/opt/stacks/” directory as it helps keep them organized. Additionally, it will also work with the Dockge management tool out of the box.
sudo mkdir -p /opt/stacks/reverseproxy/Copy3. After making a directory to store the proxy configuration, change to it using the cd command within the terminal.
cd /opt/stacks/reverseproxy/CopyWriting a Docker Compose file for your Nginx Reverse Proxy
4. Our next step is to write a Docker Compose file that will manage the Nginx reverse proxy on your system.
You can begin writing this file using the following command in the terminal.
sudo nano compose.yamlCopy5. Within this Docker Compose file, we will set up two separate services. The first Docker container is the Nginx reverse proxy. This is what your other apps will be routed through.
The other component is a companion container that will handle requesting Let’s Encrypt certificates for your services. This is critical for having proper HTTPS support and stops you from relying on insecure self-signed certificates.
While filling out this file, you must replace a placeholder value with your own.
<EMAIL>: Replace this with an email where Let’s Encrypt can contact you. This will be used in various cases, such as notifying you of an expiring certificate.
We are doing a couple of extra and super important things within this Compose file.
First, we specifically specify a network called “nginx-reverse-proxy” on which the Nginx Reverse proxy container will run. We need to do this as every service we want to be routed through this proxy must be a member of this network.
One thing you may have noticed from this file is that we are setting up two volumes. These volumes allow the certificates generated by the companion Docker container and read in by the Nginx reverse proxy container.
services:
  nginx-proxy:
    image: nginxproxy/nginx-proxy
    restart: always
    ports:
      - "80:80"
      - "443:443"
    volumes:
      - certs:/etc/nginx/certs
      - html:/usr/share/nginx/html
      - /var/run/docker.sock:/tmp/docker.sock:ro
    labels:
      - com.github.nginx-proxy.nginx
    networks:
      - nginx-reverse-proxy

  nginx-proxy-acme:
    image: nginxproxy/acme-companion
    restart: always
    depends_on:
       - "nginx-proxy"
    environment:
      DEFAULT_EMAIL: <EMAIL>
    volumes:
      - certs:/etc/nginx/certs
      - html:/usr/share/nginx/html
      - /var/run/docker.sock:/var/run/docker.sock:ro
    networks:
      - nginx-reverse-proxy

networks:
  nginx-reverse-proxy:
    name: nginx-reverse-proxy

volumes:
  html:
  certs:Copy
6. After filling out this file, you can save and quit out of Nano by pressing CTRL + X, Y, and then ENTER.
Starting up the NGINX Reverse Proxy Container
7. All you need to do now to start up the NGINX reverse proxy using Docker is to run the following command within the terminal.
With this command, Docker will read in the Compose file we wrote and start up each container referenced within it. This process should only take a couple of minutes.
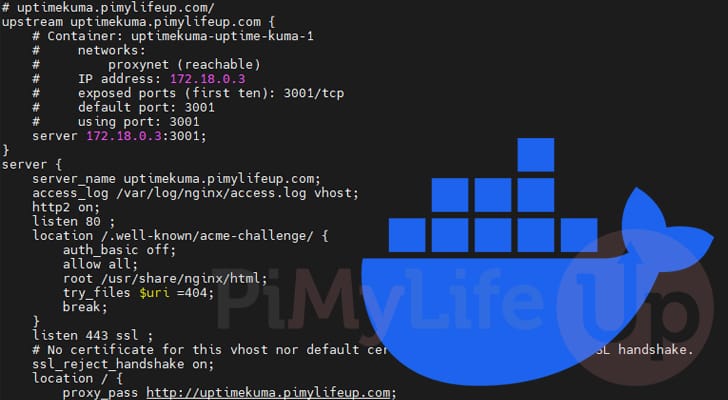
Once it has started, the container will continually poll Docker to see when other containers have started. It will check each container to see if the “VIRTUAL_HOST” environment variable has been defined. If it finds this variable, it will automatically reconfigure Nginx to act as a reverse proxy for that service using the specified domain name.
docker compose up -dCopyModifying your Container to Run through the Nginx Proxy
8. Now to route any of your containers to run through the Nginx reverse Proxy you will need to modify them. If you have been using Docker Compose files, then this process should be pretty easy.
To each container that you route through the proxy, you must add three additional environment variables. When using Compose files, this means you would set them under the “environment:” option.
VIRTUAL_HOST: This environment variable must be set to the hostname you want used for this particular container.
For example an Owncloud app running through the proxy might have the domain name “owncloud.pimylifeup.com“.LETSENCRYPT_HOST: The Let’s Encrypt variable is what is used to tell the Proxy what domain name it should attempt to fetch an SSL certificate for.
In the vast majority of cases, you will want this value to be the same as the one you set for the virtual host.VIRTUAL_PORT: The final of the three environment variables is the one that tells the Nginx proxy what port it should use when routing traffic to your Docker container.
Use this variable to set the port on which your container uses to expose its web interface. For example, with the Owncloud container, this would mean you would use port 8080 as the value for this variable..
9. On top of adding these environment variables, you must also add each routed container to the “nginx-reverse-proxy” network that we created.
This is achieved by performing two actions. The first, is for every container you want routed through the Nginx Reverse Proxy container, you must add the “networks” option add then specify the “nginx-reverse-proxy” network.
    networks:
      - nginx-reverse-proxyCopy
Secondly, outside of your “services:” definition, you must tell Docker that the “nginx-reverse-proxy” network is external to the current Docker stack. This will allow Docker to connect the Nginx reverse proxy with your app.
networks:
  nginx-reverse-proxy:
    external: trueCopy
Example of Configuring a Docker Container to use the Nginx Reverse Proxy
Now that you have successfully got the Nginx reverse proxy up and running using Docker, let us now walk you through how you can modify an existing container to use it.
For this example, we will be assuming that you have ran through our guide on installing Uptime Kuma using Docker. These steps should work with any container you want routed behind a reverse proxy, but using this guide we can give you real-world example.
Editing your Existing Compose file
1. Before we begin editing our existing Compose file, we will want to change to the directory where it was written. This just makes it easier to interact with the file down the track when we need to restart the container.
For our example, this would mean that we would change to the directory “/opt/stacks/uptimekuma” using the cd command.
cd /opt/stacks/uptimekumaCopy2. Once we are in the right place, we can begin editing the Docker Compose file so that our app will use the Nginx reverse proxy.
To open the Compose file up for editing, using the following command in the terminal.
sudo nano compose.yamlCopy3. Opening up this file, we will find a really basic Compose stack. It only has the single container that we want to expose
We will need to change a few things with this file, and we will go over them. These should be easy enough to apply to your own containers.
- First, we must add the environment variables that we discussed earlier on in this guide. These will help the Nginx Reverse Proxy know how to route traffic to your other Docker containers.
VIRTUAL_HOST: We will be adding this environment variable to tell the Nginx reverse proxy the hostname it should look for when routing traffic to this app.
For this example, we will be using “uptimekuma.pimylifeup.com”.LETSENCRYPT_HOST: As we want an SSL certificate for the domain name we are using, we will set this value to “uptimekuma.pimylifeup.com” as well.VIRTUAL_PORT: Looking over our existing Compose file, we can see that Uptime Kuma is using port 3001 (Right-hand side of the colon symbol) for its web interface.
Which means, we must set this variable to port “3001“.
- Secondly, we must add this container to our “
nginx-reverse-proxy” network.
services:
  uptime-kuma:
    image: louislam/uptime-kuma:1
    volumes:
      - ./data:/app/data
      - /var/run/docker.sock:/var/run/docker.sock
    ports:
      - 3001:3001
    restart: unless-stoppedCopy
Making Changes
4. Now that we are ready, we will walk you through each of the changes that we will make to this file for it to be routed through the Nginx reverse proxy Docker container.
Removing the Existing Port Declaration
5. When modifying an existing Docker container like Uptime Kuma to route through a Nginx reverse proxy, you will first want to remove the ports declaration for the port you are routing through the proxy.
The reason you want to do this is to stop users from being able to work around your Proxy and accessing the app without needing to use HTTPS. Without the port declaration, only networked containers like the Proxy will be able to communicate with your software.
In our case, that would mean we would want to remove the declaration for port 3001 as that is what Uptime Kuma uses for its web interface.
As we have no other port declarations, our example file will end up looking like what we have shown below.
services:
  uptime-kuma:
    image: louislam/uptime-kuma:1
    volumes:
      - ./data:/app/data
      - /var/run/docker.sock:/var/run/docker.sock
    restart: unless-stoppedCopy
Adding the Environment Variables
6. With the port removed, our next step is to add the environment variables that the Nginx Reverse proxy container will look for. You must define these environment variables under each container you want routed through your proxy.
With this example, we will be adding the “VIRTUAL_HOST” and “LETSENCRYPT_HOST” variables which will be set to the domain name “uptimekuma.pimylifeup.com“.
We will also be setting the “VIRTUAL_PORT” variable to 3001 so that the Nginx proxy knows to use that port to communicate with Uptime Kuma.
Below is an example of what a Compose file will look like after adding the environment variables.
services:
  uptime-kuma:
    image: louislam/uptime-kuma:1
    volumes:
      - ./data:/app/data
      - /var/run/docker.sock:/var/run/docker.sock
    environment:
        VIRTUAL_HOST: uptimekuma.pimylifeup.com
        LETSENCRYPT_HOST: uptimekuma.pimylifeup.com
        VIRTUAL_PORT: 3001
    restart: unless-stoppedCopy
Adding your Docker Container to the Reverse Proxy Network
7. To get your Docker container to route through your Nginx Reverse proxy, we must ensure it is a member of the same network.
The way you achieve this is by adding the “nginx-reverse-proxy” network to the “networks” option. If your Docker container is missing the “networks” option, simply add it like we will be doing.
Every Docker service you want routed through the proxy must be a member of this network. The proxy won’t be able to handle communications between the proxy and your service without this.
After adding the “networks” line to our Uptime Kuma service, it will end up looking like what we have shown below.
services:
  uptime-kuma:
    image: louislam/uptime-kuma:1
    volumes:
      - ./data:/app/data
      - /var/run/docker.sock:/var/run/docker.sock
    environment:
        VIRTUAL_HOST: uptimekuma.pimylifeup.com
        LETSENCRYPT_HOST: uptimekuma.pimylifeup.com
        VIRTUAL_PORT: 3001
    networks:
      - nginx-reverse-proxy
    restart: unless-stoppedCopy
Allowing Access to the External Nginx Reverse Proxy Network
8. While we now have the Uptime Kuma container using the “nginx-reverse-proxy” we need to tell Docker that this is an external network that doesn’t belong to the containers specified here.
Telling Docker that a network is external to the current stack is really simple. All you need to do is add a “networks” block, add a block for the “nginx-reverse-proxy” network and then ensure that the “external” option is set to “true“.
After we have made all of these changes, our Docker Compose file will now end up looking like the following.
You can see we removed the port, declared all three required environment variables, and reconfigured the container to use our Nginx reverse Proxy’s Docker network.
services:
  uptime-kuma:
    image: louislam/uptime-kuma:1
    volumes:
      - ./data:/app/data
      - /var/run/docker.sock:/var/run/docker.sock
    environment:
        VIRTUAL_HOST: uptimekuma.pimylifeup.com
        LETSENCRYPT_HOST: uptimekuma.pimylifeup.com
        VIRTUAL_PORT: 3001
    networks:
      - nginx-reverse-proxy
    restart: unless-stopped

networks:
  nginx-reverse-proxy:
    external: trueCopy
Saving your Changes and Restarting the Container
9. After you have finished adding these variables, save and quit by pressing CTRL + X, Y, and then ENTER.
10. With those changes, all you need to do to get the NGINX reverse proxy to start routing traffic to it is restarting the container.
One of the simplest ways to do this when dealing with a Docker Compose file is to run the following command.
Once Docker declares your container “healthy,” the NGINX reverse proxy will automatically reconfigure itself to begin routing traffic from your domain name to the service.
Additionally, if you use the Lets Encrypt companion container, an SSL certificate will automatically be fetched and set up for your service.
docker compose up -dCopyConclusion
Hopefully, by getting to this point in the guide, you will have successfully set up the NGINX Reverse proxy using Docker.
This container is a great way to route your various services through a single point. It is also one of the easiest ways to add HTTPS support to containers that might only provide an HTTP connection.
Please feel free to leave a comment below if you have any questions or concerns about setting up your reverse proxy with a Docker container.
If you found this Docker guide to be helpful, we highly recommend taking some time to explore our many other Docker guides.