In this guide, we will be showing you how to view the performance overlay on your Steam Deck.

The performance overlay is a great and in-depth tool that is implemented into the Steam Decks gaming interface.
This overlay allows you to view various performance metrics of your device while playing a game.
For example, you can see whether your game consumes more CPU than GPU or uses all of the Deck’s RAM. It even allows you to see how each individual CPU core is being utilized.
If you are fascinated by metrics, you will be interested in learning how to enable the performance overlay. Additionally, it is incredibly useful when you are tweaking the settings of a game to see where you can get the most out of lowering or increasing the quality settings.
Using the Performance Overlay on the Steam Deck
For the performance overlay to be displayed on the Steam Deck’s display, you will need to enable it.
Luckily, enabling this overlay is a straightforward process and can be activated with a few short steps.
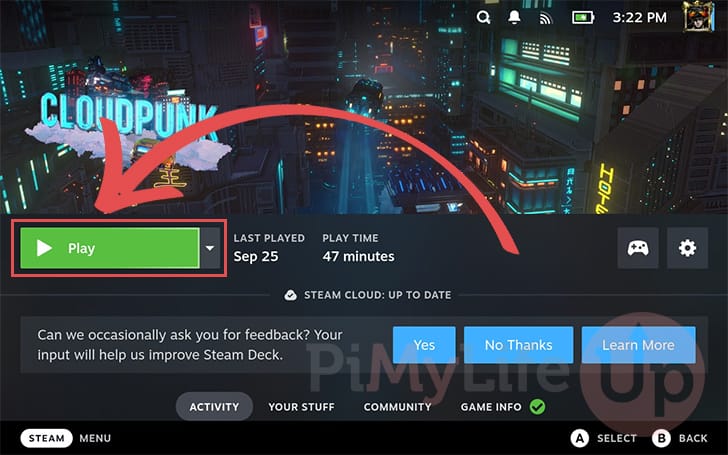
1. Start by loading up a game on which you want to see the performance overlay.
In our case, we will be loading up the game Cloudpunk. It is a graphical game with a fair bit going on, so it’s good for trying out the performance overlay.
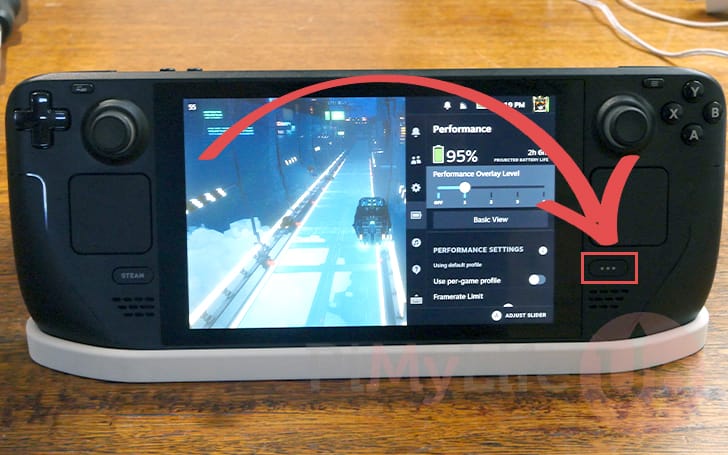
2. With the game running, bring up the quick settings menu by clicking the button with the three dots on it. This button is on the right side of your Steam Deck.
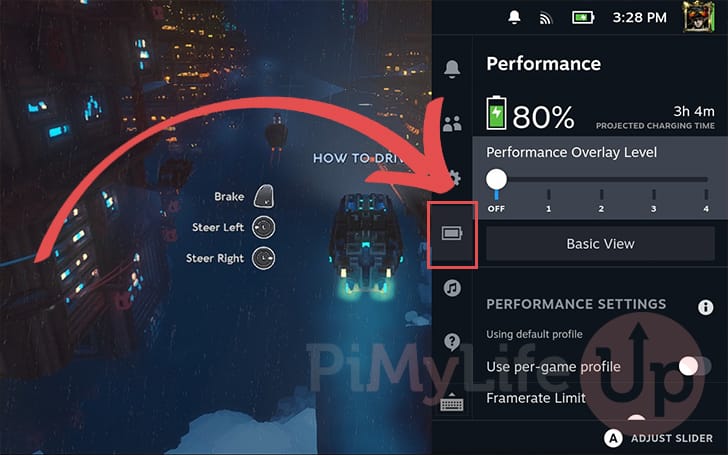
3. With the quick settings panel open, change to the performance tab.
This tab is the one that has the battery icon on it.
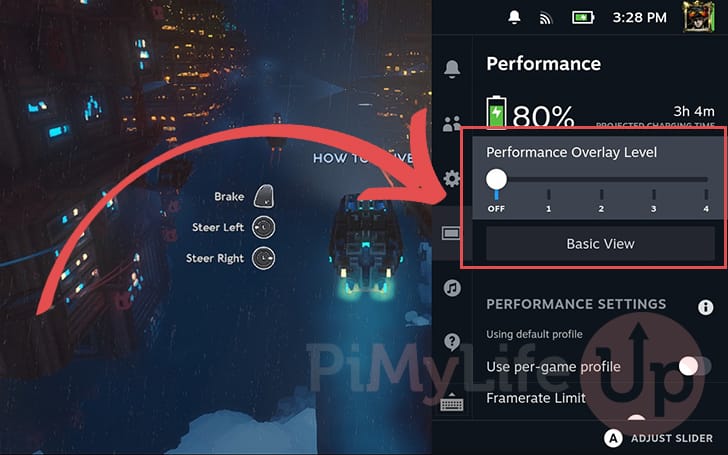
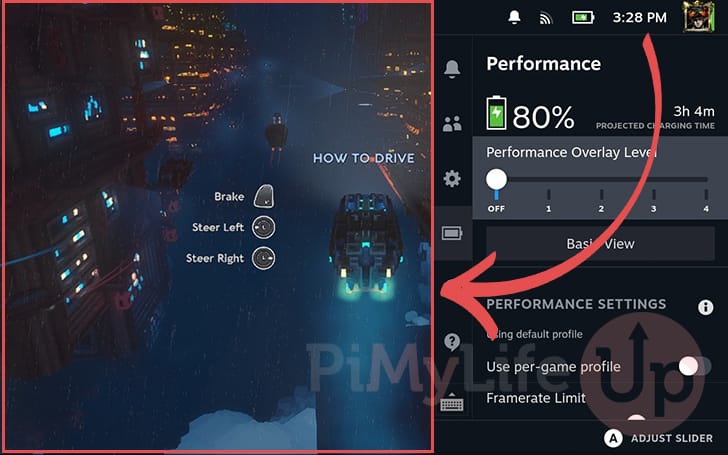
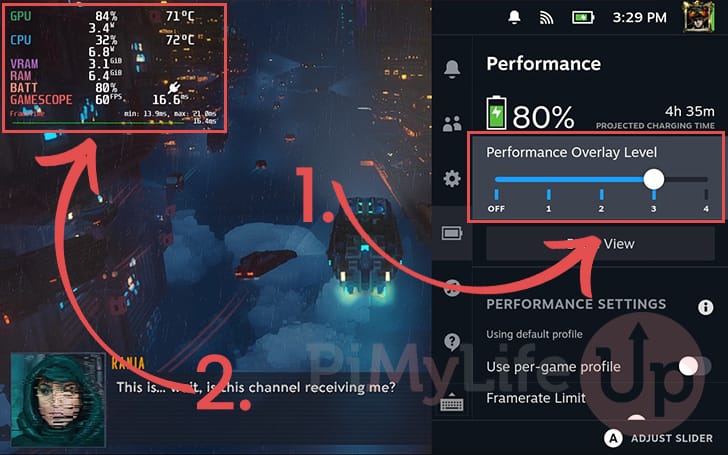
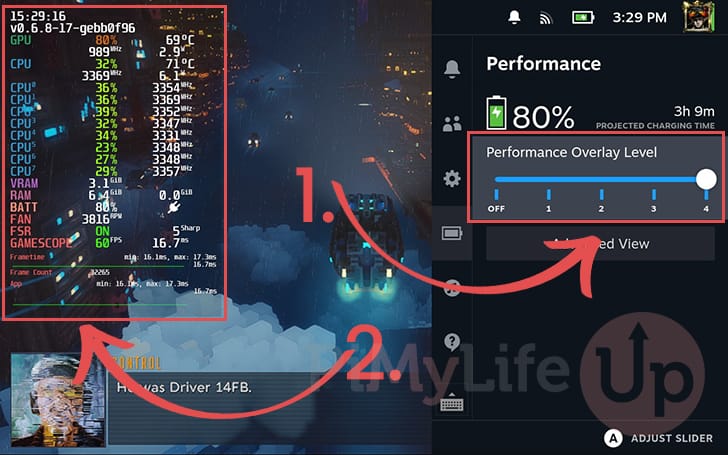
4. You will see the performance overlay settings near the top of the performance menu.
You can see that the performance overlay has five different settings that you can use. By default, the performance overlay will be set to the “Off” position. We will go over what each of
To change this setting, press the “A” button to select it and then use the D-PAD, left touchpad, or left analog stick.
The Different Performance Overlay Levels on the Steam Deck
Now that you know how to enable the performance overlay on your Steam Deck, let us explore what each level of the overlay will display.
The lower the number, the lower the level the less amount of information will be displayed on your screen.
Off
When set to off, the performance overlay is obviously completely disabled. You should see no performance metrics being displayed on your screen.
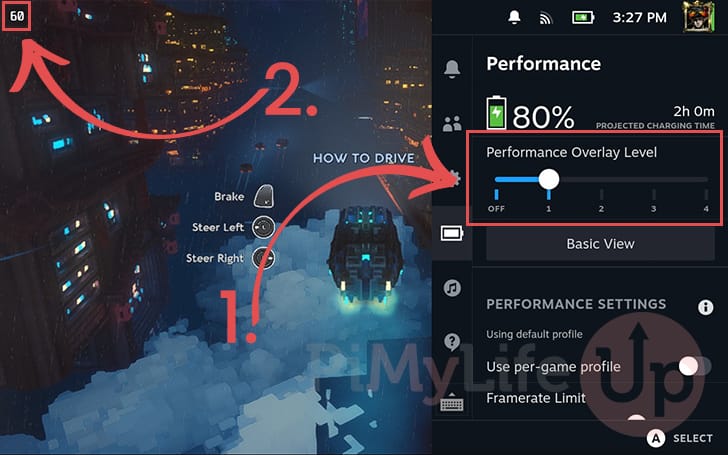
Level 1 Performance Overlay
The first level of the performance overlay is the most basic. This is useful if you only want to view the FPS of the game you are playing on your Steam Deck. FPS is one of the most basic ways of judging how a game is performing.
The FPS will be displayed in the top-left corner of the screen. A frame limiter is likely enabled if you see the value sitting at a solid number, such as 60 or 30.
Level 2
Setting the performance overlay level to 2 on your Steam Deck will display significantly more information about your hardware.
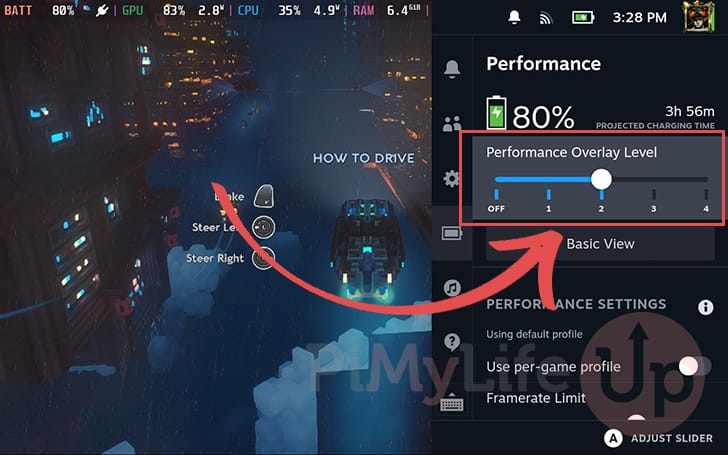
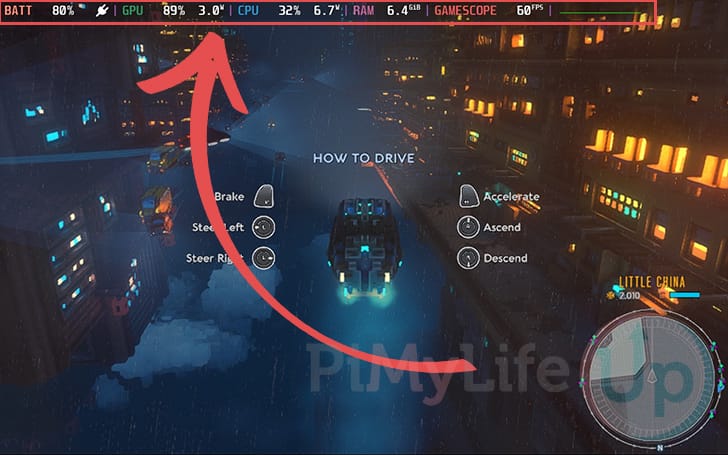
Instead of just seeing the FPS, you will now see several additional pieces of information stretched across the top of the screen.
- BATT: This shows you the current battery level of your Steam Deck. If it is plugged in to a power source, you will also see a little plug icon displayed here.
If it is not plugged in, you will instead see the power usage of your Deck in watts. This is a good indicator to see how fast the game is chewing up your battery. - GPU: The GPU performance overlay shows the percentage of the GPU being used. The higher the number, the more load on the GPU. At 100%, your GPU is being completely utilized.
Next to the usage percentage, you will see the amount of power the GPU consumes. - CPU: Using this value, you can see how much CPU is currently being utilized. Again, next to this, you will also see how much power is being used to drive the CPU at this utilization level.
- RAM: This shows how much RAM is currently being consumed by the entire system. This will be a combination of the system and the game’s memory usage.
- GAMESCOPE: The second last element that this performance overlay shows on your Steam Deck is the current frame rate.
You might be confused by the name “gamescope“, but this is the compositor used to display everything on your Steam Deck’s screen. It also allows you to apply FSR to games that don’t support it. - Frame Time Graph: The last element is a graph that shows you the frame time.
This graph lets you see whether you are getting a smooth FPS. If you see lots of spikes, you will see that the game is struggling to maintain a consistent FPS, which can sometimes make it feel like it is performing worse than its FPS might indicate.
To maintain a consistent 60 FPS, for example, your frame time would need to sit at 16 ms consistently.
Level 3 Steam Deck Performance Overlay
The third performance overlay level on your Steam Deck is similar to level two. Its layout changes from displaying across the top of the screen to a box in the top-right corner.
It includes all the information from level 2 but with some added information.
- CPU, GPU: Level three will add temperature levels for both the CPU and GPU to the performance overlay. These are useful for seeing whether your device is throttled due to heat.
- BATT: The battery information will now show the approximate time remaining. You will need to have the power cable unplugged to see this information.
- VRAM: One of the additional pieces of information that is displayed now is VRAM usage. The Deck itself doesn’t have dedicated VRAM, so this is a portion of the RAM that the GPU is utilizing.
Steam OS automatically handles how the RAM and VRAM are split. If your RAM and VRAM levels are equal or close to 16 GB, the game is using up all of the Deck’s memory. Reducing texture quality may help reduce VRAM usage. - Frame Time Graph: Setting the Steam Decks performance overlay to three makes viewing the frame time graph much easier. The chart is more prominent and will show you the minimum, maximum, and current frame times in milliseconds.
Level 4 Overlay
The final level of the performance overlay adds even more information. Some of this information isn’t nearly as useful for the average user but is beneficial for a developer.
Let us quickly review the additional information displayed when using level four of the performance overlay on your Steam Deck.
- CPU: The CPU is where you will see one of the most significant differences from earlier levels. The first difference is that you will now see the overall clock rate of the CPU.
Directly underneath the main CPU utilization figures, you will see every core’s usage and clock rate. These values can help indicate whether a game appropriately uses all Steam Deck’s CPU cores. - GPU: The fourth performance overlay level adds the clock rate of the GPU to the displayed information.
- FAN: The FAN value indicates the current RPM of the cooling fan. The higher the number, the faster the fan is running to keep your Steam Deck cool.
- FSR: This value lets you know whether or not the Steam Deck’s FSR implementation is enabled. If the game is upscaled to the Deck’s resolution and you have FSR enabled, it will show as “
ON“. - Frame Count: The number of frames that have been rendered.
Conclusion
You should now have a good understanding of how you can enable the performance overlay on your Steam Deck.
We have also walked you through each performance overlay level so you will hopefully understand what you are seeing on the screen.
The higher the level, the more in-depth the information provided becomes.
Please feel free to comment below if you have any questions about the performance overlay.
If you found this tutorial useful, be sure to check out our many other Steam Deck guides.