In this tutorial, we will show you how to install and use Fastfetch on Linux to get your system information from the terminal.
Fastfetch is a neat command line tool that enables you to easily get the system information of a Linux based operating system.
If you have ever used the now-abandoned Neoftech, you will be very familiar with how FastFetch works. Basically, it grabs all the main bits of information about your system and then outputs it all to the terminal in a graphically pleasing way.
This tool has been written in C with a focus on customizability and performance. This differs from the original Neofetch tool, which was written completely in the Bash scripting language.
Fastfetch also supports other non-Linux-based operating systems, including Android, macOS, and even Windows.
You will quickly find this tool to be a great way to get all of the information about your Linux system that someone might require. It can also be a visually pleasing way to show off your system.


Installing and Using Fastfetch on Linux
In this section, we will show you the quick and easy way to install and use Fastfetch on your Linux system.
Fastfetch supports most Linux-based operating systems and is often included in the package repository for many operating systems making it easy to install.
This guide will include a mix of installation steps for Fastfetch from the latest packages and package repositories. For Debian, we will be using the packages to ensure we get the latest release. For other operating systems, we will fall back to their repository version.
Installing Fastfetch on Linux
1. In this section, we will show you how to install Fastfetch on a Linux-based operating system. As Linux distributions can use wildly different package managers, ensure you follow the section relevant to your system.
Downloading and Installing FastFetch on Debian/ Ubuntu Systems
a. Before installing Fastfetch on a Debian or Ubuntu-based Linux operating system, we will need to ensure a couple of packages are installed.
However, before we can install those packages, you must update the package list cache by running the following command.
sudo apt updateCopyb. Once the package list cache has been updated, we can install the “curl“, “wget“, and “jq” packages. These packages will help us install the latest version of Fastfetch on your Linux system.
While we could take the easy route and install Fastfetch directly from the package repository, you will often end up with quite a dated version of the software.
sudo apt install curl wget jqCopyc. With this following command, we use “curl” and “jq” to grab the latest version number for Fastfetch. This saves you from having to manually get the download link.
NEO_VERSION=$(curl -s https://api.github.com/repos/fastfetch-cli/fastfetch/releases/latest | jq -r '.name')Copyd. Next, we will be setting a Bash variable with the architecture of your CPU. This will make grabbing the correct build of Fastfetch easier in the next step.
For those who are running an x64 system you will want to use the following command.
CPU_ARCH=amd64CopyIf you are running an ARM based device such as a Raspberry Pi, you will want to use the command below instead.
CPU_ARCH=aarch64Copye. We are finally at the point where we can use wget to download the latest version of Fastfetch to our Linux system.
Here, we use the two environment variables we used in the previous two commands to insert both the Fastfetch version (NEO_VERSION) and the CPU architecture (CPU_ARCH).
wget https://github.com/fastfetch-cli/fastfetch/releases/download/$NEO_VERSION/fastfetch-linux-$CPU_ARCH.deb -O fastfetch.debCopyf. Finally, at this point, all you need to do to install Fastfetch onto your Linux system is to run the following command.
sudo apt install ./fastfetch.debCopyInstalling Fastfetch using the APT Package Manager
a. If you prefer not to manually install Fastfetch on your Linux system manually you can instead rely on the pacakge manager.
Before installing this system information tool on your Debian-based Linux system, you will first want to update the package list cache by running the command below.
Please note that not all versions of Debian or Ubuntu have Fastfetch included in their package repository, so these steps may not work.
sudo apt updateCopyb. Once the package list has been updated, all you need to do to install Fastfetch is to run the following command within the terminal.
If you run into any errors, you will have to resort to the manual installation method.
sudo apt install fastfetchCopyUsing DNF to Install FastFetch on Fedora or RHEL
a. If you are running Feodra or RHEL, you should be able to install Fastfetch on your Linux system using the dnf package manager.
All you need to do is use the following command within the terminal.
sudo dnf install fastfetchCopyInstalling Fastfetch on Arch Linux with pacman
a. For those running Archlinux, you will be using the pacman package manager to install Fastfetch by using the command below.
pacman -S fastfetchCopyUsing apk to Install Fastfetch on Alpine Linux
a. The final method we covered in this guide is installing Fastfetch on Alpine Linux.
Depending on the Alpine version, you should be able to install a relatively new version of Fastfetch using the command below.
apk add --upgrade fastfetchCopyUsing FastFetch to Get Linux System Information
2. One of the neat things about using Fastfetch on Linux is that it is straightforward to use to get your system information.
All you need to do to output your Linux system information is to run the following command in the terminal. Fastfetch gives you a decent amount of information right out of the box.
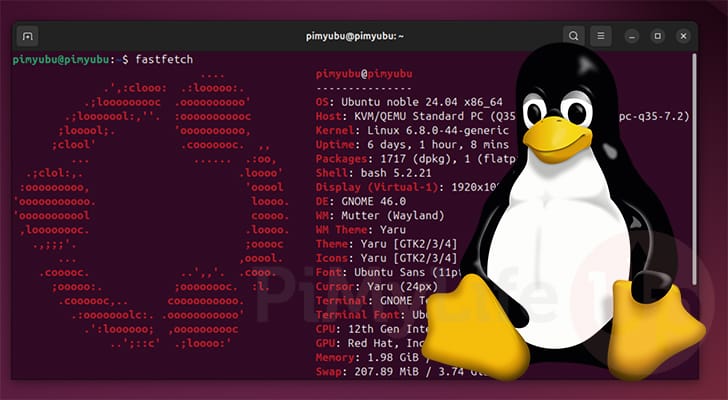
fastfetchCopyBelow, you can see how much information the Fastfetch tool gives you. In our case, we tested this on a Raspberry Pi. You can quickly see the operating system we were running, the kernel, CPU, GPU, and disk usage.
       _,met$$$$$gg.           pi@raspberrypi
    ,g$$$$$$$$$$$$$$$P.        --------------
  ,g$$P"         """Y$$.".     OS: Debian GNU/Linux bookworm 12.7 aarch64
 ,$$P'               `$$$.     Host: Raspberry Pi 5 Model B Rev 1.0
',$$P       ,ggs.     `$$b:    Kernel: Linux 6.6.31+rpt-rpi-v8
`d$$'     ,$P"'   .    $$$     Uptime: 15 hours, 43 mins
 $$P      d$'     ,    $$$P    Packages: 1849 (dpkg)
 $$:      $.   -    ,d$$'      Shell: bash 5.2.15
 $$;      Y$b._   _,d$P'       Display (default): 5120x1440 in 55″
 Y$$.    `.`"Y$$$$P"'          WM: Wayfire (X11)
 `$$b      "-.__               Cursor: Adwaita
  `Y$$                         Terminal: /dev/pts/0
   `Y$$.                       CPU: Cortex-A76*4 (4) @ 2.40 GHz
     `$$b.                     GPU: V3D 7.1.7 [Integrated]
       `Y$$b.                  Memory: 707.62 MiB / 7.76 GiB (9%)
          `"Y$b._              Swap: 0 B / 200.00 MiB (0%)
             `"""              Disk (/): 10.95 GiB / 28.69 GiB (38%) - ext4
                               Local IP (eth0): 192.168.0.32/24
                               Locale: en_GB.UTF-8
3. While Fastfetch provides a considerable amount of system information on Linux, it can actually give you even more. As the software is fairly extensible it has a series of modules that allow it to gather more information.
You can get this system information tool to output everything it can gather by using the command below.
fastfetch -c all.jsoncCopyBelow is an example of all the information that can be output about your system. It even includes additional information such as the DNS server, IP address and more.
                               pi@raspberrypi
                               --------------
       _,met$$$$$gg.           OS: Debian GNU/Linux bookworm 12.7 aarch64
    ,g$$$$$$$$$$$$$$$P.        Host: Raspberry Pi 5 Model B Rev 1.0
  ,g$$P"         """Y$$.".     Board: 5-model-b
 ,$$P'               `$$$.     Kernel: Linux 6.6.31+rpt-rpi-v8
',$$P       ,ggs.     `$$b:    Init System: systemd 252.30-1~deb12u2
`d$$'     ,$P"'   .    $$$     Uptime: 16 hours, 23 mins
 $$P      d$'     ,    $$$P    Loadavg: 0.09, 0.08, 0.08
 $$:      $.   -    ,d$$'      Processes: 231
 $$;      Y$b._   _,d$P'       Packages: 1849 (dpkg)
 Y$$.    `.`"Y$$$$P"'          Shell: bash 5.2.15
 `$$b      "-.__               Display (default): 5120x1440 in 55″
  `Y$$                         Monitor (default): 5120x1440 px - 1354x380 mm (55.37 inches, 96.06 ppi)
   `Y$$.                       LM: sshd 9.2 (TTY)
     `$$b.                     WM: Wayfire (X11)
       `Y$$b.                  Cursor: Adwaita
          `"Y$b._              Terminal: /dev/pts/0
             `"""              Terminal Size: 270 columns x 83 rows (2192px x 1259px)
                               CPU: Cortex-A76*4 (4) @ 2.40 GHz - 46.3°C
                               CPU Cache (L1): 4x64.00 KiB (D), 4x64.00 KiB (I)
                               CPU Cache (L2): 4x512.00 KiB (U)
                               CPU Cache (L3): 2.00 MiB (U)
                               CPU Usage: 0%
                               GPU: V3D 7.1.7 [Integrated]
                               Memory: 684.33 MiB / 7.76 GiB (9%)
                               Swap: 0 B / 200.00 MiB (0%)
                               Disk (/): 10.95 GiB / 28.69 GiB (38%) - ext4
                               Public IP: XXX.XX.XXX.54 (Sydney, AU)
                               Local IP (eth0): 192.168.0.32/24 XXXX:XXXX:XXXX:XXXX:XXXX:XXX:XXXX:XXXX/64 (d8:3a:dd:a2:06:0f)
                               DNS: 192.168.0.1 XXXX:XXXX:XXXX:7000::1
                               Wifi: down
                               Date & Time: 2024-09-17 15:07:09
                               Locale: en_GB.UTF-8
                               Vulkan: 1.2.255 - V3DV Mesa [Mesa 23.2.1-1~bpo12+rpt3]
                               OpenGL: 4.5 (Compatibility Profile) Mesa 23.2.1-1~bpo12+rpt3
                               Users: pi - login time 2024-09-16 15:37:37
                               Bluetooth Radio (raspberrypi): Unknown
                               Sound: Built-in Audio Digital Stereo (HDMI) (34%)
                               Weather: +14°C - Overcast (not found)
                               Network IO (eth0): 14.00 KiB/s (IN) - 11.03 KiB/s (OUT)
                               Disk IO (mmcblk0): 1.48 MiB/s (R) - 0 B/s (W)
                               Physical Disk (mmcblk0): 29.72 GiB [SSD, Fixed]
                               Version: fastfetch 2.24.0 (aarch64)
Conclusion
Hopefully, at this point in the guide, you will understand how to install and use Fastfetch on a Linux system.
This tool, as you have seen, is a great way to gather and print out all of the information about your Linux system in an easy-to-read and visually pleasing way.
Please feel free to comment below if you have had any issues getting Fastfetch to work on your Pi.
If you liked this Linux tutorial, we highly recommend exploring our many other guides.


Followed all your instructions but could not download from github.com. this is a snapshot of the wget:
Hi Paul,
Sorry to see that you were having issues with this guide. I think the tools that the tutorial uses to grab the CPU architecture provides to much of an inconsistent result.
I have written the guide so that you manually specify the CPU architecture so it should all work fine now.
Please let me know if you continue to run into issues.
Kind regards,
Emmet