In this tutorial, we will show you how to self-host the personal flight tracker AirTrail using Docker.
AirTrail is a neat, self-hosted tool that lets you easily list and track your flights. All you need to do is log your flight details through the software’s easy-to-use web interface.
This software is basically a self-hosted alternative to FlightRadar24’s myFlightRadar24. It has the same functionality and is just as easy to use.
You can even import flight data from myFlightRadar24, so you don’t have to start over completely if you move from their platform to AirTrail.
Setting up AirTrail is also a relatively easy process, especially with us using Docker. All we need to do is fill out a Compose file with a couple of details, and you will be ready to go.
Please note that the AirTrail team only provides 64-bit builds, so you must run a 64-bit operating system for this guide.


Self-hosting AirTrail with Docker
Over the following steps, we will show you how easily you can self-host AirTrail using Docker.
The only thing we recommend having before continuing is a domain name or hostname that you can point at your machine. Alternatively, you can just use the IP address of your machine like we are within this guide.
Preparing your System
1. Before we can set up AirTrail, you must install the Docker runtime on your machine.
If you don’t have Docker installed, we highly recommend our guide on installing Docker on Linux.
https://pimylifeup.com/linux-docker-install/2. Your next step is to create a directory where we will store the Compose file for AirTrail as well as where the database will save its data.
You can create this directory by using the mkdir command within the terminal. A bonus of using the “/opt/stacks/” directory is that this will work well with a Docker management system such as Dockge.
sudo mkdir -p /opt/stacks/airtrailCopy3. Once the directory has been created, use the cd command to change to it.
cd /opt/stacks/airtrailCopyWriting a Docker Compose File for AirTrail
4. Our next step is to write the Docker Compose file that we will use to set up and manage AirTrail on our machine.
You can begin to write this file by using the Nano text editor. We like to use Nano as it is relatively easy to use.
sudo nano compose.yamlCopy5. Within this file, you will want to enter the following details. This Compose file sets up two things, first is the database server used by AirTrail. The second is the AirTrail container itself.
While you fill out this file, there are two placeholders that you must replace.
<HOSTNAME>: The first thing you must replace is the hostname of your device. If you aren’t using a domain name, this must be the IP address you use to access your AirTrail instance.
The IP or hostname must match up with what you will type into your web browser otherwise you will run into errors.<DBPASSWORD>: Next, you must specify a password to use for the database server. There are two occurrences of this placeholder in this Compose file.
All you need to do is set this to a random bunch of letters and numbers. Try to avoid most symbols as sometimes this can cause issues. Outside devices shouldn’t be able to access this container as we aren’t exposing its ports.
services:
  db:
    container_name: airtrail_db
    image: postgres:16-alpine
    restart: always
    environment:
      POSTGRES_DB: airtrail
      POSTGRES_USER: airtrail
      POSTGRES_PASSWORD: <DBPASSWORD>
    volumes:
      - ./db_data:/var/lib/postgresql/data
    healthcheck:
      test: ["CMD-SHELL", "pg_isready -U airtrail -d airtrail"]
      interval: 5s
      timeout: 5s
      retries: 5
  airtrail:
    container_name: airtrail
    image: johly/airtrail:latest
    restart: always
    environment:
      - ORIGIN=http://<HOSTNAME>:3000
      - DB_URL=postgres://airtrail:<DBPASSWORD>@db:5432/airtrail
    ports:
      - 3000:3000
    depends_on:
      db:
        condition: service_healthyCopy
6. After filling out the Compose file, you can save and quit by pressing CTRL + X, Y, and then ENTER.
Starting up the AirTrail Docker Container
7. A key feature of using Docker to run AirTrail is that once configured, running the software is a breeze.
You can start up the AirTrail container as well as the database by using the following command within the terminal. We use the “-d” option to detach Docker from the terminal once it has started
docker compose up -dCopyAccessing the AirTrail Web Interface
8. To access the AirTrail web interface, you will want to go to the following address in your favorite web browser.
You must replace “<IPADDRESS>” with either the hostname or IP that you will be using to access the interface.
http://<IPADDRESS>:30009. With the web interface now open within your web browser, you will be asked to create the first account that will become your admin. Fill out your username, password, and name (1.).
Once you have finished filling out your details, click the “Create” button (2.).

Adding your First Flight to AirTrail
10. You will now be greeted with a blank interface since we haven’t yet added any flights to AirTrail.
There are two ways you can add your initial flights. The first is to add a new flight from scratch (1.). The second is to import existing data by going to the setting menu (2.).
For this guide, we will be just showing you how to add a flight by clicking the button indicated below (1.).

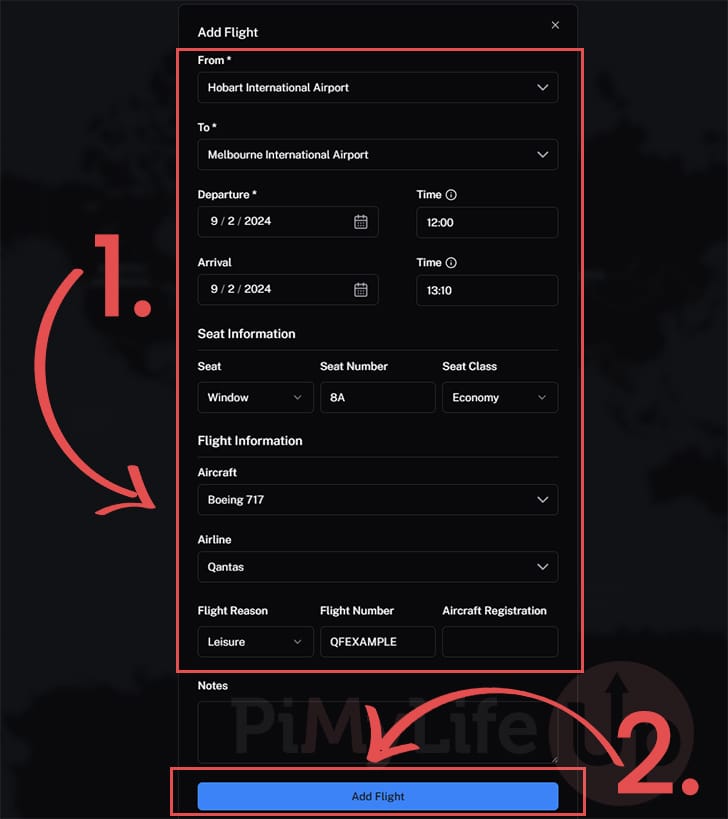
12. Within this next interface, you will be asked to fill out all the information for your flight. AirTrail asks for a decent amount of information but luckily the software does have autocomplete for some options (1.).
Once you have finished filling out of your information, click the “Add Flight” button (2.)
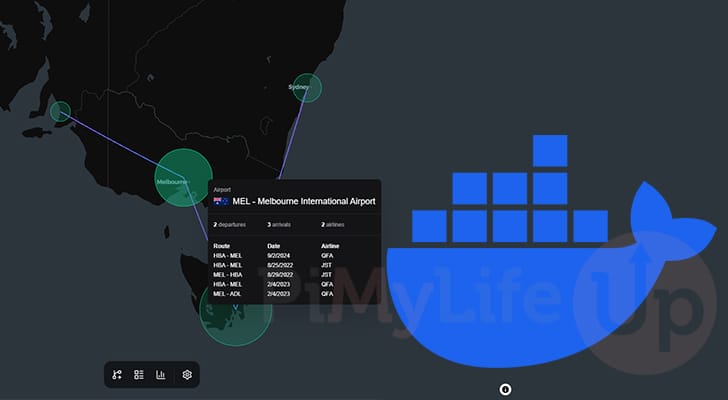
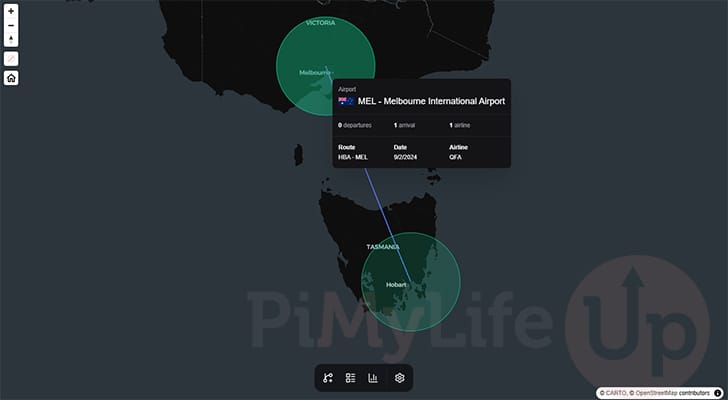
13. Below you can get a good idea of how this interface begins to present your flight data. The more flights you add, the more interesting the visualization looks.
Clicking on an airport will give you a list of all the flights you have taken from it, alongside a quick rundown of that flight.
Updating to the Latest Release of AirTrail
Since AirTrail is a relatively new software, it gets updates quite often. Luckily, updating to the latest release is relatively straightforward since it runs within a Docker container.
The next few steps will show you how to update to the latest release using the terminal.
1. Before we can update the AirTrail container to the latest release, we must change to the directory where we wrote the Compose file in this guide.
You should be able to change to the correct folder by running the following command.
cd /opt/stacks/airtrailCopy2. Once we are in the right place, we can get Docker to pull the latest AirTrail container to your system using the below command.
This will download the newest images for all containers specified within your Compose file. However, the command won’t restart the running containers.
docker compose pullCopy3. To get your running Docker containers to move to the new images, you will want to run the following command within the terminal.
docker compose up -dCopyConclusion
Hopefully, if you have arrived at this point in the guide, you will have successfully managed to host AirTrail on your system using Docker.
AirTrail is one of the best and easiest ways to keep track of the flights that you take. It is a neat experience to go back and see where you have taken flights to and how often you might flow through a particular airport or country.
Please feel free to drop a comment below if you have encountered any issues using our guide to self-host AirTrail.
If you found this tutorial to be helpful, we recommend exploring our many other Docker tutorials.