In this tutorial, we will show you how to tail the logs of your Docker containers.
Knowing how to tail the logs of your Docker containers is a crucial skill, especially for debugging and ensuring that everything is running as it should be. Most of the time, you will likely run your Docker containers in detached mode. This means you won’t see any output from the containers within the terminal.
Luckily for us, Docker bakes a lot of functionality into its runtime. This includes the ability to easily follow all of the logs produced by your containers.
With Docker, any program that writes lines to the standard output (STDOUT) or standard error (STDERR) is saved to the logs. A well-written container will ensure that any error or important information is written to these outputs to ensure easier debugging.
In the following two sections, we will show you how to tail the logs of individual containers and an entire Compose stack.
How to Tail the Logs for your Docker Containers
In this section, we will show you how to follow the logs of an individual Docker container. If you want to tail the logs for an entire Docker Compose stack, the steps differ slightly, and you should skip to the next section.
Getting the ID of the Container you Want to Check Logs for
1. To tail the logs of a specific Docker container, you will need to know its ID. If you don’t know the ID, then don’t worry as it is relatively easy to get them.
Use the following command to output a list of currently running containers within the terminal. If your user doesn’t have access to Docker, you may need to add “sudo” to the start of this command.
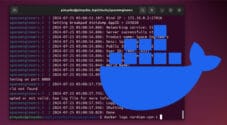
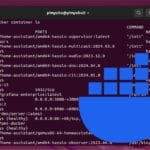
docker ps -aCopyBelow is an example of the list of containers that you will get after running the above command. The value you are after is the ID in the first column.
If you are having trouble identifying the container for which you want to tail the logs, try checking the “IMAGE” and “NAMES” columns.
For this example, we will be tailing the logs for Changedetection.io so we will use the ID “5745f27b69f7“.
CONTAINER ID   IMAGE                                      COMMAND                  CREATED        STATUS        PORTS                                                                      NAMES
4609ed0242aa   dgtlmoon/sockpuppetbrowser:latest          "tini -- /bin/sh -c …"   8 hours ago    Up 8 hours                                                                               changedetection-playwright-chrome-1
5745f27b69f7   ghcr.io/dgtlmoon/changedetection.io        "python ./changedete…"   8 hours ago    Up 8 hours    0.0.0.0:5000->5000/tcp, :::5000->5000/tcp                                  changedetection
273ef3171366   jrcichra/lancachenet-monolithic:latest     "/bin/bash -e /init/…"   31 hours ago   Up 30 hours   0.0.0.0:80->80/tcp, :::80->80/tcp, 0.0.0.0:443->443/tcp, :::443->443/tcp   lancache-monolithic-1
a9992f837cab   jrcichra/lancachenet-lancache-dns:latest   "/bin/bash -e /init/…"   31 hours ago   Up 30 hours   0.0.0.0:53->53/tcp, 0.0.0.0:53->53/udp, :::53->53/tcp, :::53->53/udp       lancache-dns-1
Using a Container ID to tail Logs using Docker
2. Once you know the ID of the Docker container for which you want to follow the logs, the rest of the process is really simple.
The command you want to use is “docker logs“, followed by the “-f” (--follow) option and finally, the ID of your container. This command written as a syntax, would be expressed as follows:
docker logs -f <CONTAINER_ID>For example, if we wanted to tail the logs of our Changedetection Docker container, we would run the command below within the terminal.
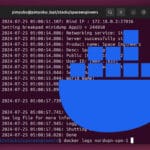
docker logs -f 5745f27b69f7CopyAfter running this command, you will see a small section of the logs that have occurred previously, and the terminal will automatically update with any new logs.
Once you are done looking at the logs from your Docker container, press CTRL + C to exit.
Playwright console: Watch URL: https://changedetection.io/CHANGELOG.txt log: Returning 'Possibly in stock' - cant' find any useful matching text [<JSHandle preview=Returning 'Possibly in stock' - cant' find any useful matching text>]
2024-05-28 10:06:13.054 | DEBUG    | changedetectionio.update_worker:run:541 - Watch 5d5773e3 done in 43.09s
2024-05-28 10:06:24.242 | INFO     | changedetectionio.store:sync_to_json:420 - Saving JSON..
How to Tail the Logs of a Docker Compose Stack
Over the next few steps, we will show you how to tail the logs for a Docker Compose file. This will allow you to easily see all the logs from your entire stack in one location.
Following logs like this is useful when there is a chance any of the containers in the stack could have caused the issues you are running into.
Changing to Where your Docker Compose File is Written
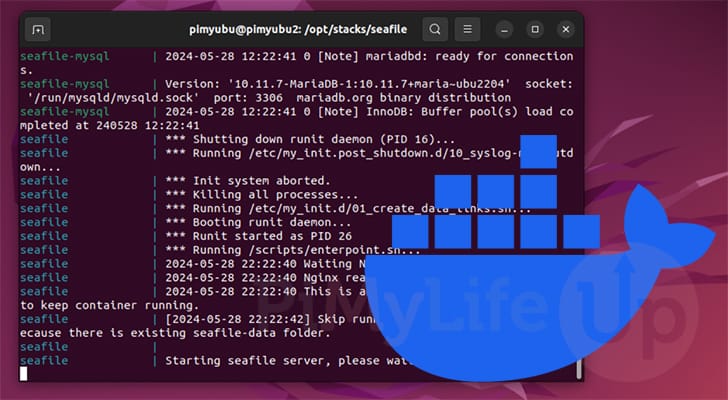
1. Before you can begin, you must change to where your Docker Compose file is written. For this example, we will change to the directory “/opt/stacks/changedetection” where our Compose file is written.
You must be in the right location for Docker to interpret the Compose file.
cd /opt/stacks/changedetectionCopyFollow the Logs of a Docker Compose Stack
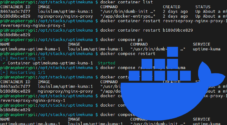
2. Once you are in the directory where you wrote the Compose file, using Docker to tail the logs is a really easy process.
All you need to do is use the “compose logs” command and include the “-f” or “--follow” options. These options will give you live logs of all containers included within this stack.
If you have services that log quite often, you may want to consider getting the container’s individual ID instead.
docker compose logs -fCopyUsing this on our example stack, you can see a small slice of the logs that were output. It will continue to be updated until we quit the tail by pressing CTRL + C.
playwright-chrome-1  | 2024-05-28 11:53:15.126 | INFO     | __main__:stats_thread_func:371 - Memory: Used 12.3% (Limit 90%) - Available 3114.7MB.
playwright-chrome-1  | 2024-05-28 11:53:18.129 | INFO     | __main__:stats_thread_func:366 - Connections: Active count 0 of max 10, Total processed: 0.
playwright-chrome-1  | 2024-05-28 11:53:18.130 | INFO     | __main__:stats_thread_func:371 - Memory: Used 12.3% (Limit 90%) - Available 3114.7MB.
changedetection      | (1) accepted ('192.168.0.201', 9959)
changedetection      | 2024-05-28 11:53:19.163 | DEBUG    | changedetectionio.model.Watch:history:219 - Reading watch history index for da6b606a-4368-
changedetection      | 2024-05-28 11:53:19.164 | DEBUG    | changedetectionio.model.Watch:history:219 - Reading watch history index for 02d198bf-841e-
changedetection      | 192.168.0.201 - - [28/May/2024 11:53:19] "GET / HTTP/1.1" 200 8117 0.131522
Conclusion
By this point in the tutorial, you should have a good idea of how to tail a Docker container’s logs.
Knowing how to create tail logs is crucial for debugging software issues. This allows you to quickly see if your container throws any errors or warnings.
If you have any questions about how to check your container logs, please don’t hesitate to post a comment below.
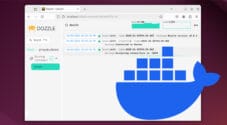
If you found this tutorial helpful, we recommend you browse through our Docker guides.