In this guide, we will show you how to prune any unused Docker images, containers, or volumes using the terminal.
With the way Docker operates, every time you install or update a container, the image used to create that container is stored on your physical system. These images are never automatically cleaned up as they allow you to quickly and easily roll back to an older release.
The one downside of keeping a cache of all these Docker images is that it will slowly consume more and more of your system, especially if you use a container that updates often.
Another thing Docker needs to clean up automatically is unused Docker volumes. If you ran a container that used volumes but removed it, the volumes themselves will be left behind on your system.
Luckily, Docker includes built-in tools that allow you to easily prune unused Docker images, containers, networks, and volumes.
Over the following sections, we will show you the various ways you can prune unused elements of your Docker setup. There is quite a bit of control over what Docker can prune. For example, you can prune all unused data, but you can also make it only prune unused images or containers if you want to be more specific.


Pruning all Unused Docker Containers, Images and Networks
This first section will show you how you can easily prune all unused Docker containers, images, and networks on your system.
We will achieve this using a command called “docker system prune“. This command is basically a global way of telling Docker to clean up all unused containers, networks, images, and, optionally, volumes. It saves you from having to use several different commands.
By default, Docker will only remove removing dangling images (Unused and untagged) and not unused ones. Additionally, it will not touch volumes to avoid accidentally removing your data.
1. To get Docker to prune all unused networks, containers, and dangling images, all you need to do is run the following command within the terminal.
docker system pruneCopy2. You will receive a warning before Docker prunes your system. This warning indicates what Docker is about to remove from your system.
If you want to proceed with the pruning, type in “y” and press the ENTER key to proceed.
WARNING! This will remove:
- all stopped containers
- all networks not used by at least one container
- all dangling images
- unused build cache
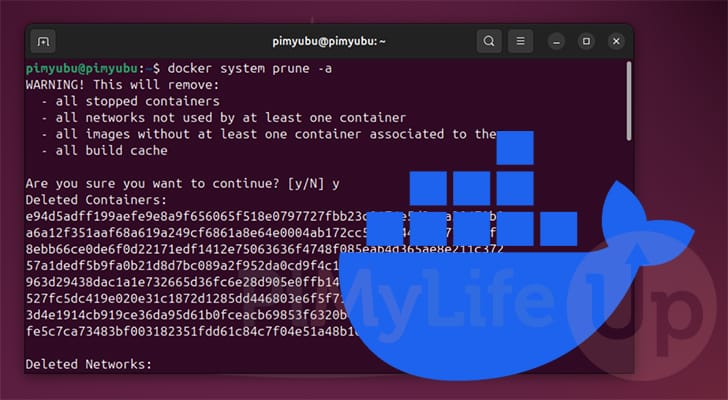
Are you sure you want to continue? [y/N] yPrune All Unused Images
The default behaviour of Docker is to only prune dangling images. A dangling image is one that has no name and tag. Docker, however, allows you to remove unused images that aren’t attached to a running container.
1. You can get Docker to prune all unused images instead of just dangling ones by including the “-a” or “--all” option when running the prune command.
docker system prune -aCopy2. You will be prompted with a list of things the prune command will remove from your system. You should see within this list it nay says that all images that aren’t being used will now be pruned.
To proceed with clearing all of this Docker data, type in “y” and press the ENTER key.
WARNING! This will remove:
  - all stopped containers
  - all networks not used by at least one container
  - all images without at least one container associated to them
  - all build cache

Are you sure you want to continue? [y/N]
Prune Docker Volumes as Well
By default, Docker will not prune unused volumes; this is the intended behavior to stop it from removing your data when you don’t want it to be.
Luckily, Docker does allow you to override this behavior easily and have it prune these volumes and clean up more space.
Please note that this will only remove anonymous volumes. If it is a named Docker volume, you must use the prune Docker volume command.
1. To get Docker to prune your unused and unattached volumes, you will want to use the “--volumes” option when running the prune command.
Below, you can see that we have used the “all” option (-a) alongside the volumes option to purge both unused images and unused volumes.
docker system prune -a --volumesCopy2. Docker will now warn you about the type of data it will prune from your system. Please note that you cannot easily recovery data wiped by this command.
If you are happy to proceed with the prune, type “Y” and press ENTER.
WARNING! This will remove:
  - all stopped containers
  - all networks not used by at least one container
  - all anonymous volumes not used by at least one container
  - all images without at least one container associated to them
  - all build cache

Are you sure you want to continue? [y/N]
Using Docker to Prune Unused Images
On top of having a system-wide prune, Docker allows you to purge certain types of data individually. This section will show you how you can easily prune unused images on your system.
1. To prune dangling Docker images from your system, run the following command within the terminal.
If you want to prune all unused images and not just dangling ones, then all you need to do is add the “-a” or “--all” option to the end of this command.
docker image prune2. Before Docker purges these images off your system, you will get a warning stating what the command is about to do.
To prune these unused images, type in “y” and press ENTER.
WARNING! This will remove all images without at least one container associated to them.
Are you sure you want to continue? [y/N] y
How to Prune Unused Docker Container
It is also possible to just purge the unused Docker containers that are on your system. Typically, this is something you will likely want to do before you clean up any unused images.
With Docker, a container is probably the most disposable part of your system. They don’t hold any persistent data, so they can typically be safely deleted and recreated at any time.
1. To prune unused Docker containers, you only need to run the following command within the terminal.
When running this command, all containers that are stopped will be removed from your system. These containers will be re-created if you ever start them up again.
docker container pruneCopy2. Before Docker prunes your stopped containers, you will be prompted to confirm the action.
If you are happy to remove any stopped services, type in “y” and press ENTER.
WARNING! This will remove all stopped containers.
Are you sure you want to continue? [y/N] y
Only Pruning Unused Docker Volumes
Docker allows you to just prune unused volumes. A volume is a place where Docker stores all of its persistent data for a container. These are usually used when not mounting a local directory.
You can prune unused Docker volumes in two ways, which we will go over in the next step.
1. To prune unused and anonymous Docker volumes, you only need to run the following command within the terminal.
If you want Docker to purge named volumes that aren’t in use, you will want to use the “-a” and “--all” options. Be careful when using this command, as the data removed by this tool will be hard to recover.
docker volume pruneCopy2. Docker will give you one last warning about pruning unused volumes from your machine. If you are happy to proceed and understand that this data will likely not be recoverable, type in “Y” and press ENTER.
WARNING! This will remove anonymous local volumes not used by at least one container.
Are you sure you want to continue? [y/N] y
Removing Unused Networks on Docker
To communicate between different containers, Docker will automatically create an internal network. These networks aren’t removed when containers are and must be manually pruned.
1. To get Docker to prune all unused custom networks off of your system, you must use the command below within the terminal.
A network is considered unused when there are no containers referencing it left on your system.
docker network pruneCopy2. To proceed with pruning unused networks, type in “Y” and press the ENTER key.
WARNING! This will remove all custom networks not used by at least one container.
Are you sure you want to continue? [y/N] y
Conclusion
If you have gotten to this point in the guide, you should now understand how to easily use Docker to prune unused images, containers, and volumes.
Knowing how to use Docker to prune unused data is useful for maintaining the storage on your system. Unused volumes and images can quickly consume a significant amount of space.
Please feel free to drop a comment below if you have any questions about how to prune unused Docker images.
If you found this guide to be helpful, we recommend taking some time to explore some of our other Docker tutorials.