In this guide, we will show you how to view the logs of a Docker container.
If you are using Docker on your machine for anything, you will often want to know how to view the logs produced by your containers.
The logs of a Docker container contains all of the text that the container has printed to the standard output. A well-designed container will print important lines, such as errors, so you can easily identify problems.
Being able to easily view this information quickly allows you to diagnose any issues that might be occurring with your containers.
For example, if you have a container that crashes after a few minutes, you can view the logs to see if a particular error is occurring.
This tutorial will show you how exactly you can view the logs of your Docker containers, and as you will see, it is a very simple process.
Using Docker to View the Logs of a Docker Container
In the following sections, we will walk you through the process of viewing the logs of a Docker container. We will also show you how to get the ID or name of the container you want to see the logs for.
Getting the Name or ID of the Container
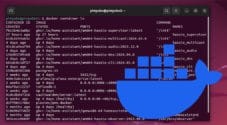
1. You must know the container ID or name of a Docker container running on your system to view its logs.
The easiest way to find this information is to get Docker to list the running containers. You can get it to output this information by running the following command within the terminal.
docker container listCopyAfter running the command above, you should be given a list of containers currently active on your machine. You can use two different values from this list to select your container.
- The first is the container ID, which is the value referenced within the first column. This value looks like “
81be99da96cf“. - The second way that Docker allows you to select a container to view the logs is by using its name. Every container is assigned a name regardless of whether you set one. An example from our list below is “
nordvpn-vpn-1“.
CONTAINER ID   IMAGE                             COMMAND                  CREATED       STATUS         PORTS                                       NAMES
81be99da96cf   ghcr.io/linuxserver/qbittorrent   "/init"                  5 hours ago   Up 9 minutes                                               nordvpn-torrent-1
e94d5adff199   ghcr.io/bubuntux/nordvpn          "/init /bin/sh -c 'n…"   5 hours ago   Up 9 minutes   0.0.0.0:8080->8080/tcp, :::8080->8080/tcp   nordvpn-vpn-1
Viewing the Logs of your Chosen Docker Container
2. Once you know the name or ID of your container, we can move on to view the logs of said Docker container. However, before we do that, let us quickly review the command you will be running.
This command has two parameters. The first is entirely optional. The second is what you will use to specify the specific container you want to view.
[OPTIONS]: You can use the options parameter to control the behavior of this command. For example, it is how you can make Docker follow logs rather than just printing them.CONTAINER: The required parameter is where you will specify either the container ID (E.g.81be99da96cf) or the container name (E.gnordvpn-vpn-1).
docker container logs [OPTIONS] CONTAINERCopyYou can also write this same command by dropping the “container” keyword.
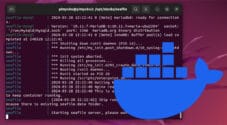
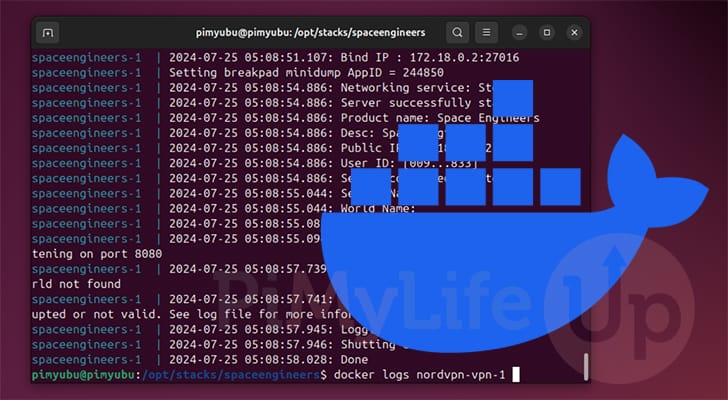
docker logs [OPTIONS] CONTAINERCopy3. For example, if we wanted to view the logs of a Docker container with the name “nordvpn-vpn-1“, we must run the following command within the terminal.
If we wanted, we could use the ID “e94d5adff199” instead of the container name.
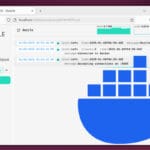
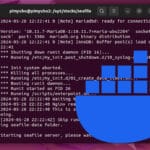
docker container logs nordvpn-vpn-1CopyBelow, you can see some of the logs that have been output by the NordVPN Docker container that we are running on our system.
To support the app dev(s) visit:
Bubuntux: https://github.com/sponsors/bubuntux
To support LSIO projects visit:
https://www.linuxserver.io/donate/

───────────────────────────────────────
GID/UID
───────────────────────────────────────

User UID:    911
User GID:    911
───────────────────────────────────────

Firewall is up, everything has to go through the vpn
Enabling connection to secure interface and docker network
Enabling connection to secure interface6 and docker network6
How to View the Logs of a Docker Compose Stack
While it is possible to view the logs of individual Docker containers, you can also view the logs produced by an entire Docker Compose stack.
Viewing the logs of an entire Docker Compose stack can be incredibly useful. You can see the logs as they are produced by each container.
It allows you to identify the root cause of an issue more easily. Just because one container broke doesn’t mean another container in your stack caused the issue.
Swap Directories to Where your Compose File is Located
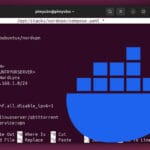
1. Before we can view the logs of your Docker Compose stack, you must change to where your Compose file is located.
To showcase this, we will change to the directory where we wrote a Compose stack file for our NordVPN setup. We need to be in the correct place so that Docker knows what Compose stack we want to interact with.
Of course, this directory will differ depending on your setup, but in our case, we have the stack we are after in the “/opt/stacks/nordvpn” directory.
cd /opt/stacks/nordvpnCopyViewing the Logs of an Entire Docker Compose Stack
2. Once you are in the correct place, viewing the logs of your Docker Compose stack is really simple. Before we show you an example, let us quickly go over the command we will use.
There is only one parameter you can use with this command, which is completely optional.
[OPTIONS]: This parameter allows you to adjust how the logs will be printed to the terminal.
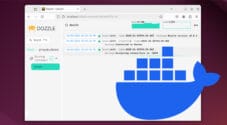
docker compose logs [OPTONS] Copy3. For this example, all we need to do to view the logs of our Docker Compose stack is to run the following command within the terminal.
This command will tell Docker to output the logs produced by every container that is specified within the containers.
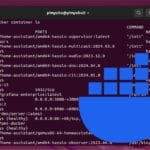
docker compose logsCopyBelow is an example of the logs produced by this command. At the start of every line, you can see the name of the container that output that particular line.
vpn-1      | Here is your private Key:
vpn-1      | IP: 10.5.0.2/32
vpn-1      | ############################################################
torrent-1  | Catching signal: SIGTERM
torrent-1  | Exiting cleanly
torrent-1  | [migrations] started
torrent-1  | [migrations] no migrations found
torrent-1  | usermod: no changes
Conclusion
By this point in the tutorial, you should have learned how to easily view the logs of the Docker containers running on your system.
Being able to view the logs is crucial to debugging issues with the containers you are running. Any well-designed container will log enough information to make it easier to debug.
Please feel free to comment below if you have any issues viewing your Docker containers logs.
If you liked this quick guide, we recommend that you explore the many other Docker guides.