In this Raspberry Pi Twitch bot tutorial, we will be showing you how to program your own Twitch Moderator in Python that will run on your Raspberry Pi.
The bot we will be showing you how to write is rather simple in nature but can be adapted to being quite a powerful and versatile bot. The basics we will be explaining and showing you how to write is a simple bot that will connect into Twitch’s IRC (Internet Relay Chat) chat.
Once connected the bot will continually receive all messages and scan for any that matches our ban pattern. If any match the pattern it will automatically ban them from the server. You can also use this to timeout a user or post a message to the chat when a specific phrase is used.
If you’re wondering what Twitch is, it’s a video streaming service which is predominantly aimed at gaming. Chat is displayed alongside the video which is a key feature for interacting with the streamers. You can check out more about Twitch over at their website.
While this is a rather basic moderator bot, it is easily extensible with a bit of Python knowledge. This is a great Pi project that has a ton of uses if you are a Twitch streamer, big or small.
Equipment List
Below are all the bits and pieces that you will need to do this Twitch bot tutorial.
Recommended
Optional
Getting your Twitch oAuth Token
1. Before we get to programming our Twitch moderator bot, we will first need to grab the OAuth key from Twitch. Of course, this means you will need to have a Twitch account ready that you want to use as your bot for your channel.
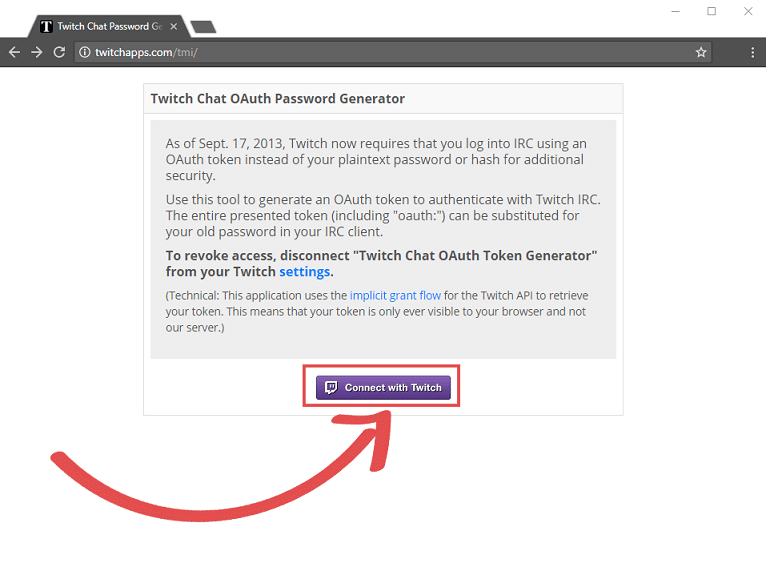
Once you have the user you want ready, go to Twitch apps tmi. You will be shown the screen below. Press the “Connect with Twitch” button to continue.
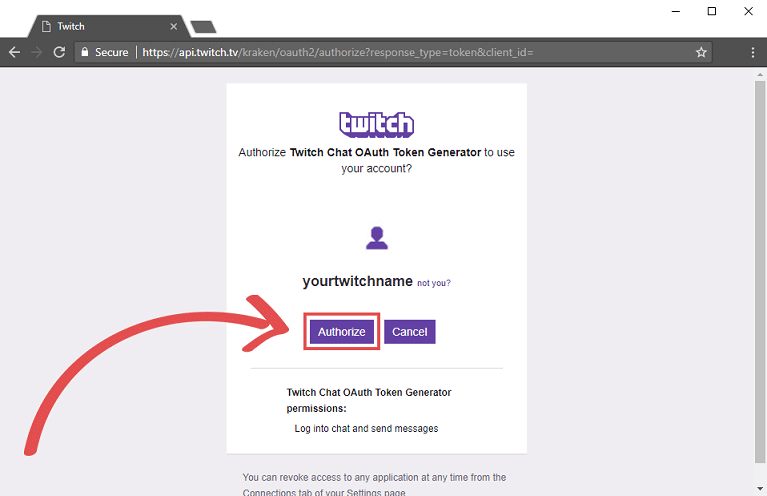
2. If you are not logged in already you will be asked to do so. Otherwise, you will be shown the screen below. This screen lets you authorize Twitch to provide you with access to your chat through IRC. Press authorize to continue.
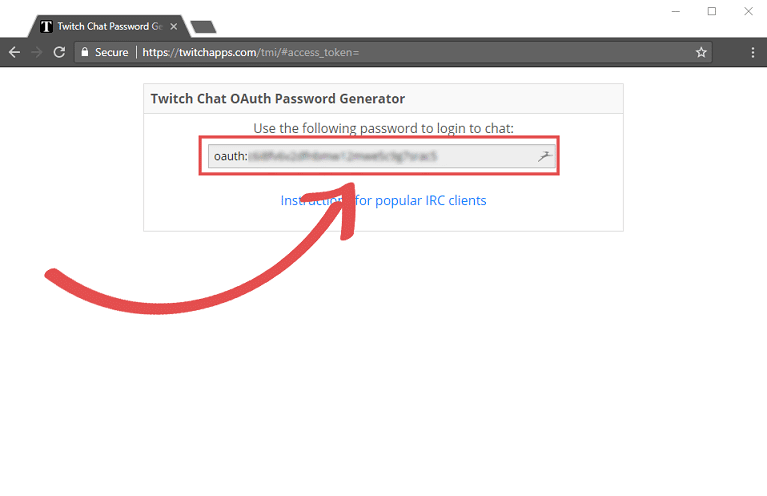
3. Finally, your OAuth token will now be displayed to you. Copy this token somewhere safe as we will need this shortly while writing our script. This OAuth token is what will allow us to login to the IRC channels.
Programming our Twitch Moderator Bot
1. Now that we have grabbed our Twitch OAuth token we can now proceed with writing our script. For our purposes, we will be utilizing Python, and it’s versatile and fast enough for our basic needs.
If you’re new to Python you might want to consider checking out our Python getting started guide.
First let’s make a folder that we will keep our script in, run the following command to create our directory and move into it.
mkdir ~/twitchbot
cd ~/twitchbot
2. Now that we have made our folder and changed into it, we can proceed with writing our script. Let’s start off by making a simple file that will keep all our configuration. This file will help make it easy to change any values we want configurable.
Run the following command to begin writing our first Python file.
nano config.py3. Add the following lines to this file. Make sure you replace twitch_username with your Twitch username, your_oauthtoken with the OAuth token we grabbed earlier and your_channel with the name of the channel you want the bot to join.
BAN_PAT is where we define the patterns we want to look for in the chat messages. For instance, if you want to ban anyone who enters a specific word or link you can add it into the array.
HOST = "irc.twitch.tv"              # This is Twitchs IRC server
PORT = 6667                         # Twitchs IRC server listens on port 6767
NICK = "twitch_username"            # Twitch username your using for your bot
PASS = "your_oauthtoken" # your Twitch OAuth token
CHAN = "#your_channel"                   # the channel you want the bot to join.
RATE = (20/30) # messages per seccond
BAN_PAT = [
    r"swear",
    r"some_pattern"
]
Once you have filled in your information, save the file by pressing Ctrl + X then Y and then hitting Enter.
4. We can now move onto writing our utility Python file. We will keep a few simple functions in this file to keep our main file clean. While these functions do simple things, it makes it easier to be able to keep them all in one place.
Run the following command to begin writing the Python script.
nano utility.py5. To this file, we want to add the following lines of code. We will explain each block of code as we go along.
def chat(sock, msg):
	"""
	Send a chat message to the server.
	Keyword arguments:
	sock -- the socket over which to send the message
	msg  -- the message to be sent
	"""
	sock.send(("PRIVMSG {} :{}\r\n".format(config.CHAN, msg)).encode("UTF-8"))
This bit of Python code defines out chat message, and almost all our functions will run through this. This code basically sends a formatted message through our socket to Twitch’s IRC Server.
def ban(sock, user):
	"""
	Ban a user from the current channel.
	Keyword arguments:
	sock -- the socket over which to send the ban command
	user -- the user to be banned
	"""
	chat(sock, ".ban {}".format(user))
This code issues a ban command to the server. This process formats a ban message and sends it through our chat function. The function accepts both the socket to send through and the username that we want to ban.
def timeout(sock, user, secs=600):
	"""
	Time out a user for a set period of time.
	Keyword arguments:
	sock -- the socket over which to send the timeout command
	user -- the user to be timed out
	secs -- the length of the timeout in seconds (default 600)
	"""
	chat(sock, ".timeout {}".format(user, secs))
This segment of code is quite like to the ban function, except it formats a timeout command instead. It formats a message with a timeout, the user you want to be timed out and the amount of time to timeout the user.
6. Your final file for the Raspberry Pi Twitch bot should end up looking like what is displayed below.
import config
import socket

def chat(sock, msg):
	"""
	Send a chat message to the server.
	Keyword arguments:
	sock -- the socket over which to send the message
	msg  -- the message to be sent
	"""
	sock.send(("PRIVMSG {} :{}\r\n".format(config.CHAN, msg)).encode("UTF-8"))

def ban(sock, user):
	"""
	Ban a user from the current channel.
	Keyword arguments:
	sock -- the socket over which to send the ban command
	user -- the user to be banned
	"""
	chat(sock, ".ban {}".format(user))

def timeout(sock, user, secs=600):
	"""
	Time out a user for a set period of time.
	Keyword arguments:
	sock -- the socket over which to send the timeout command
	user -- the user to be timed out
	secs -- the length of the timeout in seconds (default 600)
	"""
	chat(sock, ".timeout {}".format(user, secs))
Once, you have finished writing in the code, save the file by pressing CTRL + X then Y and then hitting Enter.
7. With both our config file and utility script now written, we can proceed with writing our main script. The current folder will be where our bot runs. It will utilize the configuration from our config file and utilize the functions we wrote in our utility script.
Let’s begin writing our main script by running the following command.
nano main.py8. Now to this file, we are going to add the following lines of code. This file will set up our connection to Twitch’s IRC server and loop through all the messages it receives.
#!/usr/bin/env python
import config
import utility
import socket
import time
import re

CHAT_MSG = re.compile(r"^:\w+!\w+@\w+\.tmi\.twitch\.tv PRIVMSG #\w+ :")
These first few lines import all the external functionality we need. The first two of these are the scripts we wrote, our config and utility script. Socket is the library we will use to talk to Twitch’s IRC server. Time is the library use to keep track of how often we are sending messages, and the re library is what we will use to utilize regular expressions.
We also define our CHAT_MSG variable, this we still our compiled regular expression. This expression will sift out our message form the rest of the IRC message.
try:
	s = socket.socket()
	s.connect((config.HOST, config.PORT))
	s.send("PASS {}\r\n".format(config.PASS).encode("utf-8"))
	s.send("NICK {}\r\n".format(config.NICK).encode("utf-8"))
	s.send("JOIN {}\r\n".format(config.CHAN).encode("utf-8"))
	connected = True #Socket succefully connected
except Exception as e:
	print(str(e))
	connected = False #Socket failed to connect
This segment of our script is what we use to connect to Twitch’s IRC server. This part will initialize the connection and send through our Username, OAuth token and our join command to the server.
We run this all within a try statement so we can catch any errors and print them to the log. We also set our connected variable to true or false based on whether it successfully connected.
def bot_loop():
	while connected:
		response = s.recv(1024).decode("utf-8")
		if response == "PING :tmi.twitch.tv\r\n":
			s.send("PONG :tmi.twitch.tv\r\n".encode("utf-8"))
			print("Pong")
		else:
We now write our bot loop function, and we will explain this in two segments. This first segment of the code checks if we are first connected, and if it does we check if there is anything to receive, and if there is we grab it and decode it.
We then check the received message, and if it is equal to a ping command from the IRC server, then we need to respond to this with a PONG message. Failure to do so would mean we are booted from the IRC server.
			username = re.search(r"\w+", response).group(0)
			message = CHAT_MSG.sub("", response)
			print(username + ": " + response)
			for pattern in config.BAN_PAT:
				if re.match(pattern, message):
					utility.ban(s, username)
					break
		time.sleep(1 / config.RATE)

if __name__ == "__main__":
	bot_loop()
This final part of the script does the main grunt work. The first line will use our regular expression to grab the username out of the IRC message, and the second line will grab the message that the user sent.
We will then search through our BAN_PAT that we set within our config file. If we find any matches within our message to our patterns, we will run the ban function that we defined in our utility file.
Afterward, we will sleep for a period that is defined in our config file.
Finally, we do our __name__ main check. This check will make it so we can utilize this file as a library if need be. Meaning that our loop will not run into the bot_loop function that has been called.
Your script should look something like what is displayed below once you have finished typing in all the code.
#!/usr/bin/env python
import config
import utility
import socket
import time
import re

CHAT_MSG = re.compile(r"^:\w+!\w+@\w+\.tmi\.twitch\.tv PRIVMSG #\w+ :")

try:
	s = socket.socket()
	s.connect((config.HOST, config.PORT))
	s.send("PASS {}\r\n".format(config.PASS).encode("utf-8"))
	s.send("NICK {}\r\n".format(config.NICK).encode("utf-8"))
	s.send("JOIN {}\r\n".format(config.CHAN).encode("utf-8"))
	connected = True #Socket succefully connected
except Exception as e:
	print(str(e))
	connected = False #Socket failed to connect

def bot_loop():
	while connected:
		response = s.recv(1024).decode("utf-8")
		if response == "PING :tmi.twitch.tv\r\n":
			s.send("PONG :tmi.twitch.tv\r\n".encode("utf-8"))
			print("Pong")
		else:
			username = re.search(r"\w+", response).group(0)
			message = CHAT_MSG.sub("", response)
			print(username + ": " + response)
			for pattern in config.BAN_PAT:
				if re.match(pattern, message):
					utility.ban(s, username)
					break
		time.sleep(1 / config.RATE)
if __name__ == "__main__":
	bot_loop()
Once, you have finished writing in the code, save the file by pressing CTRL + X then Y and then hitting Enter.
9. With all the python code now written it is incredibly easy to run our Twitch moderator bot, type in the following command to run the script.
python3 ./main.pyYou should now have a fully working moderator bot that by now should have connected into your Twitch chat and be searching for any of the patterns mentioned within your array.
Hopefully, this tutorial has given you a good understanding of the script, and allow you to modify it to your needs. Drop a comment below if you have any feedback on this Raspberry Pi twitch bot tutorial.


Hi,
I am planning on making this shortly and was wondering if i have to use an image and burn that on the SD card before starting or if i can just plug it in and start coding? Any help is useful and i hope i can get this lovely piece working
Thanks, Ava
Hi Ava,
This tutorial should work on any Debian based operating system that will run on the Raspberry Pi. For our tutorials we typically test everything on Rapsberry Pi OS.
Cheers,
Emmet
Hi,
Can this be used also to catch events like new follower and subs?
Hi Ninjaturtle,
No this would not allow that, you would have to use the Twitch API for that, and likely use webhooks.
Cheers,
Emmet
How do i do this through python and not raspberry pi?
Hi Abigail,
The python scripts will work fine on any device. They don’t rely on anything that is specific to the Raspberry Pi!
If you are using a Debian based operating the steps should work exactly as is.
Cheers,
Emmet
Hi, first of all: Awesome code!
But i have a question: I want to add following code:
If a user types:”!discord” the bot should write “the official discord: ____ ”
where do i have to implement this?
I know this is a bit outdated but for anyone else looking, I hope this can help.
In config add the following.
In the main change the code to look like this:
Super helpful code so thanks.
I’m looking to add some functionality where a user can type in say !green or !purple and it will send a response back to the user saying the colour has changed (which I have) but then the bot sends a node.js response (I have the node.js command required) to the bulb to change the colour.
The part I’m missing is in the config.py file. Can anyone help.