In this guide, we’re going to use a Raspberry Pi to mount a USB drive. We show you both how Raspbian automatically mounts a drive and how to do it manually.
If you’re looking to have this drive accessible over your network, then the Raspberry Pi samba server is better suited for your needs.
It’s important to know that Raspbian lite currently does not automatically mount your drives. So you will need to either set it up manually or install the software package to have it automatically mount.
Mounting drives is an important skill to have when it comes to working hard drives and file structures in Linux. Once you have a general understanding, it becomes a pretty easy task.
Having a good understanding of Linux file permissions will make this tutorial a lot easier. If you don’t, then you should still be able to complete this tutorial without issue.
Equipment List
You will need some basic equipment for setting up a Raspberry Pi mounted USB drive.
Recommended
- Raspberry Pi
- Micro SD Card (8 GB+ Recommended)
- Ethernet Cable or Wi-Fi
- External Hard drive or USB Drive
Optional
Note: If you plan on using an external hard drive, then it is highly likely you will need a powered USB hub. This recommendation is because the Raspberry Pi is unable to output enough power via the USB ports to power the drive.
Video Tutorial
If you want to see how to do this project visually, then be sure to check out my video below. It will take you through all the necessary steps to getting your USB drive mounted correctly.
If you do like the video, then be sure to subscribe or follow us on social media to stay up to date on all my projects, guides and much more.
Mount a USB Drive to the Raspberry Pi Automatically
In the latest version of Raspbian (Stretch), your USB drives should be automatically mounted when it is connected to the Pi. It is important to know if you do upgrade to Stretch from Jessie there might be compatibility problems with older projects & tutorials.
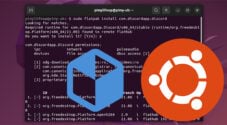
If you want to check where your drive has been mounted, you can simply use the following command.
sudo cat /proc/mountsThis will output quite a bit of text. Any USB drives are typically at the bottom of the text as shown in the image below.

As you can see my drive located at /dev/sda1 has been automatically mounted to /media/pi/CA1C-06BC.
The automatic mounting done by Raspbian will be fine for most projects and just regular use. It will retain its mount location whenever you remove and re-insert the drive since it uses the UUID of the drive for the mount folder name. You can also find out the UUID by using the following command: ls -l /dev/disk/by-uuid.
You might come across problems if you wish to allow access to the drive to a specific user that isn’t the default user. In our next step, we will mount the drive using the fstab file and force permissions of a given user and group.
Mount a USB Drive to the Raspberry Pi Manually
If you want to mount the drive to your Raspberry Pi permanently, then we will need to set up the drive in the fstab file.
In this section, you will learn how to identify and mount any attached disk drives.
Identifying the Disks You Want to Mount
1. We need first to find out the filesystem name for the drive we want to mount to our Raspberry Pi.
To do this, we will be making use of the df command.
df -hdf stands for “disk-free”, and is typically used to show the available disk space for file systems, but it also displays the name of the filesystem.
2. From this command, you should see a result as we have below
Filesystem      Size  Used Avail Use% Mounted on
/dev/root        29G  3.1G   25G  12% /
devtmpfs        1.8G     0  1.8G   0% /dev
tmpfs           2.0G  8.0K  2.0G   1% /dev/shm
tmpfs           2.0G  8.6M  1.9G   1% /run
tmpfs           5.0M  4.0K  5.0M   1% /run/lock
tmpfs           2.0G     0  2.0G   0% /sys/fs/cgroup
/dev/mmcblk0p1  253M   53M  200M  21% /boot
tmpfs           391M     0  391M   0% /run/user/1000
/dev/sda1       932G  595G  337G  64% /media/pi/My Passport
This result lists all the connected storage devices, the name of their filesystem and where they are currently mounted on
3. Use this result to identify the drive you want to mount.
For example, we want to mount our 1TB “My Passport” drive to our Raspberry Pi. Most external drives will be references under the /dev/sd** filesystem name.
So scanning through the list, we can see that this entry matches what we are after.
/dev/sda1 932G 595G 337G 64% /media/pi/My PassportFrom this row, we can find the filesystem name that we need to use for the next few steps is the following.
/dev/sda1Retrieving the Disk UUID and Type
In this section, we will need to take the filesystem name we retrieved in the previous section to find both the UUID (Universal Unique Identifier) and the type of drive.
1. To find out more information about our drives filesystem, we can make use of the blkid tool.
Run the following command to retrieve information about your drive.
sudo blkid /dev/sda1Please note that you should replace /dev/sda1/ with the filesystem name you retrieved in the previous section.
2. From this command, you should have retrieved a result as we have below
/dev/sda1: LABEL="My Passport" UUID="8A2CF4F62CF4DE5F" TYPE="ntfs" PTTYPE="atari" PARTUUID="00042ada-01"Please make a note of the value for both the UUID and the TYPE.
3. Depending on the “type” of your filesystem, you may need to install additional drivers.
If you are using a drive that has a type of ntfs or exFAT, you will need to follow the appropriate steps below. Otherwise, you can continue to the next section.
NTFS To be able to use the NTFS format on your Raspberry Pi, you will need to install the NTFS-3g driver.
You can do this by running the following command.
sudo apt install ntfs-3gYou can find out more about NTFS on the Raspberry Pi by following the guide.
exFAT To add support for the exFAT filesystem, we will need to install two packages.
sudo apt install exfat-fuse
sudo apt install exfat-utils
These two packages will allow the Raspberry Pi to read and interpret exFAT drives. You can learn more about exFAT on the Raspberry Pi by reading our guide.
Mounting the Drive to the Raspberry Pi
With everything now prepared and the UUID and type of the drive on hand, we can now proceed to mount the drive.
1. To start, we need to make a directory where we will mount our drive to.
We can do this by running the following command. You can name the folder we are mounting anything, but for this tutorial, we will be using the name usb1.
sudo mkdir -p /mnt/usb12. Let’s now give our pi user ownership of this folder by running the command below.
sudo chown -R pi:pi /mnt/usb13. Next, we need to modify the fstab file by running the command below.
sudo nano /etc/fstabThis file controls how drives are mounted to your Raspberry Pi.
4. The lines that we add to this file will tell the operating system how to load in and handle our drives.
For this step, you will need to know your drives UUID ([UUID]) and TYPE ([TYPE]).
Add the following line to the bottom of the file, replacing [UUID] and [TYPE] with their required values.
UUID=[UUID] /mnt/usb1 [TYPE] defaults,auto,users,rw,nofail,noatime 0 0Once done, save the file by pressing CTRL + X, followed by Y, then the ENTER key.
5. Now since the Pi will likely have automatically mounted the drive, we will need to unmount the drive.
A simple way to do this is to use the following command (Replace /dev/sda1 with the filesystem name you found earlier in this guide).
sudo umount /dev/sda16. Once the drive has been umounted, we can now go ahead and mount it again.
To mount the drive again, you can use the following command.
sudo mount -aThe drive should now be mounted using the changes we made to the fstab file.
7. If you want to make sure the drives are restored after the Pi has been shut down then run the following command:
sudo reboot8. The drives should be automatically mounted after the Raspberry Pi has finished rebooting.
Hopefully, you have your drive mounted to the Raspberry Pi now. If you have any trouble, then be sure to check out the troubleshooting guide below.
Troubleshooting
These following issues will most likely only arise when you manually mount the drive.
Troubleshooting File Permission Issues
One of the biggest problems that you will come across with mounting a drive is permissions.
There are multiple ways you can try and deal with this issue, we will go into a couple of them below.
Giving Ownership to Your User
One of the easiest ways to ensure that your user can read and write the files is to give it ownership of them.
To do this, you should run the following command. If you are using a different mount position, replace /mnt/usb1 with your mount position.
Also, if you are using a different user, make sure that you replace “pi:pi” with your user. For example, for plex, you would use “plex:plex“.
sudo chown -R pi:pi /mnt/usb1Correcting Permissions
If you are using a drive with a type of ext4 or another native Linux format, you can also correct the file permissions.
This method won’t work for NTFS or exFAT as they do not support the same permission system that Linux uses.
For this step, make sure you have the mount directory you set on hand, for our example, we will be using the directory /mnt/usb1.
1. Start by changing to the superuser.
sudo su2. Now run the following two commands.
These commands will run through the directory setting permissions for both files and directories.
find /mnt/usb1/ -type d -exec chmod 755 {} \;
find /mnt/usb1/ -type f -exec chmod 644 {} \;
If you are using a different mount path, make sure you replace “/mnt/usb1/” with your own.
3. You can exit out of the superuser by using the command below
exitDrives Not Mounting on Boot
Another problem you may come across is the drive not being mounted on boot. There have been some changes to Raspbian and the Raspberry Pi that might cause issues with mount the drive in time.
The best way to work around this would be to add the following lines before the exit 0 line in the /etc/rc.local file.
sleep 20
sudo mount -a
Hopefully, you are now able to mount a USB drive on your Rasberry Pi. If you are having issues with the mounting your USB drive or you have any feedback, then feel free to drop a comment below..
We also have plenty of Raspberry Pi beginner projects that you should take a look at if you’re looking to do doing something cool with your Pi.


Spent hours trying to set this up til I found this super helpful step by step guide. Thank you so much!
So I followed everything and at the end when I type in “sudo mount -a” I get back “mount: /mnt/usb1: unknown filesystem type ‘NTFS'” So I’m not sure what I got wrong and why now its not showing my hard drive anywhere.
Hi Josh,
Make sure that you have typed in
ntfslowercase, this keyword is case sensitive.Cheers,
Emmet
When I try changing the ownership to plex:plex, I ge tthe error:
chown: changing ownership of ‘/mnt/usb1’: Operation not permitted
What should I do? It seems like plex is installed properly but it won’t read any files from my external HD.
Hi Lindsay,
Are you making sure you use
sudoat the start of the command?Also what format is the drive that you are using?
Cheers,
Emmet
I know you posted a while ago and I am just now running across this problem. What I found was if you enter the line “UUID=[YOUR UUID] [YOUR MOUNT POINT such as /mnt/usb] [TYPE such as vfat] uid=pi,gid=pi 0 0” in your fstab file it gives permission to the user pi.
Thank you very much. This solved my problem.
Sorry if this is a stupid question but I want to make it so that my USB drive will automatically mount to the Pi when I hot plug it without rebooting the Pi, I am running the minimal Debian install, is there a way to do this.
Thanks!
My drive isn’t automounted for some reason, I was hoping you could tell me how to change this to make it like the default
Thank you very much for the tutorial . But i have some . question .
My requirement is to drive a tablet PC from raspberry pi through USB. It is not showing anything . I have tested the path using normal FAT32 flash drive .The flash drive is getting detected.
Please let me know the way out.